Date
Fri Apr 3A roofing emergency rarely happens on a sunny afternoon. When you’re facing an asphalt shingle roof emergency, it’s usually in the middle of a storm when getting help feels impossible. But you are not powerless. Taking control inside your home is the most important first step to prevent a small leak from becoming a disaster. This guide gives you actionable tips for emergency roof repair for those first critical moments. We’ll cover how to protect your interior, make a safe temporary patch, and know when you need professional emergency roof repair.
Key Takeaways
- Prioritize safety and interior damage control: Your first steps should happen inside your home. Move valuables, catch dripping water, and document everything with photos for your insurance claim. Stay off the roof to avoid serious injury.
- A temporary patch is just first aid: While a heavy tarp can prevent further water damage, it is not a long-term solution. Using the correct materials and application methods is critical to avoid making the problem worse before a professional can make a permanent repair.
- Know when to call a professional: A DIY fix is not suitable for large leaks, sagging ceilings, or any structural damage. For a safe and lasting solution, choose a local, insured roofer who offers emergency services and has a proven track record in your community.
How to Know If You Have a Roofing Emergency
A roofing emergency is any situation that requires immediate attention to protect your property from significant damage and ensure the safety of everyone inside. It’s more than a small drip; it’s a problem that can’t wait. Ignoring an emergency can quickly turn a manageable issue into a catastrophic one, causing extensive harm to your home’s structure, interior, and even its electrical systems. Water damage can lead to hazardous mold growth, while a compromised roof structure poses a direct threat to your family or employees.
These urgent problems often happen without warning, usually after severe weather or an accident like a fallen tree branch. The key is recognizing when a roof problem has crossed the line from a standard repair to a true emergency. Knowing the signs helps you act fast to minimize the damage and the cost of repairs. Whether you own a home or a commercial building, a swift response is critical. Getting a professional assessment for your residential roofing is the first step toward securing your property and preventing a small crisis from becoming a major disaster. A professional can identify hidden issues and ensure that the immediate threat is contained properly before a permanent solution is put in place.
Warning Signs You Can’t Ignore
It can be tough to know if you’re overreacting, but some signs are clear calls for help. If you see significant water pouring into your home, especially from multiple points, it’s an emergency. This isn’t just a bucket-worthy drip; it’s the kind of leak that can quickly damage ceilings, walls, and electrical wiring, creating a serious safety hazard and setting the stage for mold. Another major red flag is any visible structural damage. If your roof is sagging, or worse, has partially collapsed from heavy snow, standing water, or a fallen tree, the situation is extremely dangerous. After a major storm, be sure to look for widespread missing shingles, large holes, or significant debris on your roof. These issues create direct paths for water to enter your home and cause further harm.
Understanding the Safety Risks
Your first instinct might be to get up on the roof and see the damage for yourself, but please, don’t. Climbing on a roof is incredibly dangerous, especially during or after a storm when surfaces are wet and slippery. Professionals have the right safety gear and training for a reason. Falls are a serious risk, so never go on your roof at night, during bad weather, or if you’re alone. The other critical safety risk involves the stability of your home itself. If you notice the ceiling is bulging, sagging, or you hear any cracking or popping sounds, evacuate the area immediately. These are signs of a potential collapse. Your safety is the top priority, so get everyone out and call for professional help.
What Isn’t a Roofing Emergency?
It’s just as important to know when a situation *isn’t* a full-blown crisis. While all roof damage needs attention, not every issue requires an immediate, middle-of-the-night call. For example, if you notice a few missing shingles after a windstorm but the underlayment is intact and there’s no active leak, you can likely schedule a repair for the next business day. The same goes for a small, discolored stain on your ceiling that isn’t wet to the touch or growing in size. These problems, along with clogged gutters or tiny cracks in the metal flashing around vents, should be addressed promptly to prevent them from worsening. Think of them as important warnings, not five-alarm fires. You can learn more about what goes into a standard fix in our roof repair guide.
How to Spot Hidden Roof Damage
The most destructive roof damage is often the kind you can’t see from the ground. A small, slow leak can go undetected for weeks or even months, silently causing rot, compromising your home’s structural integrity, and creating the perfect environment for mold to grow in your attic. By the time you notice a visible water spot on your ceiling, the damage is often far more extensive than it appears. Be proactive and look for subtle clues inside your home. Check your attic periodically for a musty smell or damp insulation. Keep an eye out for peeling paint or faint water stains on the ceilings and walls of your top floor. For business owners, catching these issues early is crucial to preventing disruptions, making regular inspections of your commercial roofing a smart investment.
Common Causes of Sudden Roof Damage
A roofing emergency can feel like it comes out of nowhere, but these urgent situations usually have a clear cause. Understanding what puts your roof at risk is the first step in knowing what to watch for. Most roof failures can be traced back to three main culprits: severe weather, physical impact from falling objects, and the slow, steady effects of age. While you can’t control the weather, knowing the signs of trouble can help you act quickly to protect your property when an emergency strikes.
How Severe Weather Impacts Your Roof
Here in the Pacific Northwest, our weather can be unpredictable and harsh. High winds, driving rain, and even hail can cause serious roof damage in a short amount of time. After a bad storm, you might notice missing shingles, dents from hail, or even large holes where the storm has torn away materials. These problems are more than just cosmetic; they create openings for water to get into your home, leading to leaks and significant interior damage. A compromised residential roofing system after a storm requires immediate attention to prevent small issues from becoming major disasters.
Weather Damage by the Numbers
To put the impact of weather into perspective, let’s look at the numbers. While storm patterns vary by region, data from other parts of the country shows just how widespread the damage can be. In a single year, Michigan recorded 19 tornadoes, 259 severe wind storms, and 81 severe hail storms, leading to potential roof damage for over 42,000 homeowners in just one city. Here in the Puget Sound, our intense wind and rainstorms are more than capable of tearing off shingles and causing sudden, severe leaks. It often only takes one major storm to turn a solid roof into an urgent problem requiring emergency repairs.
Impact from Fallen Trees and Debris
One of the most dramatic causes of a roofing emergency is a direct impact. Sometimes, things like heavy tree limbs fall during a storm and make large holes in your roof, causing immediate and severe leaks. It doesn’t have to be a whole tree to cause a crisis; even large branches or other debris carried by strong winds can puncture your roof’s surface. This type of damage often requires a fast response to cover the opening and stop water from pouring into your attic and living spaces. Both homes and commercial properties are vulnerable to this kind of sudden, structural damage.
Fire Damage
A fire in your home creates an immediate roofing emergency, even if the flames never touched the roof itself. The intense heat and smoke from a fire can seriously weaken your roofing materials, compromising their strength and leaving your home vulnerable to leaks or even structural failure. After the fire is out, your first priority should be to prevent any further harm from the elements. A temporary solution like emergency roof tarping can protect your property from rain while you arrange for a permanent fix. Because this kind of damage isn’t always visible, it’s critical to have a professional roofer conduct a thorough inspection. For a safe and lasting solution, you need an experienced, local contractor who can assess the full extent of the damage and ensure your home is secure.
When Gradual Wear Becomes an Emergency
Not all emergencies are caused by sudden events. Over time, your roof naturally wears down, and small, unnoticed issues can suddenly fail. Most roof leaks actually start in places where something goes through the roof, like skylights, vents, or chimneys. The flashing and seals around these areas are common weak points that can degrade, crack, or pull away over the years. What might have been a slow drip can quickly turn into a major leak during a heavy rainstorm, catching you completely by surprise. Regular inspections can help you find and fix these weak spots before they turn into a full-blown emergency.
Found a Leak? Your First Steps
The drip-drip-drip sound is one no property owner wants to hear. Finding a leak can feel overwhelming, but your first moves are critical for minimizing damage. Before you even think about climbing on the roof, there are three immediate steps you can take inside your home to get the situation under control. Acting quickly can save you a lot of headaches and money down the road, protecting your home and belongings from further harm. These initial actions will also set you up for a smoother repair and insurance process when you call in a professional roofing contractor.
Protect Your Home’s Interior
The moment you spot a leak, your priority is to protect everything inside. Water can quickly ruin furniture, electronics, flooring, and personal keepsakes. Start by moving any vulnerable items out of the affected area. If something is too heavy to move, cover it with thick plastic sheeting. In the damp Puget Sound climate, water damage can set in fast, with mold growth starting in as little as 24 to 48 hours. Quick action not only saves your belongings but also helps prevent long-term structural issues and unhealthy mold from taking hold in your walls and ceiling.
How to Contain the Water
Next, you need to manage the water coming in. Place a bucket, trash can, or any large waterproof container directly under the drip to catch the water. If the water is splashing, you can put an old towel or a small board in the bottom of the bucket to absorb the impact and reduce the noise. For larger leaks or saturated ceilings, lay down towels and blankets to soak up any water that has already pooled on the floor. If you see a bulge forming in the ceiling, it’s a sign that water is accumulating. Carefully poking a small hole in the center of the bulge with a screwdriver can allow the water to drain in a controlled way, preventing a larger ceiling collapse.
Document Everything for Insurance
Before you clean up too much, grab your phone and start documenting everything. This step is incredibly important for your insurance claim. Take clear photos and videos of the leak itself, the water dripping, and any damage to your ceiling, walls, floors, and personal property. Be as thorough as possible, capturing the extent of the problem from multiple angles. This visual evidence provides undeniable proof to your insurance provider about the damage your home has sustained. Having this documentation ready will make the claims process much smoother and helps ensure you get the coverage you need for repairs and replacements.
A Guide to Emergency Roof Repair Patching
When you’re dealing with a sudden roof leak, your immediate goal is to stop more water from getting inside. A temporary patch can be a lifesaver, preventing further interior damage while you arrange for a professional repair. Think of it as first aid for your roof. It’s a solid short-term fix, but it’s not a substitute for a permanent solution from a residential roofing expert who can address the underlying problem correctly and safely. Before you get started, remember that getting on your roof is risky, especially in bad weather, so only proceed if you feel completely safe doing so.
Gather Your Tools and Materials
You don’t need a truck full of professional tools for a quick, temporary fix. You can likely find what you need around your house or with a quick trip to the hardware store.
Here’s a short list of materials to gather:
- Heavy Plastic Sheeting or a Tarp: A thick roll of plastic or a large tarp will act as your primary barrier against water.
- Roofing Tar: A can of “wet/dry” roof tar is incredibly useful because you can apply it even if the surface is still damp.
- A Pry Tool: You’ll need something to gently lift the shingles. A flat bar is ideal, but in a pinch, a simple butter knife can work just fine.
- Weights: If you don’t have nails or caulk handy, a few rocks or other heavy, secure objects can hold your patch in place and keep it from blowing away.
How to Apply a Temporary Patch, Step-by-Step
With your materials ready, you can create a temporary patch to cover the leak. Follow these simple steps to guide water away from the problem area.
- Clear the Surface: Gently sweep away any leaves, twigs, or old, failing patch material from the damaged spot. You want the area to be as clean as possible.
- Lift the Shingles: Carefully use your butter knife or flat bar to break the seal on the shingles directly above the hole. You only need to lift them enough to slide your plastic underneath.
- Position the Plastic: Slide your plastic sheeting or tarp under the lifted shingles. Make sure the material extends far enough up the roof to go past the “drain line,” which is the top edge of the shingle below it. This helps ensure water flows over the patch, not under it.
- Secure Your Patch: Place your rocks or other heavy objects on top of the plastic to hold it down securely. For larger holes, you might spread a tarp over the area and weigh it down along the edges.
Safety Tips for Emergency Roof Repair
When you discover a leak or damage to your roof, your first instinct is probably to fix it as quickly as possible. While that urgency is understandable, your personal safety has to come first. A damaged roof can be an unpredictable and dangerous place, especially during or after a storm. Before you even consider a temporary fix, you need to assess the situation with a clear head and prioritize your well-being over the property. Rushing up a ladder without the right preparation can turn a manageable problem into a much more serious one.
The most important thing to remember is that no repair is worth an injury. If you feel unsure, lack the proper equipment, or the damage looks extensive, the best and safest decision is to call a professional. Our team is equipped to handle emergency residential roofing situations safely and effectively, taking the risk off your shoulders. For business owners, the same principles apply; protecting your property shouldn’t come at the expense of safety, which is why professional commercial roofing services exist.
Always Use the Right Safety Gear
If you determine the situation is minor and you can safely access the roof, having the right gear is non-negotiable. Your everyday sneakers and work gloves won’t cut it. To do the job safely, you need equipment specifically designed for roofing work. This includes a fall protection harness with a roof anchor, non-slip roofing shoes that can grip the surface, heavy-duty gloves to protect your hands, and safety glasses. You’ll also need a sturdy extension ladder that is placed on solid, level ground. If you don’t own this equipment, it’s a clear sign that the job is best left to the professionals.
Never Work in Bad Weather
Timing is everything when it comes to roof repairs, and the weather is the biggest factor. Never, ever climb onto your roof during a storm, in high winds, or when it’s wet. A damp roof is incredibly slick, and the risk of a fall increases dramatically. It’s also a bad idea to go up at night when visibility is low. Even on a clear day, consider your roof’s pitch. A steep roof is hazardous for even experienced individuals without the proper training and equipment. If the weather conditions aren’t perfect, stay on the ground. The temporary patch can wait until it’s safe to proceed.
Always Work with a Partner
You should never attempt a roof repair alone. Having a partner with you is a critical safety measure. This person can hold the ladder steady, hand you tools, and most importantly, call for help immediately if an accident happens. Working with a spotter on the ground ensures someone is always aware of your situation. If the damage is severe and you have any doubts about your home’s structural integrity, the safest choice is to have everyone leave the building until a professional can perform an inspection. Your partner’s most important job might be convincing you that it’s time to call for help.
Avoid These Common DIY Repair Mistakes
When your roof is leaking, your first instinct is to fix it fast. While that urgency is understandable, a few common DIY mistakes can turn a manageable problem into a much bigger, more expensive one. A hasty repair can cause more leaks, damage your roof’s structure, or even lead to a serious injury. Before you climb a ladder, make sure you know what pitfalls to look out for. Getting a temporary fix right is just as important as the final repair, and avoiding these errors will protect your home and your safety.
Using a Tarp the Wrong Way
A frequent mistake is nailing a tarp flat over a hole. It seems logical, but this method often fails because water can simply run down the roof, slip under the tarp, and find its way into the original leak. A better approach is to extend the tarp well beyond the damaged area, running it over the peak of the roof if possible. This allows water to flow over the tarp and into the gutters, just as it would on an intact roof. Use wood planks or sandbags to weigh the edges down instead of nails, which create more holes.
Choosing the Wrong Repair Materials
In a pinch, it’s tempting to grab whatever you have on hand, but not all materials are up to the task. A thin plastic sheet or a non-waterproof covering won’t hold up against Puget Sound wind and rain. You need a heavy-duty, waterproof tarp. Also, avoid using sealants or adhesives that aren’t meant for roofing, as the wrong kind of caulk can trap moisture or complicate the final repair. A proper residential roofing job depends on a clean surface, and the wrong materials get in the way.
Making the Problem Worse
Your safety should always be the top priority. Climbing onto a roof is dangerous, especially when surfaces are wet and slippery after a storm. Never go on your roof at night, if it has a steep pitch, or if you are working alone. Beyond personal risk, walking on a damaged roof can cause more harm. You might break additional shingles or weaken the underlying structure without realizing it. This can turn a small leak into a major issue, leading to more complex commercial roofing work down the line.
When to Call a Professional Roofer
While a quick DIY patch can be a lifesaver, it’s crucial to know when a problem is beyond your scope. Some roofing issues are not just complex; they’re dangerous. Attempting a major repair without the right training, tools, and safety equipment can lead to serious injury or cause even more damage to your home. A professional roofer does more than just fix a leak. They can identify the root cause of the problem, assess the full extent of the damage (including issues you might not see), and provide a lasting solution that protects your home for years to come.
Think of it this way: your roof is a complex system. A small issue in one area could be a symptom of a much larger problem. Professionals are trained to spot these connections and ensure the entire structure is sound. If you feel overwhelmed, unsure, or unsafe at any point, that’s your cue to step back and pick up the phone. Calling for help isn’t giving up; it’s making the smartest, safest decision for you and your property. When you’re dealing with the primary shield that protects your home, it’s always better to rely on expert roofing and siding services. They have the experience to handle everything from minor fixes to complete replacements, ensuring the job is done right the first time.
Is This Repair Too Big for You?
Your first clear signal to call a professional is significant water intrusion. We’re not talking about a slow drip in a bucket; we mean a situation where a lot of water is entering your home, possibly in multiple spots. This is a major problem that can quickly harm your walls, ceilings, and electrical systems, while also creating a serious risk for mold growth. If the damage looks extensive and you feel your home might not be safe, the best course of action is to leave the property until a professional roofer can perform a thorough inspection and confirm it’s secure. Your safety is always the top priority.
How to Spot Serious Structural Damage
Some warning signs point directly to a problem with your roof’s structural integrity. If you notice any part of your roof has fallen in or is visibly sagging, this is a critical emergency. A sagging roof can be caused by the immense weight of heavy snow, standing water, or the impact of a fallen tree, and it signals a high risk of collapse. Another serious red flag is when large sections of shingles are missing or so badly damaged that the layers underneath are exposed. This means your roof’s primary protective barrier is gone, leaving its core structure vulnerable to water damage and rot. This level of damage requires an immediate professional assessment.
What to Expect from Professional Emergency Services
When you call a professional for a roofing emergency, you’re getting more than just a repair; you’re getting a rapid response team. A reputable contractor understands the urgency and will prioritize your call. Their first goal is to assess the situation safely and implement a temporary solution to stop the damage in its tracks. This immediate action is what separates a professional service from a standard repair appointment. They arrive with the right safety gear, tools, and materials to handle the problem without putting you or your property at further risk. This initial visit is all about containment and stabilization, giving you peace of mind while a permanent, long-term repair is planned.
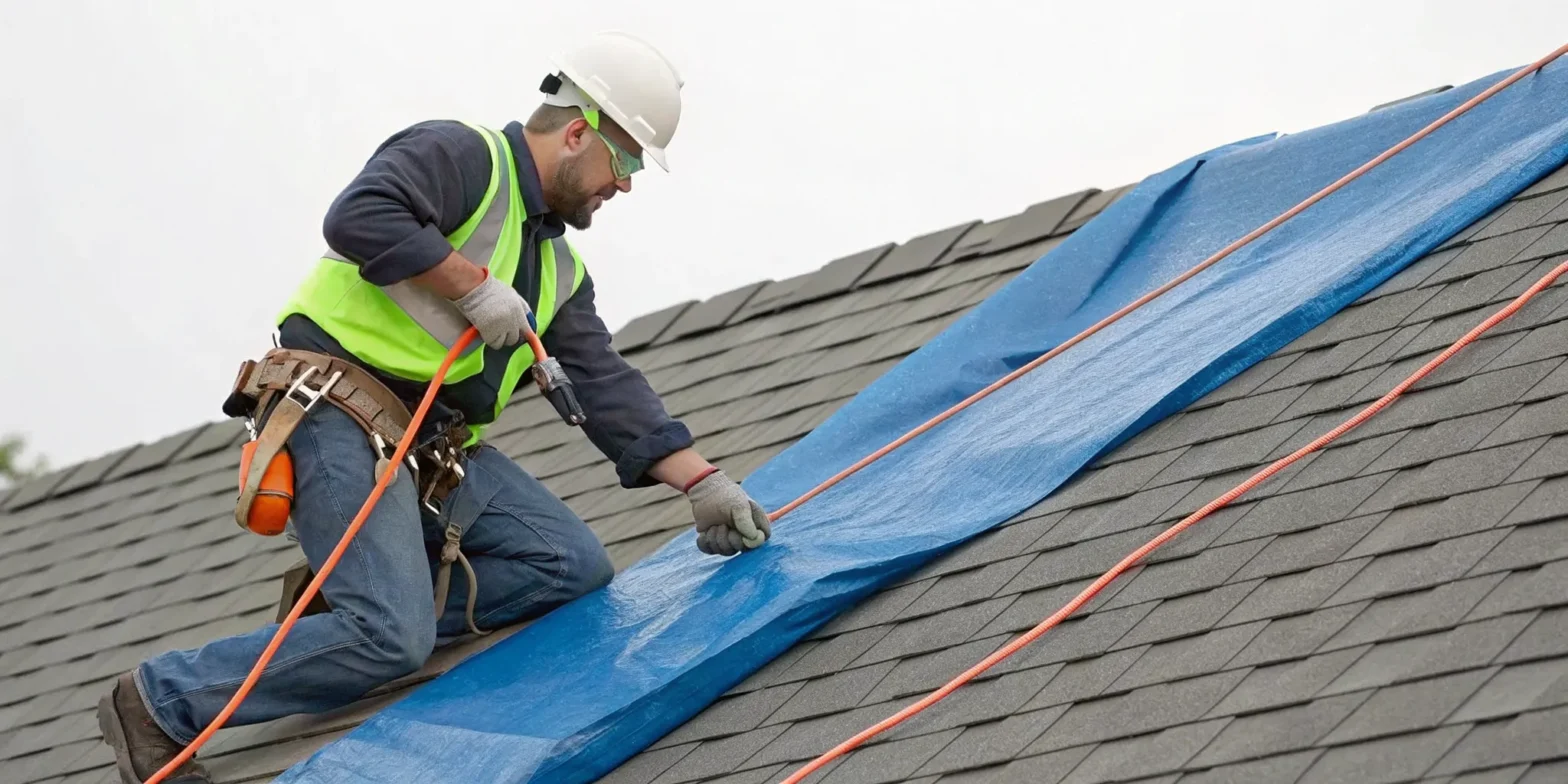
Professional Emergency Tarping
One of the most common and effective first responses from a professional is emergency roof tarping. This isn’t just throwing a blue tarp over a hole; it’s a strategic, temporary fix designed to keep your home dry until a full repair can be completed. A professional crew will use heavy-duty, weather-resistant tarps and secure them properly to your roof, ensuring they can withstand wind and rain without causing more damage. This service is crucial because it immediately stops water from entering your home, preventing further harm to your attic, insulation, and ceilings. It’s the most important step in protecting your property and stabilizing the situation until a permanent roofing solution can be scheduled.
Response Times and Guarantees
In an emergency, time is critical. You can’t afford to wait days for a callback. Established local roofers who offer emergency services understand this and are set up for a quick response. Many companies aim to be at your property the same day or within 24 hours to assess the damage and get a temporary solution in place. When you call, you should expect to get a clear timeframe for their arrival. A reliable company will communicate with you every step of the way, from the initial call to the moment they arrive. This quick action is key to minimizing water damage and is a hallmark of a trustworthy emergency roofing service.
What Will an Emergency Roof Repair Cost?
What Determines the Final Repair Cost?
When you’re facing a roofing emergency, the final bill is probably on your mind. Several things determine the cost of a repair, including the size of the damaged area, the type of roofing material on your home, and the complexity of the fix. A minor patch on a composition roof will cost less than a major repair on a cedar shake roof. The most important factor, however, is how quickly you act. A small leak can seem manageable, but delaying even a temporary fix can turn a small problem into a huge, expensive repair. Water damage can lead to structural issues and mold growth, which are far more costly to address than the initial leak. You can get a general idea of potential expenses by using a roofing cost calculator for a full replacement, but for emergency repairs, getting a professional quote is key.
Tips for a Smooth Insurance Claim
Figuring out your insurance coverage can feel overwhelming, but a few simple steps can make the process smoother. Before you or a professional touches anything, document everything. Take plenty of clear photos and videos of the leak and any resulting damage, both inside and outside your home. This evidence is crucial for your insurance claim. Next, contact your insurance provider as soon as possible, usually within 24 to 48 hours of discovering the leak. Most homeowner’s policies cover “emergency mitigation,” which means they’ll often reimburse you for temporary fixes designed to prevent further damage. Be sure to keep every receipt for materials or professional services. Having a reliable partner for your residential roofing needs can make this process much easier.
The Financial Impact of Your Roof’s Condition
Your roof is much more than just a shield against the weather; it’s a major financial asset. Its condition plays a huge role in your home’s overall value, energy efficiency, and even your ability to sell your property. A well-maintained roof can save you money on heating and cooling bills and prevent costly interior damage, while a failing one can become a significant financial drain. Understanding how your roof’s age and condition affect your bottom line helps you make smarter decisions about maintenance and replacement, turning a necessary expense into a valuable investment for your home’s future.
How a New Roof Affects Home Value and ROI
Investing in a new roof is one of the smartest home improvements you can make for recouping your money when it’s time to sell. A new roof absolutely increases your home’s value, both on paper and in the eyes of potential buyers. It raises the official appraised value and sends a powerful message that the home has been well cared for. According to national averages, you can expect a return on investment (ROI) of around 61% to 68% for a new asphalt shingle roof. This strong return, combined with enhanced curb appeal, makes a roof replacement a financially sound decision that adds tangible value to your property.
Average Lifespan of Common Roofing Materials
Knowing how long your roof is expected to last is key to financial planning. Different materials have different lifespans, which is an important factor when choosing a replacement. For example, standard asphalt shingles typically last about 15 to 20 years, while higher-quality architectural asphalt shingles can protect your home for 25 to 30 years. Other materials like metal or cedar shake offer even longer lifespans, providing decades of protection. Understanding your roof’s expected service life helps you budget for future maintenance and eventual replacement, preventing you from being caught off guard by a sudden failure and a large, unexpected expense.
How Your Roof’s Condition Can Impact a Home Sale
When you’re selling your home, the condition of your roof can make or break a deal. A roof that is old or in poor repair is a major red flag for buyers and home inspectors. It often leads to lower offers, requests for significant repair credits, or can even cause a sale to fall through entirely. On the other hand, a new or well-maintained roof gives buyers peace of mind and can help your home sell faster. It prevents difficult negotiations after an inspection and shows that your property is a solid, secure investment. If you’re thinking of selling, getting a roof assessment can help you understand your options and budget accordingly, and you can even get a preliminary idea of costs with a roofing cost calculator.
How to Find a Trustworthy Emergency Roofer
When your roof is leaking and you’re in a panic, it’s tempting to call the first roofer you find online. But taking a few moments to vet your options can save you from bigger headaches down the road. The goal is to find a professional who can respond quickly without sacrificing quality or safety. A true emergency roofer is more than just a fast responder; they are an experienced, trustworthy partner who can guide you through a stressful situation. Choosing the right company means you’ll get a durable repair that protects your home long after the storm has passed.
Qualities of a Great Emergency Roofer
In an emergency, speed is essential. Look for a local company that specifically offers emergency services and can guarantee a fast response time. Beyond speed, verify their credentials. A reputable roofer will always be licensed, bonded, and fully insured. This is non-negotiable, as it protects you from any liability if an accident happens on your property. It’s also a good idea to check their reviews and see how they’ve handled urgent residential roofing projects for other homeowners in your area. A strong local reputation is often the best indicator of reliable, high-quality work.
Questions to Ask Before Hiring
Once you have a roofer on the phone, you need to get clear, direct answers. Start with the most critical question: “How quickly can you get someone to my home?” Follow up by asking about their experience with your specific type of emergency, whether it’s a fallen tree or severe storm damage. It’s also important to understand their process. Ask them how they will assess the damage and what immediate steps they will take to secure your home. Finally, get clarity on the costs. Inquire about their emergency service fees and ask if they can provide an estimate for both temporary and permanent repairs. A professional will be transparent and ready to answer all your questions.
How to Prevent Future Roofing Emergencies
After dealing with the stress of a roofing emergency, the last thing you want is a repeat performance. The good news is that you can significantly reduce your risk with a little proactive care. The best way to handle a crisis is to prevent it from happening in the first place. By staying on top of a few key maintenance tasks, you can protect your investment, extend the life of your roof, and save yourself from the cost and headache of another unexpected failure. These simple, preventative steps are your best defense against future storms and sudden damage, giving you peace of mind no matter what the weather brings.
Schedule Regular Roof Inspections
Think of a roof inspection as a routine check-up for your home’s most important shield. Scheduling a professional look-over once a year, and especially after a major storm, is one of the smartest things you can do. A trained eye can spot subtle signs of trouble you might miss, like cracked sealant around vents, failing flashing near the chimney, or shingles that are starting to curl or lose their protective granules. Catching these small issues early allows for a simple, inexpensive fix. Left ignored, they can easily become the entry point for a major leak during the next heavy downpour. A professional roof inspection gives you a clear picture of your roof’s health and a plan to address weak spots before they fail.
Keep Gutters and Drains Clear
Your gutters have one critical job: to channel water safely away from your roof and foundation. When they get clogged with leaves, pine needles, and other debris, they can’t do that job. Water backs up, pooling along the edge of your roof and seeping underneath the shingles. This constant moisture can lead to wood rot, fascia damage, and eventually, leaks inside your home. In the winter, clogged gutters are a primary cause of destructive ice dams. Cleaning your gutters at least twice a year, once in the spring and again in the late fall, is essential maintenance. It’s a simple task that prevents a whole host of expensive water-related problems down the line.
Trim Overhanging Tree Branches
The trees around your property can pose a significant threat to your roof. The most obvious danger is a large limb breaking off during a windstorm and puncturing your roof, causing an immediate emergency. But the damage can also be more gradual. Smaller branches that hang too close can scrape against your shingles day after day, wearing away the protective granules and shortening the roof’s lifespan. Keeping tree branches trimmed back, so they are at least a few feet away from your roofline, is a crucial preventative step. It protects your home from both sudden impact damage and the slow, steady wear that can lead to premature roof failure.
Ensure Proper Attic Ventilation
What happens in your attic has a huge impact on the health of your roof. Proper ventilation is key to regulating temperature and moisture levels, protecting your roof from the inside out. During our hot summers, a well-ventilated attic allows super-heated air to escape, preventing it from baking your shingles and causing them to degrade prematurely. In the winter, good airflow keeps moist, warm air from your living spaces from condensing on the cold underside of the roof deck, which can lead to mold and rot. A professional roofer can assess your attic’s ventilation during an inspection and ensure your entire roofing system is working together to protect your home.
Related Articles
- Signs of Roof Damage & The Most Expensive Part to Fix – Landmark Roofing & Siding
- A Smart Homeowner’s Guide to Roof Repair – Landmark Roofing & Siding
Frequently Asked Questions
How can I tell if a leak is a real emergency or just a minor repair? A true emergency involves a significant amount of water entering your home, visible structural damage like a sagging ceiling, or a large hole from something like a fallen tree branch. If the problem poses an immediate threat to your safety or property, it’s an emergency. A slow, contained drip that you can manage with a bucket is less urgent, but it still needs professional attention soon to prevent it from becoming a bigger issue.
My roof is leaking in the middle of a storm. What should I do right now? Your safety is the first priority, so stay off the roof. Focus on what you can control inside. Move furniture and valuables away from the leak and use buckets to catch the water. If the ceiling is bulging, you can carefully puncture the center to release the pressure and prevent a collapse. Once you’ve contained the immediate mess, document the damage with photos and call a professional roofer who offers emergency services.
Is a temporary patch a permanent solution? No, a temporary patch is just first aid for your roof. It’s designed to stop more water from getting in and causing further damage while you wait for safe weather and a professional repair. It doesn’t address the underlying cause of the leak. A professional will need to assess the full extent of the damage and provide a permanent fix to ensure your roof is secure for the long term.
Will my homeowner’s insurance cover an emergency roof repair? Most homeowner’s insurance policies cover damage from sudden and accidental events like storms or fallen trees. They also typically cover the cost of temporary repairs needed to prevent further damage. It’s important to document everything with photos and contact your insurance agent as soon as possible to start the claims process. Keep all receipts for any materials or services you pay for.
What happens when I call for an emergency service? What should I expect? When you call a professional for an emergency, they will first ask questions to understand the situation and give you safety advice. A team will then be sent to your home as quickly as possible to assess the damage. Their first goal is to secure the area and apply a professional temporary solution, like a tarp, to stop the leak. After the immediate threat is handled, they will schedule a follow-up visit to discuss a permanent repair plan and provide a detailed estimate.