Date
Mon Mar 30A stunning cedar roof is so much more than the shakes you see from the street. The real secret to its longevity lies in the system built underneath. A successful cedar shake roof installation isn’t just about laying down wood; it’s a complete process. Think carefully layered underlayments, specialized ventilation barriers to help the wood dry, and precise flashing to seal off vulnerable spots. Getting this cedar shake installation right means every component works together to manage moisture and protect your home. This guide will show you exactly how a beautiful, long-lasting roof is built from the deck up.
Key Takeaways
- Preparation is non-negotiable: Before laying a single shake, your roof deck must be inspected, repaired, and layered with waterproof barriers and a ventilation matrix. This foundation is crucial for preventing rot and helping the cedar breathe.
- Precision in placement is key: Because cedar is a natural wood, it needs room to expand and contract. Correctly spacing each shake, using the right nailing pattern, and adding felt interlayment are essential details that create a strong, weather-resistant roof system.
- Hiring an expert prevents common pitfalls: Small installation errors, like improper spacing or poor ventilation, can lead to major problems like curling and decay. A professional installer has the expertise to get these critical details right, ensuring your investment is protected for years to come.
What Exactly Are Cedar Shakes?
If you love a home with classic, rustic charm, a cedar shake roof might be exactly what you’re looking for. Cedar shakes are roofing tiles made from split logs, giving them a textured, natural appearance that blends beautifully with the Pacific Northwest landscape. Unlike uniform, mass-produced roofing materials, each shake has a unique grain and thickness, adding character and dimension to your home’s exterior.
Beyond their good looks, cedar shakes are known for their impressive durability. Cedar contains natural oils that make it resistant to decay and insects, helping it stand up to the damp Puget Sound climate. When properly installed and maintained, a cedar shake roof can last for decades, making it a solid long-term investment for your property. They offer a timeless appeal that can complement a wide range of architectural styles, from cozy cottages to grand, modern homes. Choosing cedar is about more than just roofing; it’s about selecting a material that adds lasting value and curb appeal.
Cedar Shakes vs. Shingles: What’s the Real Difference?
You’ve probably heard the terms “shakes” and “shingles” used together, but they aren’t the same thing. The main difference comes down to how they’re made. Shingles are typically sawn smooth on both sides, giving them a clean, uniform look. Shakes, on the other hand, are split from a log, which creates a more rugged, textured surface.
This difference in production affects their appearance and application. Because they are thicker and more irregular, shakes provide a distinct, rustic look that is perfect for roofs. According to Fine Homebuilding, shakes are split on one or both sides, which contributes to their unique texture and performance. Shingles, being thinner and more uniform, are often used for siding or for roofs where a smoother finish is desired.
Is a Cedar Roof an Eco-Friendly Choice?
For homeowners looking to make a sustainable choice, cedar is an excellent option. Unlike synthetic materials that rely on heavy manufacturing processes, cedar is a natural, renewable resource. When sourced from responsibly managed forests, it has a much smaller environmental footprint. Many suppliers are committed to sustainable harvesting practices, ensuring that new trees are planted to replace the ones that are used.
Cedar is also biodegradable, meaning it won’t sit in a landfill for centuries at the end of its life. It can be recycled or composted, returning to the earth naturally. This full-circle lifecycle makes it one of the most eco-friendly roofing options available. By choosing cedar, you’re not just getting a beautiful roof; you’re also making a decision that’s kinder to the planet.
How Does Cedar Handle Tough Weather?
Cedar is more than just a pretty face; it’s a high-performance material that’s perfectly suited for our local weather. One of its best features is its natural insulation. The cellular structure of wood traps air, which helps keep your home warmer in the winter and cooler in the summer. This can translate into real energy savings on your heating and cooling bills over time.
This material is also incredibly resilient. Cedar shakes are strong enough to withstand heavy rain, high winds, and even hail. Their thickness and overlapping installation create a formidable barrier against the elements. While all roofs require maintenance, cedar’s natural resistance to moisture and decay means it holds up exceptionally well in the damp conditions we often see in the Redmond area, ensuring your home stays protected year-round.
Understanding Installation Standards and Building Codes
Installing a cedar shake roof correctly involves more than just skill; it requires following a strict set of guidelines. These standards aren’t arbitrary rules—they’re designed to ensure your roof is safe, durable, and performs exactly as it should. From the quality of the wood itself to the specific techniques used during installation, every detail is guided by industry best practices and local regulations. Adhering to these standards is what separates a roof that lasts a decade from one that protects your home for a lifetime, ensuring your investment is sound and your family is safe under a well-built structure.
The Role of the Cedar Shake and Shingle Bureau (CSSB)
When it comes to quality control, the Cedar Shake and Shingle Bureau (CSSB) is the leading authority. This organization sets the official standards for how cedar shakes are graded and installed, giving contractors and homeowners a clear benchmark for excellence. For example, the CSSB designates “Premium Grade Certi-Split” shakes as the highest quality available. As experts at Fine Homebuilding explain, these shakes are 100% vertical grain, which makes them incredibly stable and far less likely to curl or warp over time. Working with a contractor who follows CSSB guidelines ensures you’re getting a top-tier product installed the right way.
Why Local Building Codes Are Non-Negotiable
While the CSSB provides the industry standard, your local building codes are the law. These regulations are tailored to our specific climate and environmental conditions here in the Puget Sound region, and they always take precedence over general guidelines. As the CSSB’s own manual instructs, installers must always check and adhere to local requirements. This is crucial for ensuring your roof is not only safe but also fully compliant, which is important for home inspections and insurance. A professional team will be well-versed in Redmond’s codes, handling all the details so you don’t have to worry about them.
Gathering Your Tools and Materials
A successful cedar shake roof installation depends just as much on the materials you use as the technique you apply. Unlike a standard asphalt shingle job, cedar requires a specific set of tools and a multi-layered system of underlayments to ensure it lasts for decades. It’s a project where cutting corners on materials will almost certainly lead to problems down the road. Because wood is a natural material that breathes and responds to moisture, the entire roofing system must be designed to work with it, not against it.
Before you even think about climbing a ladder, you need to gather everything for the job. This includes selecting high-quality shakes, assembling the right installation and safety tools, and understanding the crucial role of underlayments and ventilation barriers. Getting this part right sets the foundation for a beautiful, durable roof that can handle the Pacific Northwest climate. Think of it as your prep work. The more thorough you are here, the smoother the rest of the process will be. We’ll walk through exactly what you need to get started, from the shakes themselves to the hidden layers that do the heavy lifting.
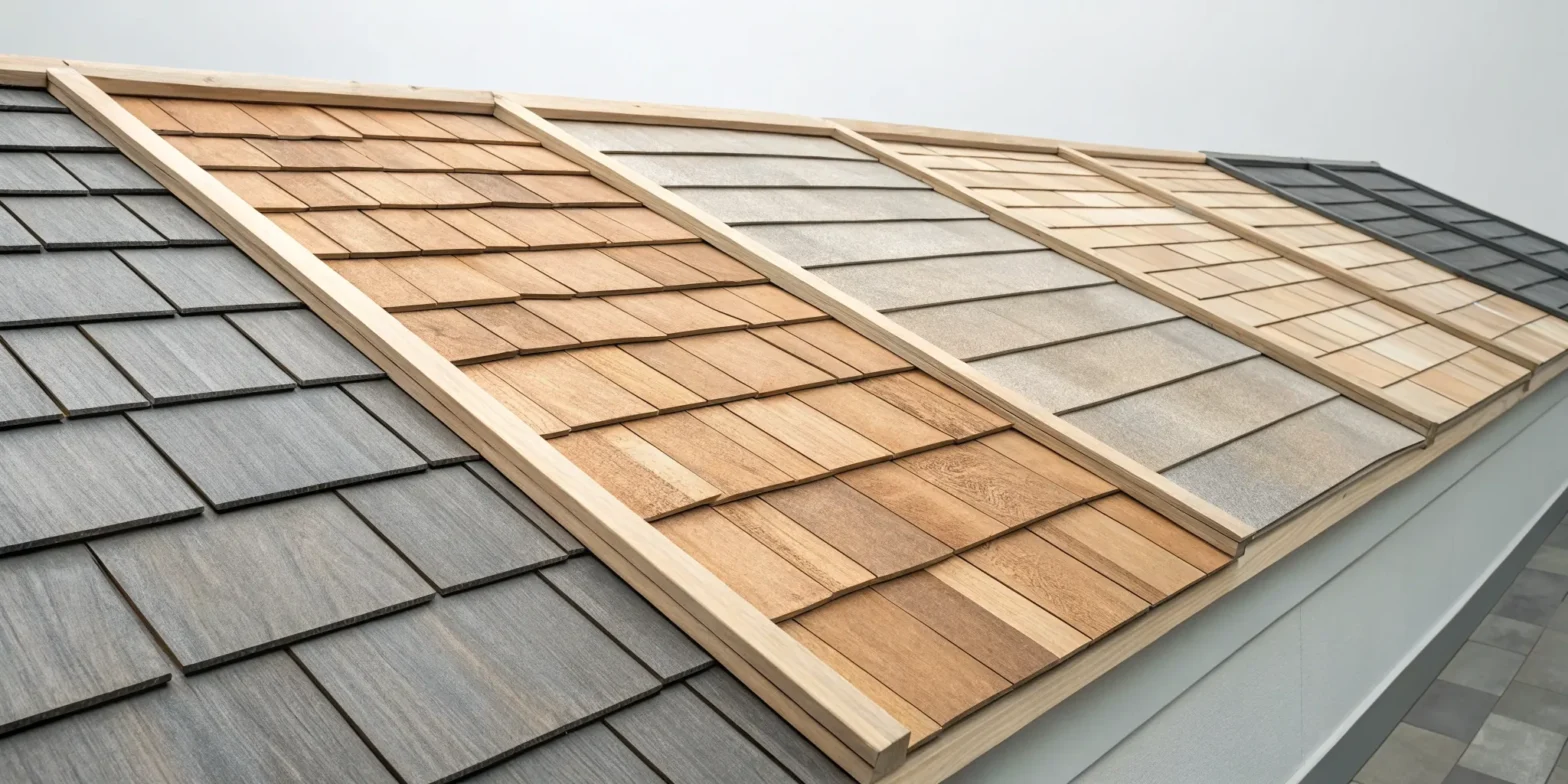
How to Spot High-Quality Cedar Shakes
Not all cedar shakes are created equal, and the quality you choose directly impacts your roof’s lifespan and appearance. For the best results, look for Premium Grade Certi-Split handsplit shakes with 100% vertical grain. This is important because vertical grain shakes are far more dimensionally stable, meaning they are less likely to curl or warp over time. While they might cost more upfront, they pay for themselves in longevity and reduced maintenance. A properly installed roof using high-quality cedar can easily last 30 to 40 years, making it a fantastic long-term investment for your home. Choosing the right residential roofing materials is the first step toward a lasting result.
Cedar Grades: From Premium to Number 1
When you’re selecting shakes, the grade is your best indicator of quality. Think of it like buying lumber—you want the best cut for the job. Premium Grade shakes are the top of the line because they are 100% vertical grain. This means the wood grain runs perpendicular to the roofline, making the shakes incredibly stable and far less likely to curl or split as they age. The next best option is Number 1 Grade, which still contains at least 80% vertical grain. While still a good product, it’s a slight step down in quality. The key is to avoid shakes with flat grain, as they are almost guaranteed to curl and cause problems down the road.
Wood Types: Western Red vs. Alaskan Yellow Cedar
You’ll primarily encounter two types of cedar for roofing: Western Red and Alaskan Yellow. Western Red Cedar is the most common choice and for good reason. It’s known for its rich, warm tones and natural resistance to rot and insects, making it a perfect fit for the damp Pacific Northwest climate. Alaskan Yellow Cedar, which is technically a type of cypress, is another excellent option. It’s even harder and more durable than red cedar and is particularly popular on the West Coast. Both are fantastic choices, and your decision may come down to aesthetic preference and availability.
Look for the Certi-label® for Quality Assurance
To be certain you’re getting a high-quality product, always look for the Certi-label® on the bundles of shakes. This label is issued by the Cedar Shake & Shingle Bureau (CSSB) and serves as a guarantee that the product meets strict grading standards. It’s your assurance against subpar materials. The label also provides important information, such as whether the shakes have been treated with fire retardants or preservatives, which can extend their life and improve safety. When you work with a professional installer, they should always use Certi-label® products to ensure your cedar roof is built to last.
Your Essential Tool and Safety Gear Checklist
Working on a roof is serious business, so your safety gear is non-negotiable. Always have a sturdy, well-placed ladder, and consider using roof jacks or scaffolding for stable footing. A safety harness, gloves, and safety glasses are essential. For the installation itself, you’ll need a few specialized tools. A pneumatic medium-crown stapler is often used, but it must be operated correctly to avoid damaging the shakes. You’ll also need a reliable hammer, a utility knife for trimming, and a measuring tape. Having everything organized and within reach will make the job safer and more efficient, allowing you to focus on getting the details right without interruption.
Installing a Permanent Safety Anchor
When you’re working high off the ground, safety is everything. That’s why installing a permanent safety anchor is a non-negotiable step in any professional roofing project. This device is fastened directly to your roof’s structure, providing a secure attachment point for harnesses and other safety equipment. It’s a small component that makes a massive difference, drastically reducing the risk of falls and ensuring anyone on the roof can work with confidence. Think of it as a permanent safeguard built right into your home’s exterior.
The benefit of a permanent anchor extends far beyond the initial installation. It’s a forward-thinking safety measure for anyone who might need to access your roof down the line, from gutter cleaners to future repair technicians. Having a reliable anchor point ready and waiting makes their job safer and gives you peace of mind. This proactive approach is a key part of a comprehensive safety plan, which should always include a full set of personal safety gear. It shows a commitment to doing the job right and protecting everyone involved.
Selecting the Best Underlayment and Barriers
A cedar shake roof is a system, and what’s underneath the wood is just as important as the shakes themselves. First, a self-adhering waterproof membrane should be installed at the eaves and in valleys, which provides critical protection against ice dams and water infiltration. Next, a ventilation matrix is laid down. This material creates a small air gap under the shakes, promoting airflow that helps them dry out evenly after it rains. This simple step is key to preventing rot and extending the life of your roof. Finally, a layer of high-quality #30 asphalt felt is installed over the ventilation matrix. This combination of barriers ensures your cedar shake roof is built to breathe and shed water effectively for years to come.
Choosing High-Quality #30 Asphalt Felt
When it comes to underlayment, the quality of your asphalt felt is a detail that directly impacts your roof’s longevity. Think of it as the final layer of defense in the hidden part of your roofing system. You can’t just use any roll of felt; you need one specifically designed for durability. According to roofing experts, it’s critical to use high-quality felt that meets specific industry benchmarks, like ASTM D226 Type II standards. This certification ensures the material has the strength and water resistance needed to protect the roof deck for decades. This felt is installed over the ventilation matrix, where it works with the air gap to shed any moisture that gets past the shakes—a crucial step for preventing rot and helping your cedar roof breathe properly.
How to Properly Prep Your Roof Deck
A beautiful cedar shake roof is only as good as the foundation it’s built on. Before a single shake is laid, preparing your roof deck is arguably the most important part of the entire job. This isn’t the place to cut corners, as the time you spend here directly impacts how long your new roof will last and how well it performs. Think of it as setting the stage for a successful installation. A solid, well-prepared deck prevents future headaches like leaks, rot, and premature aging, giving you peace of mind for years to come. This prep work involves a few key steps that create a stable and waterproof base for your new cedar shakes. It’s about creating a complete roofing system where every layer works together to protect your home from the persistent Puget Sound rain. Skipping these steps can lead to costly repairs down the road and can even void material warranties. A properly prepped deck is your best insurance policy for a long-lasting, beautiful cedar roof that adds value and character to your property. It ensures every component, from the sheathing to the final shake, functions as intended.
First, Inspect and Repair the Deck
First, you need a clean slate. This means completely removing the old roofing material to get a clear look at the wooden deck underneath. Once it’s exposed, carefully inspect every inch for signs of damage like soft spots, rot, or water stains. Any compromised sheathing must be replaced to create a solid, secure surface. This is a critical step because your new roof needs a sturdy base to be fastened to. A professional roofing inspection can identify any structural issues that need addressing before you move forward, ensuring your home is properly protected from top to bottom.
Install a Copper Drip Edge
With your roof deck solid and clean, the next step is to protect its edges. This is where a copper drip edge comes in. Think of it as a metal flashing installed right at the eaves of your roof, designed to direct rainwater away from the fascia and directly into the gutters. This simple component is crucial for preventing water from seeping behind the gutters and rotting the wood of your roof deck and fascia boards. According to the Cedar Shake & Shingle Bureau, installing a proper drip edge is a fundamental part of a long-lasting roof system.
Choosing copper specifically is both a practical and aesthetic decision. Not only is copper incredibly durable and resistant to corrosion, but it also develops a beautiful greenish patina over time that perfectly complements the natural, rustic look of cedar shakes. It’s a small detail that adds significant character and curb appeal to your home. This, combined with the self-adhering waterproof membrane at the eaves, creates a powerful defense against moisture damage, ensuring your roofing investment is protected from the very edge inward.
Laying Down Ice and Water Barriers
With a solid deck in place, the next step is adding a critical layer of protection against moisture. An ice and water barrier is non-negotiable, especially in the Pacific Northwest. This is a sticky, self-adhering waterproof membrane that gets applied directly to the roof deck in its most vulnerable areas. It’s typically installed along the eaves, in valleys, and around any penetrations like chimneys or vents. These are the spots most prone to water infiltration from heavy rain or ice dams. This barrier acts as a failsafe, providing a waterproof seal that prevents water from ever reaching the wood sheathing.
Ensuring Your Roof Has Proper Ventilation
Cedar is a natural material, and one of its biggest needs is the ability to breathe. Proper ventilation is essential for the longevity of your roof because it allows air to circulate underneath the shakes, helping them dry out evenly after it rains. To achieve this, a special underlayment called a ventilation matrix is often installed. This material creates a small air gap that prevents moisture from getting trapped against the wood, which is a leading cause of rot and cupping. Ensuring your shakes can dry from all sides is the secret to a beautiful roof that maintains its shape and integrity for decades.
From Skip Sheathing to Modern Ventilation Mats
In the past, cedar roofs were often installed over “skip sheathing”—boards spaced apart to create natural air channels that helped the wood breathe. Modern homes, however, are typically built with solid plywood or OSB roof decks for greater structural integrity. While this creates a stronger base, it also traps moisture against the underside of the shakes, which can lead to rot. This is where modern ventilation mats come in. These innovative underlayments are designed to create a dedicated air gap between the solid deck and the cedar shakes. This space allows air to circulate freely, helping the shakes dry out completely and evenly after it rains. It’s a crucial evolution in roofing technology that gives a classic, beautiful material the modern performance needed to protect your home for decades.
Your Step-by-Step Guide to Cedar Shake Roof Installation
Putting a cedar shake roof together is a craft that requires attention to detail at every stage. From the first course of shakes to the final ridge cap, each step builds on the last to create a beautiful, durable, and weather-resistant covering for your home. While it’s a project some ambitious homeowners might consider, the precision required often makes it a job best left to the pros. A professional residential roofing team has the experience to handle the nuances of a natural material like cedar.
This guide walks you through the fundamental steps of the installation process. We’ll cover how to lay the foundation with a starter course, get the spacing just right for expansion, and master the nailing pattern that holds everything together. We’ll also look at adding protective layers and finishing the job with clean, watertight ridges. Following these steps correctly is the key to a long-lasting roof that performs as well as it looks.
Setting Up Guidelines with a Chalk Line
Because cedar shakes are a natural product with slight variations in size, you can’t just wing it and expect straight lines. This is where a simple tool becomes essential for a professional-looking finish: the chalk line. Before you lay each new course, you’ll need to snap a horizontal line across the roof felt. This line acts as your guide, ensuring the bottom edge of every shake is perfectly aligned. This small step is critical for creating the clean, uniform rows that define a high-quality installation and prevent a wavy, uneven appearance. It’s a foundational technique that separates an amateur job from a professional one, guaranteeing the final result is as beautiful as it is durable.
Step 1: Lay the Starter Course
The first step in any successful roof installation is getting the starter course right. For a cedar shake roof, this means laying a double layer of shakes along the eaves. This initial course is your roof’s front line of defense against water, so it needs to be solid. The shakes should hang over the fascia by about 1 to 1½ inches. This overhang is essential because it directs rainwater straight into the gutters, preventing it from seeping behind the fascia board and causing moisture damage. Think of it as setting the foundation for the entire roof system.
Step 2: Get the Spacing Right Between Shakes
Working with a natural material like wood means you have to account for its tendency to expand and contract with changes in moisture and temperature. When you place your cedar shakes, leave a small gap of about 1/4 to 3/8 of an inch between each one. This space gives the wood room to breathe and prevents buckling. Just as important is staggering the joints. Make sure the gaps between shakes in one row don’t line up with the gaps in the row below it. A good rule of thumb is to offset them by at least 1.5 inches, a technique that is crucial for installing cedar shakes properly and creating a strong, leak-proof surface.
Calculating the Proper Exposure
“Exposure” is simply the portion of the shake that remains visible after the next row is installed over it. Getting this measurement right is critical for both the look and the function of your roof. To keep everything perfectly aligned, professionals snap horizontal chalk lines across the roof to guide each course. For example, a common standard for 24-inch shakes is a 10-inch exposure. Maintaining this consistent reveal is a key part of a professional installation, ensuring a uniform, polished appearance and, more importantly, allowing the roof to shed water effectively. This precision is what separates a high-quality job from a DIY attempt; it’s a small detail that makes a huge difference in the roof’s long-term performance and curb appeal.
Step 3: Perfect Your Nailing Technique
How you fasten the shakes to the roof deck is critical for the roof’s longevity. You’ll want to use the right hardware, specifically 8D or 9D stainless steel ring shank nails, which resist rust and provide excellent holding power. Each shake gets two nails. Position them about 1 to 1½ inches from the side edges and 1½ to 2 inches above the exposure line of the next course. This placement ensures the nails are covered by the subsequent row of shakes, protecting them from the elements. Getting the nailing pattern right prevents shakes from lifting in high winds and ensures your roof remains secure for years.
Choosing the Right Nails or Staples
The fasteners you choose are just as important as the cedar itself, especially in our damp climate. Using the wrong nails can lead to rust streaks and, eventually, failure. To avoid this, always opt for stainless steel ring-shank nails or staples. According to the Cedar Shake & Shingle Bureau, stainless steel is the best choice for its corrosion resistance, which is essential for preventing rust from staining your beautiful cedar. The “ring-shank” design features small ridges along the nail that provide superior grip, ensuring the shakes stay firmly in place through years of wind and rain. It’s a small detail that makes a huge difference in the structural integrity and lifespan of your roof.
Correct Nail and Staple Placement
Where you place the nails is a matter of precision. Each shake should be secured with two fasteners—no more, no less. Position them about 1 to 1½ inches from the side edges to prevent the wood from splitting. The vertical placement is also critical: the nails should be driven 1½ to 2 inches above the exposure line of the course that will be laid on top. This ensures the fasteners are completely covered by the next layer of shakes, protecting them from direct exposure to the weather. This careful placement not only secures the shakes but also creates a seamless, watertight barrier, which is a hallmark of a professional roofing installation.
Step 4: Add Interlayment Between Each Course
To give your roof an extra layer of water resistance, you’ll need to install an interlayment of roofing felt between each course of shakes. An 18-inch-wide strip of #30 felt paper is the standard for this. As you lay each new row of shakes, you’ll place a strip of felt over the top portion of the row below it. This creates an overlapping system where each shake has a protective barrier beneath it, helping to catch any water that might find its way past the wood. This step is a key part of building a resilient roofing system that can handle heavy rain and protect the underlying structure.
Step 5: Finish the Ridges and Hips
The final touch in the installation process is capping the ridges and hips of the roof. These are the high points where different roof planes meet, and they need a special finishing touch to keep water out. You’ll use pre-cut, beveled cedar shakes designed specifically for this purpose. These ridge caps are installed to overlap each other, covering all exposed nails as you work your way along the peak. At the same time, you’ll need to install flashing around any penetrations like chimneys, vents, or skylights. This metal barrier is woven between the shakes and the fixture to create a completely watertight seal.
Installing Flashing and Working Around Vents
Properly handling flashing and vents is one of the most critical parts of any roof installation. These are the areas where your roof meets a wall, a chimney, or has a pipe poking through, and they are the most vulnerable to leaks if not sealed correctly. Think of flashing as the final line of defense that directs water away from these sensitive spots and back onto the shakes where it can safely run off. It’s a system of overlapping metal pieces, usually made from durable materials like copper or galvanized steel, that works with your shakes to create a completely watertight barrier. Without it, water would find its way into the smallest gaps, leading to rot, mold, and serious structural damage.
Each penetration, from a small plumbing vent to a large brick chimney, requires a specific flashing technique. The basic principle is always the same: layer the materials so that water is shed down and away. This means starting from the bottom and working your way up, ensuring each new piece of flashing overlaps the one below it. Getting this right takes precision and an understanding of how water moves. It’s a detailed process, but it’s what separates a durable, long-lasting residential roof from one that will cause you headaches down the road. A professional installer knows how to custom-fit these pieces to create a seamless seal that protects your home for years.
How to Install Valley Flashing Correctly
A valley is formed where two sections of your roof meet, creating a channel. Because a large volume of water is directed into this area, it’s a prime spot for leaks. To protect it, you’ll install valley flashing. This is typically a wide strip of metal, often copper or galvanized steel, that is laid directly onto the underlayment along the entire length of the valley. Once the metal is in place, you’ll install the cedar shakes on either side, carefully cutting them at an angle to match the valley line. This creates an open channel that allows water and debris to flow freely down the roof without getting trapped.
Flashing Around Chimneys, Pipes, and Skylights
Anywhere something breaks the surface of your roof, you need to install flashing. For chimneys, this involves a multi-part system. You’ll use step flashing woven into the shake courses along the sides, a continuous piece of apron flashing at the bottom, and a small, tent-like structure called a cricket or saddle on the high side to divert water around the chimney. For pipes and vents, you’ll use a flashing boot that slides over the pipe and integrates with the surrounding shakes. The key is to always layer from the bottom up, so water flows over the seams instead of under them, a crucial step for any commercial roofing project as well.
Sizing Shakes Correctly for Flashing
Flashing isn’t a standalone solution; it needs the cedar shakes to be cut and placed perfectly to create a seamless barrier against water. This requires careful measurement and precise cuts to ensure the shakes lie flat and direct water over the flashing, not under it. For example, when installing step flashing along a wall or chimney, each shake in the course must be trimmed to fit snugly against the metal without leaving gaps or forcing the wood to lift. This meticulous work is what ensures a truly waterproof seal and is a hallmark of a professional roof installation. Getting these cuts wrong can create tiny channels for water to seep in, undermining the entire system and leading to leaks that are difficult to trace and repair.
Essential Weatherproofing Tips for a Watertight Seal
A cedar shake roof is designed to breathe. The shakes themselves, along with the felt paper interlayment, are meant to get wet and then dry out completely. This is why proper installation is so important for weatherproofing. The layers work together to shed the majority of water, while the system’s ability to dry prevents moisture from getting trapped and causing rot. To keep the shakes from curling or cupping over time, they need to dry evenly on both their top and bottom surfaces. This is achieved through correct spacing and proper ventilation, which allows air to circulate underneath the shakes, ensuring your roof performs beautifully for decades.
Common Installation Hurdles (and How to Clear Them)
Installing a cedar shake roof is a rewarding project, but it comes with its own unique set of challenges. Because cedar is a natural product, it requires special handling to ensure a beautiful, long-lasting result. Getting the details right, from letting the wood acclimate to our Pacific Northwest climate to mastering the spacing between each shake, is what separates a good roof from a great one. Knowing what to expect helps you prepare for a smooth installation process.
Dealing with Weather and Wood Acclimation
It’s tempting to start laying down cedar shakes the moment they arrive, but patience is key here. Cedar needs time to acclimate to the local humidity and temperature. Installing shakes immediately can lead to shrinking or warping later on, which compromises your roof’s integrity. Before installation, it’s best to open the bundles and stack the shakes with spacers in a covered, well-ventilated area. This allows air to circulate freely, helping the wood adjust properly. This simple step is one of the most important for preventing long-term damage and ensuring your roof performs as it should for years to come.
Nailing Your Joint Alignment and Spacing
Precision is everything when laying cedar shakes. Unlike uniform shingles, each shake is unique in size and shape. A common mistake is incorrect spacing; each shake needs a small gap (about 3/8 to 5/8 of an inch) to allow for natural expansion and contraction. Additionally, the joints between shakes must be offset from the row below by at least 1.5 inches. This staggered pattern is essential for properly shedding water. Skipping these critical details can shorten your roof’s lifespan, which is why a professional residential roofing installation is often the best path for ensuring every shake is perfectly placed.
How to Manage Moisture During Installation
A cedar roof is designed to breathe. The entire system, including the shakes and the felt interlayment, works in layers to shed water while allowing moisture to evaporate. If shakes are installed too tightly or without proper ventilation, they can’t dry evenly on both sides. This leads to “cupping,” where the edges of the shakes curl upwards, trapping water and accelerating decay. Ensuring there’s a proper air gap and that the underlayment is correctly installed allows the whole system to dry out after a rainstorm, protecting the wood and extending the life of your beautiful new roof.
Keeping Your New Cedar Shake Roof in Top Shape
A cedar shake roof is a beautiful investment, and with the right care, it can protect your home for decades. Because cedar is a natural wood product, it requires a bit more attention than materials like asphalt or metal. Think of it like maintaining a wood deck; a little proactive care goes a long way in preventing bigger issues down the road. By staying on top of a few key tasks, you can ensure your roof remains strong, healthy, and gorgeous. It all comes down to keeping it clean, dry, and well-inspected.
A Simple Checklist for Regular Inspections
The best way to extend your roof’s life is to catch small problems before they become major headaches. That’s why it’s so important to schedule regular roof inspections at least once a year, especially after a stormy season. When you or a professional from our residential roofing team take a look, you’ll want to check for shakes that are curling, splitting, or showing signs of decay. Also, keep an eye out for any moss or algae growth, as these can trap moisture against the wood. A quick check-in can save you from costly repairs and keep your roof in top condition.
How to Safely Clean Your Cedar Roof
One of the simplest yet most effective maintenance steps is to keep the roof free of debris. In the Pacific Northwest, that means clearing away fallen leaves, pine needles, and branches that can pile up and trap moisture. When water can’t drain properly, it creates the perfect environment for rot, mold, and mildew to develop, which can seriously compromise the integrity of your cedar shakes. A gentle sweep with a soft broom or a leaf blower on a low setting can do the trick. Making this a regular habit, particularly in the fall, helps your roof breathe and dry out as it should.
Applying Treatments to Extend Your Roof’s Life
To give your cedar roof an extra layer of defense, you can apply protective treatments. The main goal is to control moss, algae, and fungal growth, which thrive in our damp climate and can cause the wood to deteriorate over time. There are many products available, including stains with UV inhibitors and water repellents that help preserve the wood’s natural color and strength. It’s also great to know that cedar is a renewable resource, and using eco-friendly treatments keeps your home’s exterior in harmony with the environment. Applying these treatments correctly is key, so it’s often a job best left to the pros.
Cedar Shake Installation: Common Mistakes to Avoid
A cedar shake roof is a beautiful investment, but its longevity depends entirely on a flawless installation. Even the highest quality wood can fail if it’s not put on correctly. Getting the details right from the start is the best way to protect your home and ensure your roof performs beautifully for decades. Knowing what common errors to look for can help you feel confident in the process, whether you’re tackling a project yourself or hiring a professional.
Here are a few of the most critical installation mistakes that can compromise the integrity of a cedar shake roof and how to steer clear of them. Making sure these steps are handled correctly is essential for a durable, weather-tight, and long-lasting result.
Mistake #1: Incorrect Fastening and Spacing
How each shake is attached to the roof is incredibly important. Using the wrong fasteners or placing them incorrectly can cause the wood to split. Every shake needs to be secured with two corrosion-resistant nails or staples, placed just right so they don’t crush the wood fibers. Another common error is improper spacing. Cedar naturally expands and contracts with changes in humidity, so leaving a small gap (about 3/8 of an inch) between each shake is essential. This space gives the wood room to breathe and prevents it from buckling or warping over time, ensuring a stable and secure roof installation.
Mistake #2: Poor Storage and Handling of Shakes
You can’t just take cedar shakes from the supplier and nail them to your roof deck. Wood is a natural material that needs time to adjust to its new environment. Before installation, the bundles of shakes should be stored on-site and allowed to acclimate to your local climate. This simple step allows the wood’s moisture content to stabilize, which significantly reduces the chances of shrinking or swelling after the shakes are installed. Rushing this process can lead to warping and cracking down the line, so giving the materials a few days to settle in is a crucial part of proper preparation.
Mistake #3: Overlooking Ventilation and Moisture Control
A cedar roof is designed to get wet and dry out again. For this to happen effectively, it needs proper ventilation. Air must be able to flow underneath the shakes to dry them from both the top and bottom. Without adequate airflow, moisture gets trapped between the shakes and the underlayment. This trapped dampness is a primary cause of curling, cupping, and eventually, rot. Ensuring your residential roofing system has a well-designed ventilation plan is just as important as the shakes themselves, as it allows the entire structure to breathe and shed water efficiently.
Debunking Common Myths About Cedar Shake Roofs
Cedar shake roofs have a classic, rustic charm that’s hard to beat. But over the years, they’ve also collected a few rumors that can make homeowners hesitate. You’ve probably heard some of them: that they’re a ton of work, don’t last long, or pose safety risks. It’s time to set the record straight.
Many of these concerns are based on outdated information or misunderstandings about how modern cedar roofs are installed and cared for. With the right materials and professional installation, a cedar shake roof is a durable, safe, and stunning choice for your home. Let’s walk through some of the most common myths and separate the facts from the fiction.
Myth vs. Fact: Cedar Roof Maintenance and Durability
One of the biggest misconceptions is that cedar roofs are fragile and rot easily. While it’s true that wood is a natural material, cedar contains oils that make it inherently resistant to decay and insects. When you combine that with a professional installation that ensures proper ventilation and drainage, a cedar roof can easily last 30 to 40 years, sometimes even longer.
As for maintenance, it’s not as demanding as you might think. The key is simple, regular upkeep, like keeping the roof clear of leaves and debris that can trap moisture. An annual inspection can catch any small issues before they become big problems. With the right care, a cedar roof is a long-term investment, not a constant headache.
Myth vs. Fact: Fire Safety and Pest Resistance
The idea that cedar roofs are a fire hazard is another outdated myth. Today, all cedar shakes and shingles can be treated with fire retardants to meet strict safety standards and local building codes. These treatments don’t take away from the wood’s natural beauty but provide an essential layer of protection for your home and peace of mind for your family.
What about pests? While any wood can attract insects, cedar’s natural oils are a powerful deterrent for termites, ants, and other critters. A well-maintained roof that is kept clean and free of moisture is not an attractive home for pests. Regular inspections, which are part of any good roofing maintenance plan, will ensure your roof remains beautiful and pest-free for decades.
Potential Downsides and Risks to Consider
Choosing a cedar shake roof is an exciting decision, but it’s smart to go in with a full picture of what ownership entails. While these roofs are incredibly durable and beautiful, they do come with a few considerations that are different from standard asphalt shingles. Understanding these potential downsides ahead of time helps you prepare and ensures you can enjoy your roof without any surprises. The two main areas to think about are how a wood roof might affect your homeowners insurance and what’s involved in its long-term care. These aren’t deal-breakers by any means, but they are important factors in making an informed choice and protecting your investment for the long haul.
How a Wood Roof Can Affect Homeowners Insurance
It’s true that some insurance providers have historically been wary of wood roofs, primarily due to outdated concerns about fire risk. However, the industry has come a long way. Modern cedar shakes can be pressure-treated with fire retardants to meet stringent safety codes, making them a much safer option than their untreated predecessors. The key is to be proactive. Before you commit to an installation, have a conversation with your insurance agent. They can tell you about any specific requirements they have, such as proof of treatment or professional installation, and explain how it might impact your policy. A well-documented, code-compliant installation often makes all the difference in securing favorable coverage.
Preventing Curling and Splitting with Proper Maintenance
Because cedar is a natural wood, it responds to its environment. The most common issues, like curling or splitting, are almost always related to moisture. If shakes can’t dry out evenly on all sides after a rainstorm, they can begin to warp. This is why professional installation is so critical; a properly installed roof has a ventilation system built in that allows air to circulate under the shakes. The key to preventing issues long-term is simple, regular upkeep. Keeping the roof clear of leaves and debris that trap moisture is essential. An annual inspection from a residential roofing expert can also catch any minor issues before they develop into bigger problems, ensuring your roof stays flat, strong, and beautiful.
DIY vs. Hiring a Pro: Which Is Right for You?
Deciding between a DIY installation and hiring a professional is a major choice. While tackling the project yourself can feel empowering, roofing is a complex job where small mistakes can have big consequences. It’s important to weigh the appeal of saving money against the expertise and efficiency that a professional team brings to the table. Your home’s roof is its primary line of defense, so this decision directly impacts its safety and longevity. Let’s break down the key factors to help you figure out the best path forward for your cedar shake roof project.
Weighing the Cost and Time Commitment
The idea of installing your own cedar shake roof can be tempting, especially when you think about the potential savings. But it’s important to look at the bigger picture. A DIY project might save you money on labor upfront, but even small installation mistakes can lead to costly, long-term damage like leaks and rot, ultimately shortening your roof’s lifespan. You also have to consider the time commitment. A professional crew can often complete a roof in a few days, while a DIY installation can stretch over weeks or even months of your free time. Before you decide, it’s a good idea to estimate the cost of a professional job to see how it fits into your budget.
Breaking Down Material Costs
Let’s talk numbers. The materials for a cedar shake roof are a significant investment, and the price can vary quite a bit. For an average 3,000-square-foot roof, you can expect the total cost to fall somewhere between $18,000 and $25,000. This range reflects differences in the grade of the wood you choose. Higher-quality, premium-grade shakes will be at the top end of that scale, but they offer superior durability and are less likely to curl or split over time. While it’s tempting to go for a lower upfront cost, investing in better materials often means a longer lifespan for your roof and fewer repairs down the road. A professional quote will always break down these options for you, helping you balance your budget with long-term value.
Understanding Labor Timelines and Debris Removal
Beyond the materials, labor is the other major factor in your total cost, typically running around $5 per square foot. This is where hiring a professional team really pays off. An experienced crew not only has the specialized tools and safety equipment but also the expertise to work efficiently, often completing a full installation in just a few days. They also handle the entire cleanup process, from tearing off the old roofing to hauling away all the debris, leaving your property spotless. This is a huge part of the job that’s easy to overlook. A professional residential roofing service manages the project from start to finish, saving you from weeks of work and the headache of waste disposal.
When It’s Time to Call a Professional
If you’re not an experienced roofer, calling a professional is almost always the best choice. This is especially true in the Puget Sound region, where our weather can be tough on any roof. A pro can ensure your cedar roof is installed to withstand the elements. They have the right tools, know the correct nailing patterns, and won’t skip critical steps like the starter course, which is a common DIY error that causes leaks. Hiring an expert provides peace of mind, knowing the job is done correctly and your home is protected. For a durable and beautiful roof that lasts for decades, consider our residential roofing services to get it right the first time.
Related Articles
- Cedar Shake Roof: 9 Things You Need to Know – Landmark Roofing & Siding
- The Pros and Cons of Cedar Shake Roof Shingles – Landmark Roofing & Siding
- Cedar Shake Siding: Pros, Cons, and Costs – Landmark Roofing & Siding
Frequently Asked Questions
How long can I realistically expect a cedar shake roof to last in the Puget Sound area? With our damp climate, proper installation is everything. A well-installed cedar shake roof that includes the right ventilation system can easily last 30 to 40 years. The key is allowing the wood to breathe and dry out completely after it rains. When the shakes can dry properly, they maintain their strength and resistance to decay for decades, making them a fantastic long-term investment for any home in our region.
Is all the maintenance really necessary, or can I just let it be? Think of it less as a chore and more as simple, proactive care. The most important thing you can do is keep the roof clear of leaves, pine needles, and other debris. This prevents moisture from getting trapped against the wood, which is the primary cause of rot. A quick annual inspection and keeping the surface clean will protect your investment and prevent small issues from turning into costly repairs.
I’m worried about fire safety. Are treated shakes truly safe? This is a very common and understandable concern, but the idea of cedar roofs being a fire hazard is outdated. Today, cedar shakes are treated with fire retardants that allow them to meet strict national safety standards. These treatments provide excellent protection without compromising the wood’s natural beauty, giving you peace of mind that your home is safe.
What is the single most important factor for a successful cedar roof installation? If I had to pick just one thing, it would be ensuring the roof can breathe. This is achieved through two critical steps: leaving a small gap between each shake and installing a ventilation matrix underneath them. This combination allows air to circulate freely, helping the wood dry evenly on all sides. Proper airflow is the secret to preventing the shakes from curling or rotting prematurely.
Can I install cedar shakes over my old asphalt shingles to save money? I strongly advise against this. For a cedar roof to last, it needs a solid, clean foundation and a specific system of underlayments for ventilation and water protection. Installing over old shingles prevents a proper inspection of the roof deck for damage and makes it impossible to install these crucial layers correctly. A complete tear-off is the only way to ensure your new roof performs as it should.