Date
Wed Feb 25Getting a roof replacement is a big deal, and what you don’t know can hurt you. It’s easy to fall for common myths or make simple oversites that lead to costly mistakes—like choosing the wrong materials or hiring an unqualified contractor. A new roof should be a long-term solution, not your next big problem. This guide will help you sidestep those common pitfalls. We’ll bust the biggest roofing myths, point out the red flags of a bad contractor, and show you why cutting corners is a gamble you can’t afford to lose. Let’s get it done right.
Key Takeaways
- Look for warning signs early: You can prevent expensive, emergency repairs by knowing what to look for. Check for curling shingles, granules in your gutters, and any water stains in your attic to catch problems before they escalate.
- Choose materials for the long run: Your new roof should handle the Pacific Northwest climate and fit your budget. Consider the long-term durability and maintenance needs of materials like composition shingles or metal to find the best fit for your home.
- Vet your contractor carefully: The quality of the installation is just as important as the materials you choose. Protect your investment by hiring a licensed, insured, and reputable professional who provides a clear written estimate and a solid workmanship warranty.
7 Signs You Need a Roof Replacement
Your roof is one of those things you probably don’t think about until there’s a problem. But waiting for a leak to appear in your living room can lead to bigger, more expensive issues down the road, like water damage and mold. A proactive approach is always better for your home and your wallet. Knowing what to look for can help you decide if it’s time for a simple repair or a full replacement. It’s not always a dramatic event like a tree falling on your house; often, a roof will give you subtle clues that it’s nearing the end of its life. By paying attention to its age, checking for visible damage on the outside, and looking for subtle signs inside your home, you can catch problems early and plan your next steps without the stress of an emergency. A roof is a complex system, and understanding its condition is the first step toward protecting your investment. This guide will help you become a more informed homeowner, ready to spot the warning signs before they become major headaches. Let’s walk through the key signs that your roof might need some professional attention, so you can feel confident in your decision-making process. We’ll cover everything from the simple age test to the more detailed checks you can do from your yard and inside your attic.
Check Your Roof’s Age and Lifespan
First things first, age is more than just a number when it comes to your roof. If you know when your roof was installed, you have a great starting point for figuring out its remaining lifespan. A typical asphalt shingle roof, which is very common in the Pacific Northwest, generally lasts about 20 to 25 years. Other materials have different lifespans; a well-maintained metal or cedar shake roof can last much longer. If you’re not sure how old your roof is, check the home inspection report from when you bought your house. If your roof is getting close to that 20-year mark, it’s a good idea to start budgeting for a replacement and schedule a professional inspection, even if it looks fine from the ground. This helps you plan ahead for your next residential roofing project.
Inspecting Your Roof from the Ground
You don’t need to be a roofing expert to spot some of the most common signs of wear and tear. Take a walk around your property and look up at your roof from different angles. Are the edges of your shingles starting to curl up, or are they cupping in the middle? Both are signs that they’re past their prime and losing their ability to keep water out. Another big clue is finding shingle granules, which look like coarse black sand, in your gutters. These granules protect the shingle from sun damage, so when they start to fall off, your roof becomes more vulnerable. Of course, any obviously cracked, damaged, or missing shingles are clear red flags that your roof needs immediate attention. You can learn more about the basics of roof replacement to understand what these signs mean for your home.
Finding Leaks and Damage in Your Attic
Some of the most telling signs of roof failure are found inside your home, particularly in the attic. One of the biggest myths about roof replacement is that you only need a new one if you see an active leak. In reality, damage often starts long before water drips from your ceiling. On a sunny day, head up to your attic and turn off the lights. Can you see any slivers of daylight coming through the roof boards? That’s a clear sign of a problem. Also, look for dark streaks or water stains on the underside of the roof decking or on your ceiling. Damp or sagging insulation is another indicator of a slow leak. Catching these issues early can prevent serious water damage, mold growth, and costly structural repairs down the road.
Repair or Replace? Key Factors to Consider
Once you’ve identified a problem with your roof, the next big question is whether you need a targeted repair or a full replacement. A few missing shingles after a storm might just call for a simple fix, but widespread issues often point toward a larger project. The decision usually comes down to balancing the extent of the damage with the age of your roof and your budget. While a repair might seem like the cheaper option upfront, it can sometimes be like putting a bandage on a much bigger problem. A full replacement, on the other hand, is a significant investment, but it provides long-term security and peace of mind. Thinking through a few key guidelines can help you make a confident choice that protects your home for years to come.
The 25% Rule: Assessing Widespread Damage
A helpful guideline many roofing professionals use is the “25% Rule.” This rule of thumb suggests that if more than a quarter of your roof is damaged, a full replacement is usually the smarter path forward. While patching a large section might seem cost-effective, it can lead to a checkerboard of old and new shingles that wear at different rates, creating weak points for future leaks. Some states have even written this into their building codes, requiring a full replacement if repairs exceed 25% of the roof area. While not a strict law here in Washington, it’s a solid principle for assessing whether a repair is just a temporary fix or a lasting solution. A professional inspection can determine the true extent of the damage and help you evaluate if you’re approaching that 25% threshold.
The 30% Rule: Comparing Costs
Beyond the physical damage, you should also consider the financial side of the equation. This is where a cost-based guideline, sometimes called the “30% Rule,” comes in handy. If the estimated cost of your repairs is 30% or more of the total cost of a new roof, investing in a full replacement often makes more financial sense. Pouring a significant amount of money into an aging roof can be a losing battle, as you may find yourself paying for more repairs just a few years later. A new roofing system comes with a fresh start and a new warranty, which is a much better value in the long run. To get a clearer picture of what a replacement might cost, you can use tools like a roofing calculator to weigh your options and make an informed decision.
A Guide to Popular Roofing Materials
Choosing the right material for your new roof is one of the biggest decisions you’ll make in this process. It’s about more than just looks; your choice impacts everything from your home’s curb appeal and energy efficiency to your budget and future maintenance tasks. With so many options on the market, it’s easy to feel a bit lost. But don’t worry, we’re here to walk you through the most popular choices for homes here in the Pacific Northwest, where our roofs have to work extra hard against the elements.
Think of this as finding the perfect coat for your house. You want something that looks great, fits your style, and can stand up to years of wind and rain. Each material has its own unique set of strengths. Some are champions of longevity, while others offer unbeatable value. Your neighborhood’s aesthetic, your home’s architectural style, and even your long-term plans for the property all play a role. We’ll cover the pros and cons of the main contenders: asphalt shingles, metal, cedar shake, and advanced composite materials. Understanding these basics will help you have a more productive conversation with your contractor and feel confident in your final decision.
Asphalt Shingles: The Affordable Standard
Asphalt shingles, also known as composition shingles, are the most common roofing material you’ll see on homes, and for good reason. They offer a fantastic balance of performance, affordability, and style. Available in a huge range of colors, they can complement almost any home exterior. While they sometimes have a flatter appearance compared to other materials, modern architectural shingles can create a more dimensional look. A professionally installed asphalt shingle roof typically lasts between 20 and 25 years, making it a reliable and cost-effective choice for many homeowners. They are a staple of residential roofing projects across the Puget Sound.
Lifespan: 15-30 Years
When it comes to long-term value, it helps to know what to expect from your investment. The lifespan of asphalt shingles typically falls between 15 and 30 years, but this range depends on the specific type you choose. Standard 3-tab shingles generally last 15 to 20 years, while the more durable architectural shingles can last 25 to 30 years. This is the standard range you’ll see from top manufacturers like Owens Corning. Based on our experience here in the Pacific Northwest, a professionally installed asphalt shingle roof lasts about 20 to 25 years. Keep in mind that factors like installation quality, regular maintenance, and our unique weather patterns all play a part. Knowing these timelines allows you to plan ahead and make a confident choice for your home and budget.
Metal Roofing: Sleek and Long-Lasting
If longevity and durability are at the top of your list, metal roofing is an excellent option to consider. Made from materials like steel or aluminum, metal roofs are incredibly strong, fire-resistant, and built to last for decades, often 50 years or more. While the initial investment is higher than for asphalt shingles, their extended lifespan can make them more economical over the long run. Metal roofing also performs exceptionally well in our wet climate, efficiently shedding rain and preventing moss growth. Plus, with sleek standing-seam profiles and various color options, it offers a clean, modern aesthetic that is growing in popularity for both homes and commercial properties.
Cedar Shakes: Classic Charm and Durability
For a classic, natural look that feels right at home in the Pacific Northwest, nothing beats cedar shake. This material offers a beautiful, rustic charm with rich textures and tones that age gracefully over time. Cedar is a premium material, so it comes with a higher price tag and requires more maintenance to protect it from moisture and moss. It’s also important to consider that natural wood may not be the best choice in areas with a higher risk of wildfires. However, for homeowners who love its timeless aesthetic and are prepared for the upkeep, a cedar shake roof is a stunning investment that adds significant character to a home.
Composite Shingles: Modern and Low-Maintenance
Want the high-end look of slate or cedar without the associated cost and maintenance? Composite and synthetic roofing materials are the answer. Brands like DaVinci Roofscapes and EcoStar create products that beautifully mimic the appearance of natural materials but are made from durable, resilient synthetic blends. These options are lighter than real slate, less prone to cracking or damage, and often come with excellent warranties. They give you the best of both worlds: premium curb appeal and modern performance. If you’re curious about how these materials compare in price, using a roofing cost calculator can give you a helpful starting estimate.
Lifespan of Other Materials: Tile and Slate
If you’re looking for a roof that could genuinely last a lifetime, tile and slate are in a class of their own. These premium materials are known for their incredible durability, with many installations lasting for more than 100 years. When you compare that to the typical 20 to 25-year lifespan of asphalt shingles, the long-term value becomes clear. While the upfront cost is significantly higher, this choice is a true investment in your home’s future. You’re not just buying a roof; you’re getting a permanent solution that offers unmatched resilience and a timeless, elegant aesthetic.
How Much Does a Roof Replacement Cost?
A new roof is one of the most significant investments you’ll make in your home, so it’s smart to understand where your money is going. The total price tag isn’t just a single number; it’s a combination of materials, labor, and a few other key factors that all play a role in protecting your home for decades to come. Knowing how these elements contribute to the final cost helps you budget effectively and choose the best options for your property without feeling overwhelmed.
The primary drivers of your roof replacement cost are the size and complexity of your roof, the materials you select, and the labor required for a safe and professional installation. A steep, multi-gabled roof will naturally cost more to replace than a simple, low-slope roof on a one-story home. A trustworthy contractor will always provide a detailed, itemized estimate that clearly explains every charge, so you can see exactly what you’re paying for before any work begins. This transparency is key to feeling confident in your investment and avoiding any surprises along the way.
National Averages for Roof Replacement
While every project is unique, looking at national averages can give you a solid starting point for budgeting. Generally, a full roof replacement can cost anywhere from $9,500 to $15,000 for a typical home. The material you choose is the biggest factor in that price range. For instance, architectural asphalt shingles, a popular and durable option, usually fall between $9,000 and $15,000. If you opt for a long-lasting metal roof, you can expect the cost to be higher, typically from $14,000 to $30,000. Of course, premium materials like slate or tile will be at the top end of the scale. These figures are just a guide, but they help illustrate how your material choice impacts the overall investment. You can learn more about the basics of roof replacement to see how these costs break down further.
Comparing Repair vs. Replacement Costs
Deciding between a repair and a full replacement often comes down to a simple cost-benefit analysis. A minor repair is much less expensive upfront, typically costing between $400 and $1,800. However, if your roof is older or has widespread issues, a repair might just be a temporary fix. A helpful guideline is the 30% rule: if the cost of the repair is more than 30% of the cost of a new roof, replacement is usually the smarter financial move. Think about the age of your roof, too. Spending money to patch up a 20-year-old shingle roof that’s already near the end of its lifespan might not be the best use of your funds. Investing in a full replacement provides a long-term solution and the peace of mind that comes with a new warranty, protecting your entire residential roofing system.
How Materials Impact Your Total Cost
The materials you choose will have the biggest impact on your budget. There’s a wide range of options, each with its own price point and benefits. For example, asphalt shingles are a popular and cost-effective choice, with prices typically ranging from $9,000 to $20,000 for a full replacement, depending on the warranty and style. If you’re looking for something with a longer lifespan, a metal roof might cost between $14,000 and $28,000. For a premium, classic look, materials like natural slate can range from $25,000 to $50,000. To get a better idea of what to expect for your specific home, you can use a roofing cost calculator for a preliminary estimate.
Cost of 3-Tab vs. Architectural Shingles
When you’re looking at asphalt shingles, you’ll quickly find there are two main players: the traditional 3-tab shingle and the more modern architectural shingle. A 3-tab shingle is cut to look like three separate pieces, creating a flat, uniform pattern. It’s a classic, budget-friendly option that gets the job done. Architectural shingles, on the other hand, are thicker and laminated, with layers of material that create a varied, dimensional appearance. This gives your roof a high-end look that can mimic more expensive materials like cedar shake. While both are great options for residential roofing, the difference in construction directly impacts their cost, durability, and curb appeal.
So, what does that mean for your wallet? According to sources like The Spruce, a roof with 3-tab shingles might cost between $6,000 and $13,000. In contrast, architectural shingles typically fall in the $9,000 to $15,000 range. While you’ll pay more upfront for architectural shingles, that extra investment buys you more than just good looks. Their durable, multi-layered design often means a longer lifespan and better resistance to wind and weather. For many homeowners, the enhanced curb appeal and added durability make architectural shingles a worthwhile upgrade that provides better long-term value.
Budgeting for Labor and Installation
Roofing is a demanding and technical job that requires a skilled team to ensure it’s done correctly and safely. Labor costs cover more than just the physical work; they include the crew’s expertise, training, insurance, and the proper equipment to protect both your home and the workers. A professional installation is essential for the longevity of your roof and the validity of your material warranties. While a typical residential roofing project might take a few days, the peace of mind that comes from knowing it was installed by experienced professionals is invaluable. Cutting corners on labor can lead to costly leaks and repairs down the road.
Planning for Permits and Other Potential Costs
Beyond materials and labor, there are a few other costs to keep in mind. Most municipalities require a permit for a roof replacement, and a professional contractor will handle the entire application process for you. It’s also wise to set aside a small contingency fund for unexpected issues. Once the old roofing is removed, the crew might find rotted decking or damaged flashing that needs to be repaired before the new roof can be installed. A good contractor will discuss these possibilities with you upfront and keep you informed every step of the way, ensuring there are no major surprises on your final bill.
Understanding Tear-Off and Disposal Fees
Before your new roof can go on, the old one has to come off. This process, known as the tear-off, is a critical part of any professional roof replacement. It involves stripping away all the old shingles and underlayment right down to the roof deck. This step is essential because it allows the installation crew to thoroughly inspect the decking for any hidden issues like rot or water damage that need to be addressed. The tear-off generates a significant amount of waste, and the disposal fee covers the cost of hauling away and properly disposing of all that old material. A reputable contractor will always include these fees in their itemized estimate, ensuring you understand all the potential costs associated with giving your new roof a clean, solid foundation.
How to Find a Trustworthy Roofing Contractor
Choosing the right contractor is just as important as selecting the right shingles. This is the team you’re trusting to protect your home, so it’s worth taking the time to find a true professional. A great roofing partner will guide you through the entire process, from material selection to the final cleanup, ensuring your investment is sound and your home is secure for years to come.
What Makes a Great Roofing Contractor?
First things first, any contractor you consider should be licensed, bonded, and insured in Washington. This is non-negotiable and protects you from liability. Look for a company with a long-standing local presence and deep roots in the Puget Sound area. They’ll understand the specific challenges our climate presents and have a reputation to uphold. Check for a portfolio of completed projects and read online reviews to see what past customers have to say. A reliable contractor will be proud to share their work and references. They should also be knowledgeable guides, helping you choose materials that fit your home’s needs and your long-term goals for your residential roofing project.
Questions You Should Always Ask a Roofer
Before you sign a contract, it’s essential to ask a few key questions to make sure you’re hiring the right team. Start with the basics: “Are you licensed, bonded, and insured?” and “Can you provide a detailed, written estimate?” A clear, itemized quote helps you understand exactly what you’re paying for and can prevent surprise costs later. You can even use a roofing cost calculator beforehand to get a general idea. Also, ask about their process: “Who will be the project manager on-site?” and “What is the estimated timeline?” Finally, inquire about their guarantees by asking, “What kind of warranty do you offer on your workmanship?” The answers will reveal a lot about their professionalism and commitment to quality.
Do You Recycle Old Shingles?
This might seem like a small detail, but asking a contractor about their recycling policy for old shingles speaks volumes about their professionalism. A responsible roofer won’t just dump the old materials in a landfill. Instead, they’ll partner with facilities that recycle asphalt shingles, turning them into valuable material for paving roads and other projects. This practice not only keeps tons of waste out of our landfills but also conserves natural resources and reduces pollution. When a company takes the extra step to recycle, it shows they care about their environmental impact and are committed to responsible business practices. It’s a green flag that indicates you’re working with a forward-thinking and conscientious team.
Red Flags to Watch for When Hiring
Just as there are signs of a great contractor, there are red flags to watch out for. Be wary of anyone who uses high-pressure sales tactics or demands a large cash deposit upfront. A professional will provide a clear contract without rushing you. Another warning sign is an unusually low bid. While it might seem tempting, it often points to subpar materials, unskilled labor, or a lack of proper insurance. If a contractor gives you a quote without performing a thorough inspection or dismisses your concerns about potential damage, consider it a major red flag. A trustworthy professional will always take the time to listen and assess the situation properly before making recommendations.
How to Choose the Right Roofing Material
Picking a new roofing material is about more than just curb appeal. The right material protects your home from the elements, contributes to its energy efficiency, and fits your budget and maintenance preferences. Think of it as choosing the perfect coat for your house, one that needs to stand up to years of Pacific Northwest weather. To make the best choice, you’ll want to consider how different materials perform in our specific climate, how they affect your energy bills, and what kind of upkeep they’ll require down the road.
Matching Your Roof to Your Local Climate
Here in the Pacific Northwest, our roofs face a lot of rain, persistent dampness, and moss. That means your number one priority should be choosing a material that can handle moisture without breaking down. Materials like composition shingles are a popular and effective choice because they are durable and water-resistant. Metal roofing is another excellent option, as it sheds water effortlessly and isn’t susceptible to moss or rot. While traditional cedar shake offers a classic Northwest look, it requires specific treatments and regular maintenance to prevent moisture damage. When exploring your residential roofing options, always ask how a material holds up to our region’s unique, wet conditions.
Can a New Roof Lower Your Energy Bills?
Your roof plays a surprisingly large role in your home’s energy consumption. A well-insulated roofing system keeps your home warmer in the winter and cooler in the summer, which means your HVAC system doesn’t have to work as hard. Some materials are inherently better insulators than others. For example, modern composite materials are designed with energy efficiency in mind. Even the color of your roof can make a difference. Lighter-colored shingles reflect more sunlight, which can help keep your home cooler. As you weigh your options, consider the long-term energy savings, not just the initial price tag. Using a roofing cost calculator can help you understand the initial investment.
Weighing Durability, Maintenance, and Style
Every roofing material comes with a different balance of cost, lifespan, and required upkeep. It’s important to find the sweet spot that works for your lifestyle and budget. For instance, asphalt shingles are one of the most affordable options upfront but have a shorter lifespan than other materials. Metal roofing costs more initially but can last for 50 years or more with very little maintenance. Synthetic options, like DaVinci Roofscapes, can mimic the look of slate or cedar but offer superior durability and require minimal care. Think about how much time and money you’re willing to spend on maintenance over the next few decades to choose a material you’ll be happy with for years to come.
The Roof Replacement Process Step-by-Step
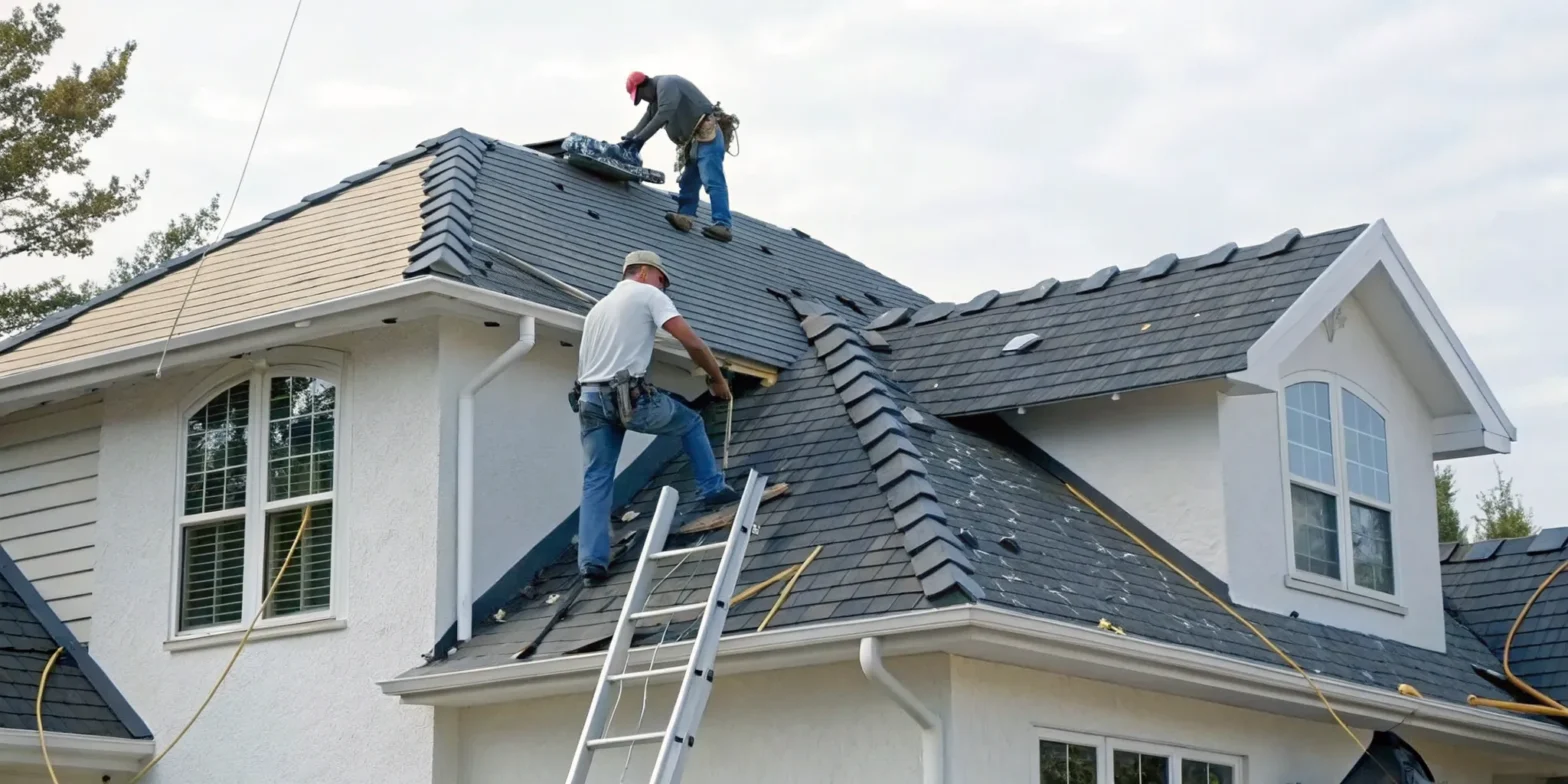
A full roof replacement is a major project, but it doesn’t have to be a mystery. Understanding the key stages can make the entire experience feel much more manageable and give you a real appreciation for the work involved. A professional crew follows a precise, step-by-step plan to ensure your new roof is installed correctly, safely, and efficiently. From the initial tear-off to the final nail, every phase is designed to build a durable, weather-tight system that protects your home for decades. Knowing what to expect each day helps you ask the right questions and feel confident that your investment is in good hands. While the team handles all the heavy lifting, being familiar with the process empowers you as a homeowner. Let’s walk through the seven main steps of a typical residential roofing project, so you know exactly what’s happening on your property from start to finish.
Step 1: Tearing Off Old Materials
The first major step is removing the old roof. The crew will carefully tear off all the old shingles, underlayment, and flashing, taking the roof down to its underlying wood structure, known as the deck or sheathing. This is often the loudest and messiest part of the job, but it’s a crucial first move. A professional team will take great care to protect your home and landscaping during this process, using tarps to cover siding, windows, and garden beds to catch falling debris. Removing all the old layers is essential because it allows for a thorough inspection of the deck, ensuring the new roof is built on a solid foundation.
Step 2: Deck Inspection and Repair
Once the old roof is gone, the crew performs a critical inspection of the exposed roof deck. They will look for any signs of water damage, such as soft spots, rot, or delaminated plywood. You can’t build a strong roof on a weak foundation, so any compromised wood must be repaired or replaced before the project can continue. This step is vital for the long-term health of your new roof. A trustworthy contractor will always communicate their findings with you and explain any necessary repairs, ensuring you understand why this work is needed to guarantee a secure and lasting installation.
Step 3: Installing Protective Layers
With a solid, clean deck ready to go, the next step is to install the protective layers that will sit beneath your shingles. This begins with a water-resistant underlayment, often a synthetic material or asphalt-saturated felt, which is rolled out over the entire roof deck. This layer acts as a secondary barrier against moisture. In critical areas like the eaves, valleys, and around skylights, an additional self-adhering ice and water shield is often installed. This provides extra protection against ice dams and wind-driven rain, which is especially important in the wet Puget Sound climate.
Step 4: Adding Drip Edge and Flashing
This is where the detail work really begins. The crew will install a metal drip edge along all the edges of the roof. This small but mighty component helps direct water away from the fascia and into the gutters, preventing water from seeping back under the shingles. Next, they install new flashing, which are pieces of metal used to seal the areas where the roof meets a wall, chimney, or vent pipe. According to The Spruce, proper flashing is one of the most critical aspects of a roof replacement, as these are the spots most vulnerable to leaks.
Step 5: Laying the New Shingles
Now for the part you’ve been waiting for—installing the new roofing material. The crew starts at the bottom edge of the roof and works their way up toward the peak, or ridge. Each course, or row, of shingles is carefully overlapped and nailed down according to the manufacturer’s specifications. This precise layering is what creates a watertight surface that effectively sheds rain. Whether you’ve chosen durable composition shingles, a sleek metal system, or another material, this is when your new roof really starts to take shape and your home’s curb appeal gets a major update.
Step 6: Installing Ridge Vents and Finishing Touches
After the main field of the roof is shingled, the crew moves to the peak. They will install a ridge cap, which are specially designed shingles that cover the top ridge of the roof for a finished look. This is also where the primary ventilation system is often installed. A ridge vent allows warm, moist air to escape from your attic, which is essential for preventing moisture buildup and regulating your home’s temperature year-round. Proper ventilation helps extend the life of your roof and can even contribute to lower energy bills by reducing the strain on your HVAC system.
Step 7: Final Cleanup and Inspection
Once the installation is complete, the job isn’t finished until your property is spotless. The crew will conduct a thorough cleanup of the entire work area, removing all debris, leftover materials, and trash. As Owens Corning explains, a key part of this process involves using large, rolling magnets to sweep your lawn, driveway, and garden beds for any stray nails. Finally, the project manager will perform a final walkthrough and inspection to ensure every detail meets the highest quality standards, leaving you with a beautiful new roof and a clean, safe property.
How to Prepare for Your Roof Replacement Project
Once you’ve selected your materials and hired a contractor, the next step is preparing for the installation. A roof replacement is a major construction project, but knowing what to expect can make the entire process feel much smoother. From handling the necessary paperwork to protecting your garden, a little preparation goes a long way.
A professional team will guide you through every step, but it’s always helpful to understand the key phases of the project. This includes navigating local regulations, safeguarding your property from debris, and getting a clear picture of the project timeline. Let’s walk through what you need to know before the crew arrives, so you can feel confident and ready for your home’s transformation.
Do You Need a Permit for Your New Roof?
It’s a common myth that you don’t need a permit for a roof replacement, but that’s rarely the case. Most municipalities, including those in the Puget Sound area, require permits to ensure the work meets local building codes. These codes are in place for your safety, guaranteeing that the installation is structurally sound and uses appropriate materials for our climate.
The good news is that you shouldn’t have to handle this yourself. A reputable, licensed contractor will manage the entire permitting process for you. They know exactly what paperwork is needed and will coordinate any required inspections. This not only saves you a major headache but also provides peace of mind that your new residential roof is fully compliant and built to last.
How to Protect Your Property During Installation
A roof replacement can be a messy job. The process involves tearing off old materials, which creates a lot of debris. Professional roofing crews understand this and will take specific steps to protect your property. They typically lay down large tarps over your landscaping, driveway, and siding to catch falling nails and shingles. This simple step is crucial for preventing damage to your plants, windows, and other exterior features.
Before the work begins, it’s a good idea to move any personal items away from your home’s perimeter. This includes patio furniture, grills, potted plants, and vehicles. Clearing the area gives the crew more space to work safely and efficiently. At the end of the project, a thorough cleanup, often involving magnetic rollers to pick up stray nails, should leave your yard looking just as it did before.
What to Expect: Timeline and Weather
For an average-sized home, a full roof replacement usually takes about three to four days from start to finish. However, this timeline can vary depending on several factors, including the size and complexity of your roof, the materials being installed, and of course, the weather. Your contractor should provide you with a clear and realistic schedule before work begins.
Here in the Pacific Northwest, weather is always a key consideration. The ideal time for a roof replacement is during drier periods, typically from late spring to early fall. Professional roofers are experts at watching the forecast and will only proceed when conditions are safe. They will never leave your roof exposed to the elements overnight, ensuring your home stays protected throughout the entire installation process.
Before the Project Begins
It’s a common myth that you don’t need a permit for a roof replacement, but that’s rarely the case. Most municipalities require permits to ensure the work meets local building codes, which are in place for your safety. The good news is that a reputable, licensed contractor will manage the entire permitting process for you, from filing the paperwork to coordinating inspections. Before the crew arrives, take some time to prepare your property. Move any vehicles out of the driveway and clear your yard of patio furniture, grills, and potted plants. This gives the team a safe, clear workspace and protects your belongings from dust and debris. Taking these simple steps helps ensure your new residential roof installation goes as smoothly as possible.
During the Installation
A roof replacement can be a messy job, but a professional crew will take specific steps to protect your property. They’ll use tarps to cover your siding, windows, and landscaping to shield them from falling debris. For an average-sized home, a full replacement usually takes about three to four days, but this timeline can vary based on your roof’s size, complexity, and the weather. You can expect a fair amount of noise during the tear-off and installation phases, so it might be a good time to plan activities away from home if you’re sensitive to sound. Your contractor will keep you updated on their progress and will never leave your roof exposed to the elements overnight, ensuring your home remains secure throughout the project.
After Your New Roof is Installed
Once the last shingle is in place, the job isn’t quite finished. The final, crucial step is a thorough cleanup. A professional crew will clear all project-related debris from your property, including your gutters. They will often use magnetic rollers to sweep your yard for any stray nails, leaving the area just as they found it. After the cleanup, your contractor will perform a final walkthrough with you to ensure you’re completely satisfied with the work. They will also provide you with all the necessary paperwork, including your workmanship and material warranties. This final inspection is your opportunity to ask any remaining questions and admire your beautiful, secure new roof with complete peace of mind.
Understanding Roof Warranties and Financing
A new roof is one of the most important investments you’ll make in your home, so it’s wise to know how to protect it. After you’ve chosen the right materials and a trusted contractor, the final step is to secure your financial safety net. This involves understanding your warranty, exploring payment options, and knowing your insurance coverage. Think of it as the crucial final piece of the puzzle that ensures your home and your peace of mind are protected for years to come. A solid warranty acts as a promise that the materials and the installation will perform as expected. Financing makes the project affordable without draining your savings, and understanding your insurance policy prepares you for unexpected events. Getting these details right from the start prevents future headaches and ensures you get the full value out of your new roof. A great contractor won’t just install your roof; they’ll help you make sense of the paperwork and options, ensuring you feel confident and secure in your decision. Taking the time to sort through these financial details is just as important as picking out the perfect shingle color.
Manufacturer vs. Workmanship Warranties
When you get a new roof, you’ll typically encounter two types of warranties. First is the manufacturer’s warranty, which covers the physical materials themselves. If the shingles or tiles have a defect that causes them to fail prematurely, this warranty has you covered. It’s important to know that many manufacturers require the roof to be installed by a certified contractor for the warranty to be valid.
The second type is the workmanship warranty, which comes directly from your contractor. This warranty covers the installation itself. It protects you from issues like leaks or other problems caused by installation errors. A reputable contractor will always stand by their work with a solid workmanship warranty, ensuring your residential roofing project is completed to the highest standard. Always get both warranties in writing before work begins.
How Can You Pay for a New Roof?
Let’s be honest, a full roof replacement is a significant expense. The good news is you don’t always have to pay for it all at once. Many roofing companies offer financing options to help homeowners manage the cost by breaking it down into predictable monthly payments. These plans can come in the form of special loans or credit options that allow you to spread the expense over several months or even years, making the project much more approachable.
Before you sign a contract, ask your potential roofer about their financing partners and what terms are available. Understanding the interest rates and payment schedule upfront will help you make a confident decision. You can also use a roofing cost calculator to estimate your project’s budget and see what a payment plan might look like.
Will Homeowners Insurance Cover Your Roof Replacement?
This is a question we hear all the time. Your homeowners insurance might cover a roof replacement, but it depends entirely on the cause of the damage. Typically, insurance policies cover damage from sudden, accidental events, which are often called “covered perils.” This includes things like severe storms, hail, wind, or a tree falling on your house.
However, insurance almost never covers a roof replacement needed due to old age, general wear and tear, or a lack of maintenance. The best first step is to pull out your policy and read it carefully. Then, call your insurance agent to discuss your coverage and understand the claims process. This is true for both homeowners and owners of commercial properties who need to protect their assets.
Actual Cash Value (ACV) vs. Replacement Cost Value (RCV)
When you look at your insurance policy, it’s really important to know the difference between two key terms: Actual Cash Value (ACV) and Replacement Cost Value (RCV). An RCV policy pays to replace your roof with new, similar materials at today’s prices, without subtracting for age. It’s the most comprehensive coverage. On the other hand, an ACV policy pays you for the value of your roof at the time of the damage. This means it subtracts money for depreciation, so you get less for an older roof. Many insurance policies will automatically switch from RCV to ACV coverage once a roof reaches a certain age, often around 15 to 20 years. Understanding which type of coverage you have is critical when planning for a replacement.
Can a New Roof Lower Your Insurance Premium?
Yes, it absolutely can. Installing a new roof can sometimes lead to a lower home insurance premium. From an insurer’s perspective, a new roof is a much lower risk. It’s less likely to leak, lose shingles in a storm, or fail unexpectedly, which means you’re less likely to file a claim. This is especially true if you choose strong, impact-resistant materials that offer superior protection against the elements. After your residential roofing project is complete, it’s a great idea to call your insurance agent. Let them know you’ve made a significant upgrade to your home’s safety and ask if you qualify for a discount. It’s a proactive step that can save you money in the long run.
Common Roof Replacement Mistakes (and How to Avoid Them)
A new roof is a big investment, and the last thing you want is to make a mistake that costs you more down the road. Knowing what pitfalls to look out for can make the entire process smoother and ensure you get a roof that protects your home for years to come. Let’s walk through some of the most common missteps homeowners make and how you can sidestep them. From believing common myths to picking the wrong materials, a little knowledge goes a long way in making a smart decision for your home.
The Risks of a DIY Roof Replacement
I understand the appeal of a good DIY project—there’s a real sense of accomplishment in doing things yourself. However, roofing is one area where the risks often outweigh the rewards. It’s a highly technical and physically demanding job that requires specialized training, safety equipment, and a deep understanding of how the entire roofing system works together to protect your home. A professional residential roofing installation is essential not only for the longevity of your roof but also to keep your material warranties valid. Attempting to save money on labor can seem appealing, but a small mistake can easily lead to costly leaks, structural damage, and repairs that end up costing far more than hiring a qualified team from the start.
Don’t Believe These Common Roofing Myths
One of the biggest myths is that you only need a new roof if you see a leak. Waiting for water to drip into your living room is a recipe for disaster. By then, moisture could have already caused rot, mold, and structural damage that’s much more expensive to fix. Another common belief is that if your roof looks fine from the street, it must be okay. Unfortunately, issues like cracked shingles, granule loss, and failing flashing aren’t always visible from the ground. This is why professional inspections are so important for catching problems early. Finally, many people assume a roof replacement will break the bank, but that’s not always true. The final price depends heavily on the materials you choose and the size of your roof. You can even get a general idea of the investment by using a roofing cost calculator to explore different options.
Is There a “Best” Season for a Roof Replacement?
When it comes to roof replacement, timing can be everything, especially here in the Pacific Northwest. The ideal window for this project is typically from late spring to early fall. During these months, the weather is generally drier and warmer, which is perfect for installing new roofing materials. Adhesives on shingles cure properly in the warmth, and there’s less risk of rain delaying the project or trapping moisture under your new roof. While you might hear that you can get a better deal during the off-season, like winter, it comes with risks. Our rainy season can make installation tricky and potentially compromise the quality of the work. It’s best to plan ahead and schedule your replacement during the more favorable weather months.
How to Avoid Costly Installation Mistakes
Choosing the right materials and the right team for the job is critical. A common mistake is picking a roofing material that isn’t suited for our wet climate or your home’s specific structure. For example, some materials require more maintenance than others to stand up to moss and rain. Working with a professional ensures your residential roofing choice fits your home’s needs and your long-term goals. Another major error is hiring an inexperienced or unvetted contractor to save a few dollars. Improper installation can lead to leaks, void your material warranty, and require a complete do-over sooner than you think. Always choose a licensed, insured, and reputable contractor with a proven track record in the Puget Sound area.
Related Articles
- Ultimate Guide to Roof Replacement for Homeowners
- What to Expect During Your Roof Replacement – Landmark Roofing & Siding
Frequently Asked Questions
My roof isn’t that old, but it has a leak. Does that automatically mean I need a full replacement? Not necessarily. A single leak, especially on a younger roof, can often be traced to a specific issue like damaged flashing around a chimney or a few missing shingles from a storm. In these cases, a targeted repair is usually all you need. A full replacement is typically recommended when the roofing system is nearing the end of its lifespan or when the damage is widespread across the entire roof. A professional inspection is the best way to determine whether a simple fix or a full replacement is the right call for your home.
Can’t you just install a new layer of shingles over my old ones to save money? While this might seem like a tempting shortcut, it’s generally not a good idea. Adding a second layer of shingles puts a lot of extra weight on your home’s structure, which it may not be designed to handle. It also makes it impossible for a contractor to inspect the underlying roof decking for rot or damage before installing the new materials. This can trap moisture and lead to much bigger problems later. For a long-lasting and reliable roof, a complete tear-off of the old materials is almost always the best approach.
How often should I have my roof professionally inspected? A great rule of thumb is to have your roof inspected by a professional every three to five years, and always after a major storm with high winds or hail. Regular inspections allow an expert to catch small problems, like cracked sealant or a loose shingle, before they turn into costly leaks. If your roof is older, say over 15 years, you might consider moving to an annual inspection schedule to keep a closer eye on its condition and plan for its eventual replacement.
What happens if the crew finds rotted wood after they tear off the old shingles? This is a common concern, and it’s something a professional contractor is always prepared for. If any soft or rotted wood decking is discovered once the old roof is removed, your project manager will stop the work, show you the problem, and explain the necessary repairs. The cost for replacing damaged decking is typically handled with a change order, which is an add-on to your original contract. A trustworthy contractor will have already discussed this possibility with you and will be transparent about any additional costs before moving forward.
How much will a roof replacement disrupt my daily life? A roof replacement is definitely a noisy and active construction project, but a professional crew will work hard to minimize the disruption. You can expect noise from hammering and equipment for a few days. It’s a good idea to keep pets indoors and clear your driveway and the areas around your home’s perimeter to give the crew a safe space to work. While you can typically stay in your home during the process, the project is usually completed within a few days, and a good team will leave your property clean and tidy at the end of each day.