Date
Fri Mar 13A successful metal roof installation doesn’t start with the first panel you lay; it starts on the ground with a solid plan. Proper preparation is the single most important factor that separates a secure, long-lasting roof from a project filled with headaches and potential leaks. If you’re tackling do it yourself metal roofing, this is the step you can’t skip. This metal roof install guide is your complete roadmap for that crucial prep work. We’ll cover how to accurately measure your roof, understand local building codes, and create a realistic timeline, ensuring a strong foundation for a smooth installation.
Key Takeaways
- Invest in a Durable, Efficient Roof: A metal roof is a smart long-term choice that offers 50+ years of protection, helps lower energy bills by reflecting solar heat, and comes in a wide variety of modern styles to improve your home’s curb appeal.
- Meticulous Preparation is Non-Negotiable: A successful DIY project starts with a solid plan. Take the time to accurately measure your roof, understand local building codes, and gather all your tools, materials, and safety equipment before you begin the installation.
- Prioritize Safety and Know Your Limits: Always use proper fall protection and handle sharp metal panels with care. While a simple roof can be a great DIY project, recognize that complex or steep roofs require professional expertise to ensure a safe, watertight, and code-compliant result.
Is a Metal Roof the Right Choice for You?
If you’re thinking about a new roof, you’ve probably seen metal options popping up more and more on homes and businesses. There’s a good reason for their growing popularity. Metal roofing is a fantastic investment that offers a powerful combination of strength, efficiency, and style that’s hard to beat. While the initial cost can be higher than some traditional materials, the long-term benefits often make it the most sensible choice for your property.
From standing up to the notoriously wet Pacific Northwest weather to helping you save on energy bills, a metal roof delivers performance you can count on for decades. It’s a choice that protects your home while also adding significant value and curb appeal. Whether you own a classic craftsman or a modern commercial building, there’s a metal roofing style that can complement your property’s look. Exploring the different types of commercial roofing and residential options will show you just how versatile this material can be. Let’s get into the specific advantages that make metal a top contender.
They’re Built to Last (Seriously)
When it comes to longevity, metal roofing is in a class of its own. While a typical asphalt shingle roof might last 15 to 20 years, a properly installed metal roof can protect your home for 50 to 70 years, sometimes even longer. Think about that, it could very well be the last roof you ever need to install. This incredible lifespan is because metal is resistant to common problems like cracking, shrinking, and eroding. It also stands strong against rot, mildew, and insect damage. This long-term durability makes it a smart financial decision, saving you the cost and hassle of multiple replacements over the years.
Hello, Lower Energy Bills
A metal roof does more than just protect your home from the elements; it can also make it more energy-efficient. Many metal roofing materials are finished with special coatings that reflect solar radiant heat. This means that during sunny summer days, your roof is actively pushing that heat away from your home instead of absorbing it. As a result, your air conditioning system doesn’t have to work as hard to keep the interior cool, which can lead to noticeable savings on your monthly energy bills. It’s a great way to make your home more comfortable and environmentally friendly at the same time.
Stands Up to Weather, Not Your Weekends
Here in the Puget Sound, we get our fair share of wind and rain. Metal roofing is exceptionally well-suited for our climate because it creates a tough, interlocking barrier against the weather. The panels are highly wind-resistant and shed water and snow effectively, preventing leaks and water damage. Compared to other materials, the required regular maintenance is minimal. You won’t have to worry about replacing cracked shingles or dealing with moss buildup. A simple annual inspection to check for debris and ensure fasteners are secure is usually all it takes to keep your roof in top condition for decades.
Great Looks and a Better Resale Value
Gone are the days of metal roofs only belonging on barns. Today’s options come in a huge variety of colors, finishes, and profiles to match any architectural style. You can choose the sleek, clean lines of standing seam panels for a modern look or opt for metal shingles that mimic the appearance of traditional cedar shake or slate. This versatility means you don’t have to sacrifice style for performance. A beautiful, long-lasting metal roof is a major selling point that can significantly increase your home’s curb appeal and resale value, making it a wise investment in your property’s future.
Understanding the Cost and Potential Downsides
While metal roofing has a long list of benefits, it’s important to look at the full picture before making a decision. Like any major home improvement project, there are costs and potential drawbacks to consider. Being aware of these factors from the start will help you determine if metal is truly the best fit for your home, budget, and long-term goals. A great roof is one that you feel confident about, and that confidence comes from knowing all the facts, not just the highlights.
Cost Comparison with Traditional Roofing
There’s no getting around it: the upfront cost of a metal roof is higher than traditional materials like asphalt shingles. You can generally expect the initial investment to be two to three times more. However, it’s important to view this cost through the lens of long-term value. Since a metal roof can last 50 years or more, you’re paying for a permanent solution rather than a temporary fix that will need replacing every 15-20 years. When you factor in the energy savings and the minimal maintenance costs over its lifetime, a metal roof often proves to be the more economical choice. To get a clearer picture of what to expect for your specific home, you can use a roofing cost calculator to estimate the initial investment.
Potential for Dents and Oil Canning
While metal is incredibly durable, it’s not indestructible. Heavy hail or falling tree limbs can sometimes cause dents in the panels. Another aesthetic consideration is something called “oil canning,” which is a perceived waviness in the flat areas of the metal panels. This can happen if the underlying roof deck isn’t perfectly even. Some people also worry about noise during a rainstorm. While it’s true that metal can be louder than shingles, proper insulation installed underneath the roof deck can dampen the sound to a gentle hum. A professional installation is key to minimizing these issues, as an experienced team will ensure the surface is properly prepared to prevent oil canning and can recommend the best insulation options for your residential roofing project. Homeowners in Kirkland looking for expert metal roofing services in Kirkland can rely on experienced local contractors for a durable installation.
Your DIY Metal Roofing Shopping List
Before you even think about stepping onto the roof, let’s get everything you need organized on the ground. A smooth installation starts with solid preparation. Having all your tools, materials, and safety equipment ready to go will save you countless trips up and down the ladder and help you work more efficiently. Think of this as setting up your command center. A little planning here goes a long way toward a professional-looking result and, more importantly, a safe project from start to finish.
The Tools You’ll Absolutely Need
Having the right tools for the job makes all the difference. You don’t necessarily need the most expensive gear, but you do need tools that are sharp, reliable, and designed for working with metal. Start by gathering these essentials:
- Sharp Snips: You’ll be doing a lot of cutting, and clean cuts are critical. A new, sharp pair of metal snips will give you precise lines without damaging the panels.
- Hand Seamer: This tool is key for bending the ends of trim pieces so they fit snugly around corners and edges, giving your roof a clean, finished look.
- Drill/Driver: A quality cordless drill with a good battery is your best friend for securing panels and fasteners.
- Measuring Tape, Chalk Line, and Square: Accuracy is everything. Measure twice (or three times!), and use a chalk line to keep your panel rows perfectly straight.
The Materials to Have on Hand
Once your tools are lined up, it’s time to check your materials. Running out of something mid-project is a major headache, so take the time to get your quantities right. You can use a roofing cost calculator to help estimate what you’ll need for your specific project. Your list should include:
- Metal Roofing Panels: Measure your roof carefully to determine how many panels you need. It’s always wise to order a little extra to account for any mistakes.
- Underlayment: This is a critical protective layer that goes down before the metal. It acts as a waterproof barrier, so don’t skip it.
- Fasteners: Use the screws recommended by the panel manufacturer. They should have a rubber washer to create a watertight seal.
- Trim and Flashing: These pieces are for edges, valleys, and ridges to seal the roof and prevent leaks.
Safety First: The Gear You Can’t Skip
This is the most important checklist of all. Working on a roof is inherently dangerous, and your safety should be your top priority. Never compromise when it comes to protective gear. Before you start, make sure you have:
- Fall Protection: A safety harness and rope system is non-negotiable. Always use fall protection when you’re working at heights.
- Proper Footwear: Wear sturdy, non-slip boots or shoes to give you solid footing on the roof surface.
- Gloves and Safety Glasses: Metal panels can have sharp edges, so a good pair of work gloves is essential. Safety glasses will protect your eyes from any small metal fragments during cutting and fastening.
If gathering this gear feels overwhelming, it’s a good sign that your project might be better left to a team of residential roofing professionals.
Prepping for Your DIY Metal Roof Install
A successful DIY project is all about the prep work. Before you even think about ordering materials or climbing a ladder, taking the time to plan will save you from major headaches down the road. A solid plan ensures your installation goes smoothly, your roof is secure, and you stay on budget. Think of it as creating a roadmap for your project. Getting these details right from the start is the single best thing you can do to ensure a professional-quality result that you can be proud of for years to come. Let’s walk through the essential steps to get you ready.
Start by Inspecting Your Current Roof
First things first, take a good, hard look at your existing roof. What you find will determine your next steps. In some cases, you might be able to install metal roofing directly over a single layer of asphalt shingles, which can save you a lot of time and demolition work. However, this depends entirely on your local building codes and the condition of your current roof structure. Before you decide, carefully inspect the roof deck for any signs of rot, soft spots, or water damage. A complete tear-off is often the better choice because it lets you inspect and repair the underlying structure, ensuring a solid foundation for your new residential roofing. For homeowners considering Bellevue metal roof installation, working with a qualified contractor ensures proper planning and a smooth timeline.
How to Measure Your Roof Accurately
Accurate measurements are non-negotiable. Guessing or estimating will lead to wasted materials and costly delays. You’ll need to measure the length and width of each roof plane to calculate the total square footage. Don’t forget to factor in the roof’s pitch, or slope, as a steeper roof requires more material. Carefully measure around any features like chimneys, vents, and skylights. I recommend drawing a simple diagram of your roof and labeling it with all your measurements. Double-check every number before placing your order. Using a roofing cost calculator can give you a good idea of the material quantities you’ll need based on your measurements.
Don’t Forget to Order Extra Material
Even with the most precise measurements, you’ll want to add a buffer when you place your material order. Trust me on this one; it’s a step that can save you from a major project-stopping headache. A good rule of thumb is to order at least 10% more material than your calculations show. This extra amount accounts for the inevitable waste from angled cuts, potential mistakes, or a panel that might get scratched during handling. It might feel like you’re overspending, but this small investment up front is your insurance policy against delays. Nothing is more frustrating than having to halt work to wait for a new shipment of a single, crucial panel. It’s a standard practice that ensures a smooth workflow, which is why professional roofing contractors always build this into their project plans.
Checking Local Building Codes
Every city and county has specific building codes that you must follow for any roofing project. These rules are in place to ensure your roof is safe, structurally sound, and able to withstand local weather conditions. Before you start, contact your local building department to find out what’s required. They’ll have information on everything from the type of underlayment you need to specific fastening patterns and whether you’re allowed to install a new roof over an old one. Skipping this step can result in fines or even force you to tear off your brand-new roof and start over. Proper installation is just as important as quality materials, which is why many people trust professionals for their commercial roofing projects.
How Much Time Do You Really Need?
Installing a metal roof is not a weekend project. It’s a complex job that takes careful attention to detail and several days to complete, especially if you’re working alone. Be realistic about how much time you can commit. Break the project down into smaller, manageable stages: tear-off, deck repair, underlayment installation, panel installation, and finishing trim. Always check the weather forecast before you begin and plan to work on clear, dry days. You never want to leave your roof deck exposed to rain. Rushing through the process increases the risk of mistakes, so give yourself plenty of time to do the job right and ensure your new roof is completely watertight.
Your Metal Roof Install Guide: A Step-by-Step Walkthrough
Alright, you’ve got your tools, materials, and a solid plan. Now it’s time for the main event: installing your new metal roof. This process requires precision and patience, so take your time with each step. Following these instructions carefully will help you achieve a professional-looking, watertight result that protects your home for decades. Remember, every roof is different, and some projects, especially those on complex or steep structures, are best left to the pros. If you start feeling overwhelmed, know that a team of experts can always step in to ensure your residential roofing project is completed safely and correctly. If you are based in the area, a trusted Seattle roofing contractor can provide professional metal roof installation services tailored to the local climate.
Step 1: Prepare the Roof Deck and Underlayment
Before any new material goes on, you need a clean slate. Start by preparing the roof deck. This usually means tearing off the old roofing down to the sheathing and checking for any soft spots or damage. Make any necessary repairs to the underlying wood structure to ensure it’s solid and stable. Once you have a clean, sound surface, it’s time to roll out the underlayment. This waterproof barrier is your roof’s second line of defense against moisture. Lay it across the entire roof, overlapping the seams according to the manufacturer’s instructions, and secure it smoothly. This step is absolutely critical for preventing leaks down the road.
Choosing the Right Underlayment
Not all underlayments are created equal, and the one you choose is especially important for a metal roof. Your best bet is a high-quality, self-healing ice-and-water shield. Think of this material as the ultimate safety net for your roof deck. Its sticky backing adheres directly to the wood sheathing, creating a completely waterproof seal. The “self-healing” part is the real magic; when you drive screws through it to fasten your metal panels, the rubberized asphalt in the self-healing membrane actually seals around the fastener’s shank. This creates a watertight gasket around every single screw, which is critical for preventing leaks over the long life of your roof.
Properly Overlapping Underlayment Layers
Your installation technique is just as important as the material itself. Always start laying the underlayment at the lowest edge of the roof, working your way up toward the peak. Roll out the first course horizontally along the eave, making sure it’s perfectly flat and smooth. Then, when you lay the next course above it, overlap the top edge of the first piece by at least six to eight inches. This creates a shingled effect, ensuring that any water that might get under the metal panels will flow down and off the roof, rather than finding a seam. Getting this layer perfectly smooth is a detail that professional roofing contractors focus on, as any wrinkles or bubbles can show through the final metal panels.
Step 2: Install Drip Edge and Map Your Panel Layout
With the underlayment in place, you’ll install a metal drip edge along all the eaves and rakes (the angled sides) of the roof. This trim piece guides water away from your fascia and into the gutters, protecting the wooden components of your roof from moisture damage. After the drip edge is on, take a moment to plan your panel layout. A good rule of thumb is to start installing panels on the end of the roof opposite the prevailing wind direction. Use a chalk line to snap straight, parallel lines to guide your installation. This ensures your panels will be perfectly aligned, which is key for both appearance and performance.
How to Square Your First Panel with the 3-4-5 Method
Getting your first panel perfectly square is one of the most critical steps of the entire project. If this one is off, every single panel that follows will also be off, creating a crooked, unprofessional look that can even lead to leaks. The easiest way to guarantee a true 90-degree corner is by using the 3-4-5 method, a simple trick based on basic geometry. To do it, measure 3 feet along the eave from your starting corner and make a mark. Next, measure 4 feet up the rake from that same corner and make a second mark. The diagonal distance between those two marks should be exactly 5 feet. If it is, you have a perfect right angle. As explained by experts at This Old House, this technique is a foolproof way to create square layouts. Taking a few extra minutes for this step ensures the rest of your installation goes smoothly and looks straight.
Step 3: Lay and Fasten the Metal Panels
Now you can start laying and securing the metal panels. Place your first panel, making sure it aligns with your chalk line and has the correct overhang at the eave. Fasten the panels to the roof deck using screws designed specifically for metal roofing; they should have a rubber washer to create a watertight seal. Pay close attention to the screw pattern recommended by the manufacturer. Proper screw placement and not over-tightening them are essential for preventing leaks. Overlap the next panel over the first one, ensuring a snug fit, and continue this process across the entire roof.
Ensuring the Correct Panel Overhang
Getting the panel overhang right is a small detail with a big impact. This is the part of the panel that extends past the edge of the roof, and its job is to direct rainwater straight into your gutters instead of letting it run down your fascia boards. Aim for an overhang of about one to two inches. This is enough to clear the edge and guide water effectively without being so long that it’s vulnerable to high winds. A consistent overhang also gives your roof a clean, professional-looking line. Take your time to measure and mark this on your first panel, as it will set the standard for the rest of the installation.
Understanding Panel Overlap and Sealant
Metal roofing panels are designed to interlock, creating a strong, weather-tight seal. Most systems have a “fat” lap and a “skinny” lap. The process is simple: you’ll place the fat lap of the new panel over the skinny lap of the one you just installed. Before you do, it’s absolutely critical to apply a bead of high-quality sealant between the overlapping ribs. This sealant is your primary defense against wind-driven rain and moisture seeping through the seams. Don’t skip this step. A proper overlap combined with sealant creates a formidable barrier that keeps your home dry and protected through even the worst Pacific Northwest storms.
Fastening Standing Seam vs. Exposed Fastener Panels
How you fasten your panels depends entirely on the type of metal roof you’ve chosen. If you have a standing seam system, you’ll use hidden clips to secure the panels to the roof deck. These clips are great because they allow the metal to naturally expand and contract with temperature changes without putting stress on the fasteners. For an exposed fastener system, the screws go directly through the face of the panel and into the roof sheathing. While this installation is often more straightforward for a DIYer, it’s crucial to use the correct screws and placement to ensure every connection is completely watertight.
Where to Place Your Screws
For exposed fastener roofs, screw placement is everything. Don’t just guess where they should go; your panel manufacturer will provide a specific fastening pattern, and you should follow it exactly. Generally, you’ll place screws in the flat area of the panel, right next to the major ribs, not on top of them. This ensures the screw head sits flush and the washer can create a perfect seal. The typical spacing is every 12 to 24 inches along the panel’s length. Using a chalk line can help you keep your screw lines straight, which is important for both structural integrity and the final look of your roof.
Following Proper Screw Spacing Guidelines
Driving the screws correctly is just as important as where you place them. You’re looking for the “just right” amount of pressure. Don’t under-tighten the screw, as the washer won’t seal properly. But don’t over-tighten it either, as this can damage the washer or even dent the panel. The goal is to tighten the screw just enough so the rubber washer is compressed flat against the metal, creating a perfect seal without bulging out at the sides. Always drive the screws in straight, not at an angle, to ensure the washer sits flush and does its job of keeping water out.
Step 4: Add Flashing, Trim, and Ridge Caps
Once all the main panels are secured, it’s time to finish the job with flashing and trim. These pieces seal the seams and edges where the roof is most vulnerable to leaks, like in valleys, around chimneys, and where the roof meets a wall. Install the eave trim at the lower edges and the gable trim along the sloped sides. The final piece of the puzzle is the ridge cap, which covers the peak where the two slopes of the roof meet. Each piece of trim must be installed correctly and sealed to ensure your roof is completely weatherproof.
Installing Eave Trim to Prevent Ice Dams
The first pieces of trim you’ll install are at the eaves, which are the bottom edges of your roof. This L-shaped metal piece, often called a drip edge, has a critical job: it guides rainwater away from the fascia board and directly into your gutters. Without it, water can cling to the edge of the roof and seep back onto the wooden components, leading to rot over time. Installing the eave trim first ensures that all the layers that come after it—the underlayment and the panels—will direct water over and away from the edge, creating a clean, protected finish that prevents water damage and helps stop ice dams from forming in the winter.
Securing Valley Flashing
Roof valleys are where two roof planes meet, creating a channel that funnels a large volume of water. Because of this, they are one of the most common areas for leaks to develop if not handled correctly. Before you lay any panels in this area, you must install a wide piece of metal flashing down the center of the entire valley. This flashing acts as a dedicated, waterproof channel. You’ll secure it with special clips or fasteners along the edges, making sure not to puncture the center of the flashing where water will flow. This is a step that requires absolute precision to ensure a watertight seal for years to come.
How to Flash Around a Chimney
Flashing a chimney is one of the most complex parts of any roofing job, and it’s where many DIY projects go wrong. The process involves installing several pieces of metal flashing in a specific, overlapping sequence to direct water around the chimney base. For a masonry chimney, this often requires cutting a groove into the brick or stone to insert a piece of counter-flashing, which is then sealed with a high-grade polyurethane caulk. This creates a durable, mechanical bond that prevents water from getting behind the base flashing. Given the high potential for leaks, this is one area where the expertise of a professional roofer is invaluable.
Using Pipe Boots for Vent Pipes
Anywhere a pipe or vent penetrates your roof, you have a potential entry point for water. To seal these spots, you’ll use a pre-formed flashing called a pipe boot. This is a flexible, cone-shaped piece of rubber or silicone attached to a metal base. You’ll apply a generous amount of roofing sealant to the underside of the metal base, slide the boot down over the pipe until it sits flush against the roof panel, and then secure the base to the roof with screws. The flexible cone creates a tight seal around the pipe itself, effectively blocking out moisture.
Installing Gable Trim to Prevent Wind Lift
The gables are the sloped sides of your roof. After all the panels are installed, you’ll cover the cut edges along the gables with a special trim piece. This gable trim serves two important functions. First, it gives the roof a clean, finished appearance by hiding the exposed edges of the panels. More importantly, it protects your roof from wind uplift. By securely covering the edge, the trim prevents strong winds from getting underneath the panels and peeling them off the roof. This is a crucial finishing step for ensuring the long-term durability of your roof, especially in stormy weather.
Sealing Gaps with Closure Strips
The final step in weatherproofing your roof is installing the ridge cap, which covers the peak where the two sides meet. Before you attach the ridge cap, you need to seal the gaps created by the profile of your metal panels. This is done using foam closure strips that are cut to perfectly match the shape of your panels. These strips often have an adhesive backing and are placed along the top edge of the panels on both sides of the ridge. They create a tight seal that keeps out wind-driven rain, snow, and pests. Once the closure strips are in place, you can install the ridge cap over them, creating a fully sealed and secure roof.
Step 5: The Final Inspection and Cleanup
You’re almost there! With everything installed, walk around and give your new roof a thorough inspection. Check that all screws are snug (but not too tight), panel overlaps are secure, and all trim and flashing are properly sealed. Look for any scratches or scuffs that may have happened during installation and touch them up with a manufacturer-approved paint to prevent rust. Finally, clean up your work area. Remove all leftover materials, metal scraps, and stray screws from the roof and the ground below to ensure the site is safe and tidy.
The Importance of Cleaning Up Metal Shavings
One final cleanup task that you absolutely cannot skip is getting rid of all the tiny metal shavings. As you cut and fasten the panels, small metal fragments, sometimes called burrs, will scatter across the roof surface. It might not seem like a big deal, but leaving them there is a recipe for rust. As publications like Family Handyman warn, these little pieces will rust quickly, creating ugly stains on your brand-new roof. More importantly, that rust can eat away at the panel’s protective finish over time, compromising the very material you installed to protect your home. Taking a few extra minutes to sweep or blow off every last shaving is a small step that preserves the look and longevity of your roof, saving you from future headaches.
Common DIY Metal Roofing Mistakes (and How to Avoid Them)
Installing a metal roof can be a rewarding project, but a few common slip-ups can turn your dream roof into a leaky headache. Knowing what to watch for can save you from costly repairs down the road. Even the most careful DIYer can miss a small detail that has a big impact on the roof’s performance and lifespan.
Think of it this way: your roof is a complete system, and every component has to work together perfectly. From the fasteners holding it down to the space you leave for it to breathe, each step is critical. Let’s walk through the most frequent mistakes so you can steer clear of them and ensure your new roof is secure, watertight, and built to last. If you’re working on a larger building, the stakes are even higher, making professional-grade commercial roofing techniques essential.
Using the Wrong Fasteners or Sealant
One of the most common reasons a new metal roof leaks is due to improperly installed screws. It sounds simple, but there’s a science to it. Using the wrong type of fastener, placing screws in the wrong part of the panel, or failing to tighten them correctly can create entry points for water. Overtightening can damage the rubber washer that creates the seal, while under-tightening won’t form a seal at all. Each screw needs to be just right to keep your home dry and secure, which is a hallmark of a professional residential roofing installation.
Over-tightening or Misplacing Screws
It’s easy to think of screws as just hardware, but on a metal roof, each one is a critical seal. One of the most frequent DIY mistakes is getting the fastener installation wrong. There’s a real science to it; each screw needs to be tightened to the perfect torque. If you overtighten it, you can crush the small rubber washer, breaking the seal and creating a direct path for water. If you under-tighten it, the washer won’t compress enough to stop moisture from seeping underneath. The placement is just as important. Screws must go in the correct part of the panel—typically the flat area next to the rib—to ensure a secure, leak-proof fit. Getting every single screw just right is a detail that separates an amateur job from a professional one.
Using the Wrong Cutting Tools
How you cut your metal panels is just as important as how you fasten them. A common and costly mistake is using a tool that generates heat, like a circular saw with an abrasive blade. The sparks and heat created by these tools can burn off the panel’s protective galvanized coating, leaving the raw edge exposed and vulnerable to rust. Instead, you need to use cold-cutting tools. A quality pair of sharp metal snips is essential for making clean, precise cuts without damaging the panel’s finish. For longer cuts, a nibbler or a specialized metal-cutting blade can work well. Clean cuts not only look more professional but also ensure that your trim and flashing fit snugly, which is crucial for creating a completely watertight system.
Forgetting to Check Panel Alignment
Getting that first metal panel perfectly straight is everything. If it’s even slightly off, every panel that follows will also be off, creating a crooked, unprofessional look and, more importantly, functional problems. Misaligned panels can create gaps that compromise the roof’s weather resistance, making it vulnerable to wind and rain. This mistake often starts with an improperly installed underlayment, which serves as your roof’s secondary defense against moisture. Taking the time to measure, snap chalk lines, and double-check your alignment from the start will prevent major issues later on.
Ignoring Thermal Expansion and Contraction
Metal naturally expands and contracts as the temperature changes. It’s a small movement, but over the length of a long panel, it adds up. If you don’t account for this thermal movement, your roof can suffer. Fastening long panels too tightly restricts their ability to shift, which can cause them to buckle, warp, or even pull the fasteners loose over time. Professional installers use special clips and fastening techniques on longer panels that allow the metal to move freely without compromising the roof’s integrity.
Not Planning for Proper Ventilation
A great roof is more than just what you see on the outside; it’s a system that needs to breathe. Proper ventilation is crucial for preventing moisture buildup in your attic, which can lead to mold, mildew, and rot. While a metal roof itself is low-maintenance, installing it without considering the attic’s airflow is a major oversight. A well-ventilated roof system helps regulate temperature in your home, extending the life of the roof structure and improving energy efficiency. It’s a critical step that ensures your investment is protected from the inside out.
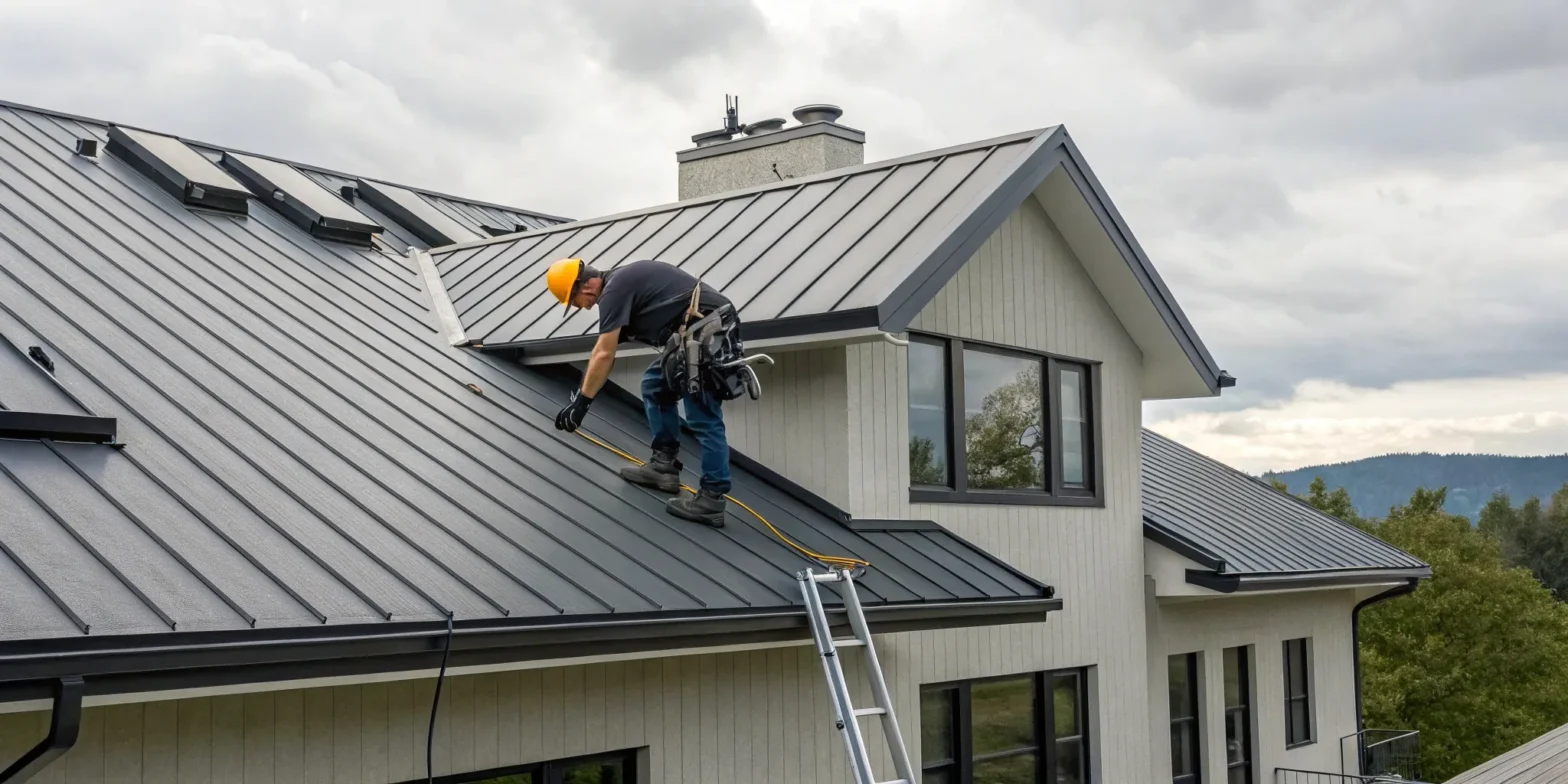
How to Stay Safe on the Roof
Before you climb that ladder, let’s talk about the most important part of this project: keeping yourself safe. A new roof is a fantastic upgrade, but it’s not worth risking your well-being. Roofing is one of the most dangerous jobs out there for a reason, and taking on a metal roof installation means you’re stepping into that environment.
Thinking through your safety plan isn’t just a suggestion; it’s a requirement for any DIY project of this scale. From the moment you start until the final cleanup, every step should be taken with caution. This means using the right gear, paying close attention to your surroundings, and knowing how to handle your materials properly. Let’s walk through the essential safety checks to make sure your project is successful and injury-free.
Always Prioritize Fall Protection
Working at a height is serious business, and a fall can have devastating consequences. This is why you must always use proper fall protection when you are on the roof. This isn’t an area where you can cut corners. Your safety setup should include a high-quality safety harness that fits you correctly, a sturdy rope, and a secure anchor point. Before you begin, double-check that your ladder is on solid, level ground and is extended well above the roofline. Taking these precautions is the single most important thing you can do to protect yourself during the installation.
Mind the Weather and Your Work Area
A metal roof can become incredibly slick when wet, so you need to be mindful of the weather. Check the forecast and plan your work for a clear, dry day. Even a little morning dew can make the surface hazardous, so it’s often best to wait until the sun has had a chance to dry everything off. Beyond the weather, keep your workspace tidy. A stray tool, a coil of rope, or a loose screw can easily become a tripping hazard. Keep the roof surface clear of anything you aren’t actively using to ensure you have a safe path to move around.
How to Handle Sharp Metal and Power Tools
The tools and materials for this job require respect. Always wear heavy-duty gloves and safety glasses, especially when cutting or moving panels. The edges of sheet metal are extremely sharp and can cause deep cuts if you’re not careful. Make sure your tools are in good working order. For example, using sharp metal snips will give you cleaner cuts and reduce the chance of the tool slipping. A dull blade requires more force, which can lead to accidents. Taking a moment to handle each tool and panel with care will save you a lot of trouble in the long run.
Keeping Your New Metal Roof in Top Shape
Congratulations on your new metal roof! One of the best things about metal is that it’s incredibly low-maintenance. But low-maintenance doesn’t mean no maintenance. With a little bit of care, you can make sure your roof looks great and protects your home for decades. Think of it as protecting your investment. A simple, consistent routine will help you catch small issues before they become big problems and keep your roof in top condition year after year. Here are a few key things to keep in mind.
Create a Simple Inspection Routine
Regular check-ups are the best way to preserve your roof’s integrity. While metal roofing requires minimal upkeep compared to other materials, a consistent inspection schedule is still important. Plan to look over your roof twice a year, ideally in the spring and fall. After any major storm is also a good time for a quick check. Look for things like loose or damaged fasteners, scratched panels, and areas where debris has collected. A pair of binoculars can make this easy to do from the ground. For a more thorough evaluation, consider a professional roofing inspection every few years to ensure everything is performing as it should.
How to Clean Your Metal Roof Safely
A clean roof is a happy roof. The most important task is keeping your gutters clear. When gutters get clogged with leaves and other debris, water can back up and get underneath your roofing panels, which is something you definitely want to avoid. You should also gently wash away any dirt, pollen, or grime from the roof surface itself. Debris that sits on the panels for too long can trap moisture and eventually affect the finish. A simple rinse with a garden hose or a wash with mild soap and a soft-bristled brush is usually all it takes to keep it looking new and functioning properly.
Why You Should Tackle Small Repairs ASAP
The key to a long-lasting roof is to address minor issues as soon as you spot them. Being observant allows you to identify problems and take the necessary steps to correct them quickly. A small scratch in the paint, a loose screw, or a bit of failing sealant might not seem like a big deal, but they can lead to bigger headaches down the road. Touching up scratches with a manufacturer-approved paint pen or tightening a fastener is a simple fix that prevents moisture from getting where it shouldn’t. If you find an issue you’re not comfortable fixing, it’s always best to call for a professional repair.
Common Metal Roof Myths, Busted
Let’s clear up a few common misconceptions about metal roofs. First, they do not attract lightning. In fact, because metal is non-combustible, a metal roof is one of the safest options during a thunderstorm. Another common myth is that they are noisy in the rain. When installed correctly over a solid deck with proper underlayment, a metal roof is no louder than an asphalt shingle roof. Modern metal roofing also has advanced coatings that prevent rust and is built to withstand hail and other impacts without denting easily, so you can feel confident in its strength and durability for years to come.
Know When to Call a Roofing Pro
Tackling a big project yourself is incredibly rewarding, and we’re here to support that spirit. However, some jobs come with high stakes, and roofing is definitely one of them. While a straightforward metal roof installation can be a DIY win, there are a few key situations where calling in a professional is the smartest, safest, and most effective choice. Let’s walk through when it makes sense to put down the tools and pick up the phone.
For Steep Pitches or Complex Layouts
If your home has a simple, low-pitched gable roof, you might be in a good position for a DIY project. But many homes feature more intricate residential roofing designs. A roof with a steep pitch, multiple valleys, dormers, skylights, or chimneys adds significant complexity to the job. Each of these features requires precise cutting, fitting, and sealing of the metal panels to create a watertight barrier. A small measurement error or an improperly sealed flashing can lead to serious leaks and water damage down the road. While metal roofing is a fantastic choice for its durability, its installation demands expertise, especially on a complicated structure.
When You Don’t Feel 100% Safe
Let’s be honest: working on a roof is risky. As home improvement experts note, installing a metal roof is an advanced project that requires proper fall protection and a healthy respect for heights. It’s not just about the risk of a fall; it’s a physically demanding job that can take several days of hard labor. You’ll be lifting heavy panels, operating power tools, and working in potentially hot or windy conditions. Managing a large-scale project, especially when the weather is unpredictable, can also be a major source of stress. Hiring a professional team means you can avoid the physical risks and enjoy the peace of mind that comes with knowing the job is done safely and correctly.
If You’re Unsure About Code Compliance
Beyond the physical work, every roofing project has to meet specific local building codes and permit requirements. These regulations exist to ensure the safety and structural integrity of your home, and they can be tricky to understand if you’re not familiar with them. A professional crew understands these local regulations inside and out, ensuring your new roof is fully compliant. Proper installation is just as important as the quality of the materials you choose, and an expert ensures both are up to standard. This is especially critical for commercial roofing, which often has even stricter requirements. A professional installation protects your investment, your home’s value, and your insurance eligibility.
When You Want a Guaranteed Professional Result
A DIY project offers a great sense of accomplishment, but when it comes to something as critical as your roof, the final result is what matters most. Hiring a professional team is about more than just getting the job done; it’s about guaranteeing a high-quality outcome that’s backed by a warranty. Experienced roofers have seen it all, from unexpected structural issues hidden under old shingles to the subtle complexities of sealing a tricky roofline. Their expertise ensures that every panel is perfectly aligned, every fastener is correctly seated, and every piece of flashing is meticulously installed for maximum weather protection. This level of precision not only makes your residential roofing look better but also ensures it performs flawlessly for its full 50+ year lifespan, giving you true peace of mind.
The Landmark Roofing & Siding Advantage in the Puget Sound
Here in the Puget Sound, your roof faces unique challenges, from persistent rain to high winds. That’s where local experience makes a real difference. For over 20 years, Landmark Roofing & Siding has been protecting homes and businesses across the Redmond area with expert craftsmanship. We understand the specific demands of our climate and are deeply familiar with local building codes, ensuring every project is done right the first time. Our team is committed to using top-quality materials and proven installation techniques to deliver a roof that not only looks fantastic but provides durable, long-lasting protection. When you work with us, you’re not just hiring a contractor; you’re partnering with a trusted local team dedicated to safeguarding your property.
Related Articles
Frequently Asked Questions
Is a metal roof really worth the higher upfront cost? It’s true that the initial investment for a metal roof is often higher than for traditional asphalt shingles, but it’s important to look at the long-term value. A metal roof can last 50 years or more, which is two to three times longer than a typical shingle roof. When you factor in the energy savings from its reflective properties and the minimal maintenance required over its lifetime, the cost often balances out, making it a very smart financial decision for your property.
Can I install a metal roof directly over my old asphalt shingles? While it’s sometimes possible to install metal over a single layer of existing shingles, it isn’t always the best idea. Your ability to do this depends on local building codes and, more importantly, the condition of your roof’s underlying structure. A complete tear-off allows you to inspect the roof deck for any rot or damage and make necessary repairs, ensuring a solid foundation for your new roof. Starting with a clean slate is almost always the recommended approach.
Are metal roofs noisy when it rains, especially in the Pacific Northwest? This is a very common myth, but you don’t have to worry about your home sounding like a drum during a rainstorm. When a metal roof is installed correctly over a solid roof deck with proper underlayment, the sound is significantly muffled. The noise level is quite comparable to that of an asphalt shingle roof, so you can enjoy our region’s rainy days in peace and quiet.
What’s the most critical part of the DIY installation process? If I had to pick one thing, it would be the preparation. A successful installation is almost entirely determined by the work you do before the first panel goes on. This includes taking precise measurements, thoroughly inspecting your roof deck, understanding your local building codes, and creating a solid safety plan. Getting these foundational steps right prevents the most common and costly mistakes down the line.
How much maintenance does a metal roof actually need? Metal roofing is valued for being low-maintenance, but that doesn’t mean you can forget about it completely. The best practice is to perform a visual inspection twice a year, ideally from the ground with binoculars, to check for any debris, scratches, or loose fasteners. The most important task is to keep your gutters clean to prevent water from backing up under the panels. This simple, proactive care is usually all it takes to keep your roof performing beautifully for decades.