Date
Fri Dec 12That moment you spot a damaged board on your house. Is it a quick weekend fix or the start of something bigger? Making the right call can save you thousands and prevent future headaches. This guide gives you that clarity. We’ll walk through simple exterior wood siding repair for small cracks and show you the key signs that mean a full replacement is the smarter choice. Knowing when it’s time for replacing wood siding, especially something specific like replacing rotted cedar siding, protects your biggest investment and gives you the confidence to maintain your home.
Key Takeaways
- Prioritize Moisture Control: Water is the biggest threat to wood siding, leading to rot and peeling paint. Regularly inspect for soft spots and discoloration, especially in damp areas, to address issues before they spread.
- Choose the Right Repair Method: Use exterior-grade wood filler for minor cosmetic issues like small cracks or holes. For significant rot or structural damage, replacing the entire board is the correct approach for a lasting fix.
- Make Maintenance a Habit: A simple routine prevents costly repairs. Inspect your siding twice a year, keep gutters clear to manage rainwater, and reapply paint or stain every 5-7 years to maintain a protective seal.
What’s Causing Your Wood Siding Damage?
Wood siding gives a home a classic, beautiful look, but it does require a bit of attention to keep it in top shape. Before you can tackle any repairs, it helps to know exactly what you’re up against. The elements, pests, and simple wear and tear can all take a toll on your home’s exterior. Understanding the common culprits is the first step toward protecting your investment and keeping your siding looking its best for years to come. Here in the Puget Sound, we see a lot of moisture-related issues, but it’s important to be able to spot the other signs of trouble, too.
The Threat of Moisture, Rot, and Decay
If there’s one arch-nemesis of wood siding, it’s moisture. Constant exposure to rain and humidity can cause serious problems over time. When water seeps into the wood, it creates a breeding ground for mildew, fungus, and eventually, rot. You’ll want to keep an eye out for peeling or bubbling paint, which is often the first sign that water is trapped underneath. Check for soft or spongy patches, especially in damp or shaded areas of your home where the siding doesn’t get a chance to dry out. If you find dark streaks or fuzzy green or black spots, you’re likely looking at mildew. Addressing these issues quickly is key to preventing the decay from spreading and compromising the structure of your home’s exterior.
Cracks and Warping from Sun and Storms
The weather does more than just get your siding wet. The constant cycle of rain and sun causes wood to expand and contract, which can lead to physical damage. Over time, this movement can make boards warp, buckle, or pull away from the house. You might notice that some panels are no longer lying flat against the wall. Direct sun exposure can also dry out the wood, making it brittle and causing long, vertical cracks to appear. Even small cracks and gaps can be problematic, as they create new entry points for moisture and pests. A regular visual inspection, especially after a storm or a change in seasons, can help you catch these issues early.
When Insects and Pests Move In
Unfortunately, some critters find your wood siding as appealing as you do. Termites and carpenter ants are notorious for chewing through wood, creating tunnels and galleries that weaken the boards from the inside out. While their damage can sometimes look like rot, you can often spot the difference by looking for tiny holes, sawdust-like frass, or the soil-filled lines that termites leave behind. Woodpeckers can also cause significant issues by drilling holes into the siding in their search for insects or a place to nest. If you suspect you have an insect problem, you’ll likely need to call a pest control expert in addition to planning for siding repairs.
Everyday Dents, Dings, and Loose Boards
Life happens, and sometimes your siding takes the hit. A stray baseball, a falling branch, or a ladder leaned against the house can all leave dents, dings, and scratches. While a single small dent might seem like a minor cosmetic issue, it can break the protective layer of paint or sealant, exposing the raw wood to moisture. Over the years, the nails and fasteners holding your siding in place can also loosen due to the wood’s natural expansion and contraction. This can cause boards to rattle in the wind or create gaps between panels. If you notice any deteriorating or loose boards, it’s a clear sign you need to look into residential siding repairs to keep your home protected.
How to Give Your Siding a Health Check
Before you can tackle any repairs, you need to know what you’re up against. A thorough inspection is your first line of defense, helping you catch small issues before they become major headaches. Think of it as a regular health check-up for your home’s exterior. Grab a notepad, and let’s take a walk around your property. I’ll show you exactly what to look for, from the most obvious red flags to the subtle signs of trouble hiding just beneath the surface. A little bit of detective work now can save you a lot of time and money down the road.
Start with a Walk-Around Visual Check
Your eyes are your best tool for the first pass. Start by walking the perimeter of your home, paying close attention to the siding. Look for any paint that is peeling, cracking, or bubbling, as this is often the first sign that moisture is getting in. You’ll want to check for any visible signs of mildew or rot, which often appear as dark or discolored patches, especially in damp, shaded areas that don’t get much sun. Also, keep an eye out for warped boards or gaps between the planks. If you see anything that looks off, make a note of its location so you can investigate further. A careful visual inspection is a crucial step in maintaining your home’s residential siding.
Gently Poke and Prod for Soft Spots
Once you’ve completed your visual sweep, it’s time to get a little more hands-on. Some of the most serious damage, like rot, isn’t always visible. Take a screwdriver or even just your finger and gently press on any areas that looked suspicious during your visual check. Healthy wood should feel firm and solid. If you find spots that are soft, spongy, or crumble under light pressure, you’ve likely found wood rot. Pay extra attention to boards near the ground, around windows and door frames, and under gutters, as these are prime locations for moisture to collect. Catching these deteriorating boards early can prevent the decay from spreading to the underlying structure of your home.
Check for Telltale Signs of Water Damage
Water is wood siding’s number one enemy, and it can be sneaky. Beyond obvious rot, look for more subtle clues of water intrusion. Are any boards starting to warp, ripple, or swell? This often means they’ve absorbed moisture. You might also spot fungus or mildew growth that looks like dark, fuzzy spots. Don’t forget to check inside your home, too. Water stains on interior walls, peeling paint near windows, or a musty smell can all be signs of a leak that started with your siding. Even an unexplained spike in your energy bills could point to damaged siding that’s compromising your home’s insulation.
Know Your Wood: Cedar, Pine, or Redwood?
Not all wood siding is created equal, and knowing what type you have can help you understand its specific vulnerabilities. In the Pacific Northwest, cedar is a popular choice for its natural resistance to rot and insects, but it still requires maintenance. Other common types of wood siding include pine and redwood, each with its own characteristics. Identifying your wood type will be important when it’s time to buy replacement materials or choose the right kind of paint or stain. If you’re not sure what you have, a professional can help you identify it and recommend the best course of action for repairs and long-term care.
Specific Wood Recommendations
When you’re replacing a board or two, you want to choose a material that will stand the test of time. Cedar is a fantastic option, especially here in the Puget Sound, because it naturally resists the rot and insects that thrive in our damp climate. It’s lightweight, easy to work with, and takes paint or stain beautifully. Redwood is another top contender with similar durable qualities. If you’re looking for something with exceptional longevity, cypress can last for a century with the right care. For a more modern approach, engineered wood offers great stability and consistency. Making the right choice ensures your repair blends seamlessly and provides lasting protection for your home’s exterior siding.
Wood Siding Longevity
One of the biggest questions homeowners have is how long their wood siding should last. The truth is, with proper installation and consistent care, it can protect your home for decades. The key is the finish. A quality coat of paint or stain acts as a shield against moisture and UV rays, and it needs to be reapplied every several years. Don’t let anyone tell you wood is a high-maintenance headache; modern wood treatments have made it just as durable as many composite or metal alternatives. When you see signs of wear like cracks or fading, it’s simply your home’s way of telling you it’s time for a little upkeep to ensure it continues to look great and perform well for years to come.
Planning Your Siding Project
Once you have a good handle on the condition of your siding, it’s time to map out your next steps. Planning a siding project involves more than just picking out materials; it’s about making smart, long-term decisions for your home. You’ll need to weigh the pros and cons of a simple repair versus a full-scale replacement, get a realistic idea of the costs involved, and think about other exterior upgrades that might make sense to tackle at the same time. A well-thought-out plan not only ensures a smoother process but also helps you get the most value out of your investment. Let’s walk through the key considerations to help you build a solid plan of action for your home.
Deciding Between Partial Repair and Full Replacement
One of the first big questions you’ll face is whether to patch up the problem areas or replace all of your siding. If the damage is limited to just a few boards and the rest of your siding is in good shape, a partial repair is a perfectly reasonable and cost-effective solution. You don’t need to tear everything off if only one section has rot. However, if your siding is nearing the end of its expected lifespan or you’re finding widespread issues like rot, warping, and pest damage across multiple sides of your house, a full replacement is likely the smarter long-term investment. A professional inspection can give you a clear picture of the overall health of your siding and help you make an informed choice between a quick fix and a complete overhaul.
Estimating Project Costs
Understanding the potential costs is crucial for planning. A partial repair will always be cheaper upfront, but if your siding is old, you might just be delaying a more expensive replacement that will be necessary in a year or two anyway. A full siding replacement is a significant investment, often ranging from $20,000 to $30,000 depending on the size of your home and the materials you choose. While that number can seem daunting, it’s important to weigh it against the cost of continuous repairs and the potential for damage to your home’s structure if failing siding is left unaddressed. Getting a detailed quote from a trusted contractor is the best way to understand the financial scope of your project and explore different material options to fit your budget.
Considering Other Upgrades at the Same Time
If you’re leaning toward a full siding replacement, it’s the perfect opportunity to think about other exterior upgrades. Since the old siding will be removed, you’ll have easy access to the sheathing underneath, making it an ideal time for improvements that can enhance your home’s efficiency and protection. Bundling projects can save you time, money, and the headache of coordinating multiple contractors down the line. It’s all about maximizing the work being done while your home is already a construction zone.
Adding a House Wrap
Many older homes were built without a “house wrap,” which is a modern weather-resistant barrier installed between the sheathing and the siding. This layer is your home’s last line of defense against moisture and air infiltration. If you’re removing all your old siding, adding a high-quality house wrap is one of the smartest upgrades you can make. It helps prevent water from reaching the structural components of your walls, reduces drafts, and can even improve your home’s energy efficiency. It’s a relatively small additional cost that provides significant long-term protection for your home.
Replacing Windows
Siding and windows go hand in hand. If your windows are also old and inefficient, replacing them at the same time as your siding is incredibly efficient. This allows contractors to properly integrate the window flashing and weatherproofing with the new house wrap and siding, creating a seamless, airtight seal that’s difficult to achieve when the projects are done separately. Upgrading to modern, energy-efficient windows can lower your utility bills and improve your home’s comfort, making it a worthwhile addition to your siding project.
Understanding the Project Timeline
Patience and planning are key when it comes to exterior renovations. It’s important to have realistic expectations for how long the process will take. From the moment you sign a contract, it can take eight to ten weeks or even longer just for the siding materials to be ordered and delivered. Once the materials arrive, the installation itself can take several weeks, depending on the size of your home and the weather. Be sure to factor in these lead times, especially if you’re trying to complete the project before a specific season. A good contractor will keep you informed every step of the way, but knowing the general timeline from the start helps manage expectations.
Can You Install New Siding Over Old Siding?
It’s a common question: can you just put new siding on top of the old stuff? The short answer is sometimes, but it’s rarely the best idea. It’s technically possible to install new siding over old wood siding, but only if the existing layer is in near-perfect condition—no rot, no warping, and securely fastened everywhere. The problem is that covering up old siding prevents you from inspecting the sheathing underneath for hidden damage or rot. It can also create an uneven surface for the new installation and potentially trap moisture between the layers. For a lasting, high-quality result, the recommended approach is always to remove the old siding completely before installing the new.
Exploring Alternative Siding Materials
If you’ve decided that a full replacement is the right move, you have a fantastic opportunity to upgrade your home’s exterior with modern materials. While wood offers a timeless, classic beauty, it also comes with a significant maintenance commitment. Today, there are many alternative siding options that provide the aesthetic you love with far greater durability and less upkeep. These materials are engineered to withstand the elements, resist pests, and hold their color for years, giving you peace of mind and freeing up your weekends. Let’s look at some of the most popular and effective alternatives to traditional wood siding.
Fiber Cement Siding (e.g., James Hardie)
Fiber cement is one of the most popular wood alternatives on the market, and for good reason. Products like James Hardie siding are made from a blend of cement, sand, and cellulose fibers, creating an incredibly durable material that can be molded to mimic the look of wood grain. It’s resistant to rot, insects, and fire, and it won’t warp or buckle under the sun and rain we see in the Puget Sound. While it’s a heavy material that requires professional installation, its longevity and low maintenance make it a fantastic investment. It holds paint exceptionally well and offers the classic charm of wood without the constant worry of decay.
Other Durable Material Options
Beyond fiber cement, several other materials offer excellent durability and unique aesthetic qualities. Depending on your budget, style preferences, and maintenance tolerance, one of these might be the perfect fit for your home. Each comes with its own set of benefits, from cost-effectiveness to modern appeal.
Engineered Wood
Engineered wood siding offers a compelling middle ground between natural wood and synthetic alternatives. It’s made from wood strands or fibers that are compressed and bonded with resin, then treated to resist moisture and insects. This process results in a product that is more stable and less prone to warping or splitting than traditional wood. It delivers a very authentic wood-like appearance because it’s a wood-based product, but with enhanced durability that stands up better to the elements. It’s a great choice if you love the look of wood but want a bit more performance and stability.
Vinyl Siding
Vinyl is a go-to option if affordability and low maintenance are your top priorities. Made from PVC plastic, vinyl siding is lightweight, easy to install, and requires little more than an occasional cleaning to keep it looking fresh. It’s impervious to rot and insects, and since the color is baked into the material, you never have to worry about painting it. While it may not offer the same high-end look as wood or fiber cement, modern vinyl siding comes in a huge variety of colors and profiles, including some that do a decent job of mimicking wood grain.
Metal Siding
For a more modern or industrial aesthetic, metal siding made from steel or aluminum is an excellent choice. It is incredibly durable, fireproof, and completely resistant to rot and insects. Metal siding can be installed as long, sleek panels for a contemporary look or in profiles that mimic traditional lap siding. While it can be more expensive than other options and is susceptible to denting, its exceptional longevity and minimal maintenance requirements make it a strong contender for homeowners looking for a durable, long-term solution for their commercial or residential siding needs.
Benefits of Factory-Finished Siding
Regardless of which material you choose, consider opting for a factory-finished product. This means the siding arrives at your home already painted or stained in a controlled factory environment. This process ensures a flawless, uniform coating that is much more durable than a finish applied on-site, where it’s subject to weather, temperature changes, and other variables. Factory-finished siding often comes with a lengthy warranty on the finish itself, protecting you against peeling, chipping, and fading for years. It also speeds up the installation process, as there’s no need to wait for good weather to paint, allowing you to enjoy your beautiful new exterior sooner.
Tools and Materials for Exterior Wood Siding Repair
Before you can jump into the repair, you’ll want to get all your ducks in a row. Having the right tools and materials on hand makes the entire process smoother and helps you achieve a professional-looking finish. Think of it as your pre-project prep work. Depending on whether you’re dealing with a small crack or a completely rotted board, your shopping list will vary slightly. But don’t worry, most of these items are easy to find at your local hardware store. Let’s break down exactly what you’ll need to get the job done right.
Your Essential Siding Repair Toolkit
First, let’s cover the basics that you’ll need for almost any siding repair. Your essential toolkit should include a hammer, a pry bar for gently removing old boards, a sharp utility knife, and a tape measure. You’ll also want a quality paintbrush and a saw—an oscillating multi-tool is fantastic for making precise cuts without damaging surrounding boards. Most minor siding repairs are considered an intermediate-level DIY project and can be completed in an afternoon. Gathering these core tools first ensures you’re ready for the most common repair scenarios you’ll encounter.
Helpful Tools for a Professional Finish
Beyond the basics, a few extra tools can make a huge difference in the quality of your repair. For a truly seamless finish, a good quality paintbrush is non-negotiable for applying primer and paint smoothly. But the real game-changer for many DIYers is an oscillating multi-tool. This versatile saw is perfect for making precise cuts on a damaged board without having to remove the entire piece or risk damaging the siding around it. It gives you the accuracy you need for a clean, tight fit when patching in a new section. While you can certainly get by without one, investing in or borrowing these specific tools will help you achieve a repair that blends in perfectly and stands the test of time.
Replacement Boards and the Right Fasteners
If the damage is too extensive for a simple patch, you’ll need to replace the entire board or a section of it. The trickiest part is often finding a new board that matches your existing siding. The best strategy is to carefully remove a piece of the damaged board and take it with you to the lumber store. This helps you match the wood type, thickness, and texture perfectly. Don’t forget to grab the right fasteners, like galvanized or stainless steel siding nails, which resist rust. If you’re having trouble finding a match or the damage is widespread, our team is always here to help with your residential siding needs.
Using the Right Nails for the Job
When you’re repairing wood siding, the type of nail you choose is more important than you might think. It’s not just about holding the board in place; it’s about ensuring a clean, long-lasting finish. Always reach for galvanized nails for any exterior work. These nails have a special zinc coating that protects them from rust, which is crucial for preventing those ugly, discolored streaks that can run down your siding over time. For the best grip, look for 8d galvanized ring shank siding nails. The rings on the shank act like tiny barbs, providing extra holding power to keep the boards from pulling loose as they expand and contract with the weather. When you drive them in, make sure you’re hitting the wall studs and that the new board overlaps the one below it by at least an inch. This simple technique creates a secure fit and a tight seal against moisture.
Picking the Best Wood Filler or Epoxy
For smaller issues like cracks, woodpecker holes, or minor rot, wood filler or epoxy is your best friend. A high-quality, paintable exterior wood filler works well for cosmetic fixes. For areas with soft, rotted wood, a two-part epoxy is the superior choice. It creates a much stronger, more durable bond that will stand up to the elements. The most important step here is to completely remove any soft, rotted wood before applying the epoxy, as it needs a solid surface to adhere to. A putty knife and some sandpaper will be essential for application and smoothing.
Safety Gear and Essential Finishing Supplies
Last but certainly not least, let’s talk about safety and finishing. Always protect yourself by wearing safety glasses and a good pair of work gloves. Once your repair is complete, the finishing touches are what make it blend in seamlessly. You’ll need a high-quality exterior caulk to seal all the edges and joints, preventing any moisture from getting in. After caulking, apply a coat of exterior primer, followed by at least two coats of a quality exterior paint that matches your home’s color. This final step not only makes your repair invisible but also gives it the protection it needs to last for years.
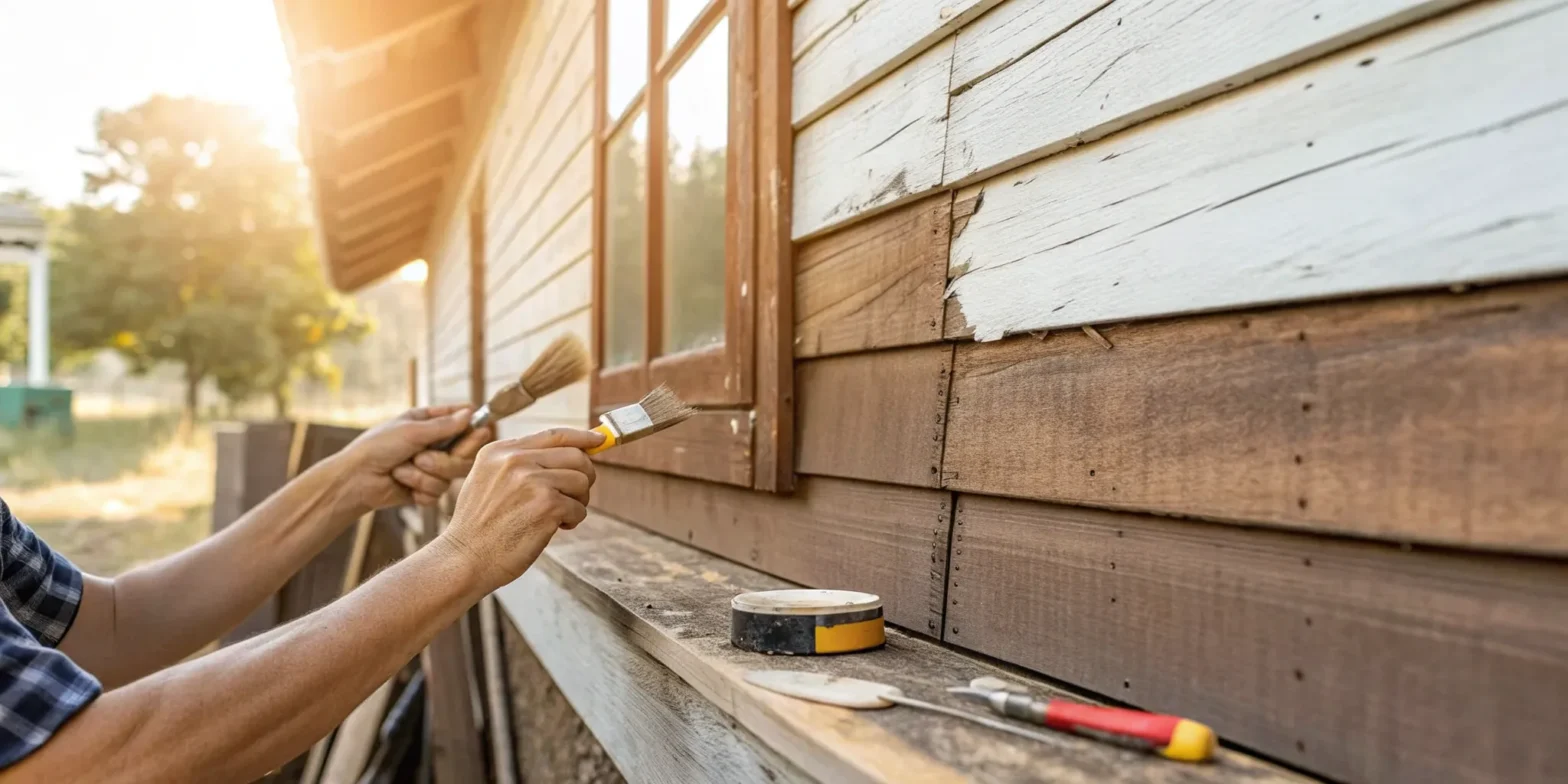
How to Patch Minor Damage with Wood Filler
For small dings, cracks, and holes, wood filler is a fantastic DIY solution. It’s a straightforward way to handle minor repairs, keeping your siding looking great and preventing small issues from becoming big ones. This method is perfect for cosmetic fixes that don’t require replacing a whole board. With just a few tools and a little patience, you can restore the smooth, clean look of your wood siding and protect it from further damage. It’s an empowering weekend project that makes a big difference.
Step 1: Prep the Damaged Area
Before you can patch anything, you need a clean slate. A solid prep job is the secret to a repair that lasts. Start by using a putty knife or a 5-in-1 tool to gently scrape away any flaking paint, dirt, and loose wood fibers from the damaged spot. If you uncover any soft, spongy wood, that’s rot. You’ll need to carefully dig out all of it with a scraper or chisel until you reach firm, healthy wood. This step is non-negotiable for a durable fix. Finish by lightly sanding the area to rough up the surface, which helps the filler bond. Wipe away all the dust with a tack cloth and make sure the area is completely dry before moving on.
Step 2: Apply Your Wood Filler
Now for the main event. Choose a high-quality, exterior-grade wood filler that’s designed to withstand the weather. For deeper holes or areas that need more structural integrity, a two-part epoxy filler is your best bet. Mix it according to the directions, then use a flexible putty knife to press the filler firmly into the damaged area, making sure to fill every nook and cranny. It’s smart to overfill the spot slightly, creating a small mound. The filler will shrink a bit as it cures, and this ensures you’ll have enough material to sand down for a flush finish. You can find great tips on choosing the right filler for your specific project.
Step 3: Sand for a Seamless Finish
Patience is key here. Let the wood filler dry completely, following the manufacturer’s recommended curing time—don’t rush it. Once it’s rock-hard, it’s time to make it disappear. Wrap a piece of medium-grit sandpaper (around 120-grit) around a sanding block. The block helps you apply even pressure and avoid creating dips or low spots. Sand the patched area using smooth, even strokes until it’s perfectly level with the surrounding siding. Run your fingers over the repair; it should feel seamless. When you’re happy with the finish, wipe away all the sanding dust with a clean, dry cloth so your primer has a clean surface to stick to.
Step 4: Prime and Paint for Protection
Your repair isn’t finished until it’s sealed and protected. This final step is what makes the patch invisible and shields it from moisture and sun. Apply a coat of high-quality exterior primer over the sanded filler and any bare wood. Primer is essential because it seals the porous filler and ensures the topcoat of paint will adhere properly and look uniform. Once the primer is dry, apply one or two coats of exterior paint that matches your siding. For a perfect color match, bring a paint chip from your siding to a paint store. This finishing touch keeps your residential siding looking its best and protected from the elements.
A Step-by-Step Guide to Replacing Wood Siding
When a board is too far gone for a simple patch with wood filler, replacing it entirely is your best bet. This might sound like a big job, but it’s completely manageable when you break it down. Taking the time to replace a single damaged board can prevent moisture from seeping into your home’s structure and causing much bigger problems down the road. Follow these steps to swap out the old board for a new one, creating a seamless, protective repair.
Step 1: Prepare the Wall for Installation
Once you’ve carefully removed the damaged board, take a moment to inspect what’s underneath. This is your chance to address any hidden problems before you cover them up. Look closely at the wall sheathing for any signs of moisture, like dark stains or soft spots, which could indicate rot. If you find any damage, it’s essential to repair it now. Next, make sure the area is clean and ready for the new board. Pull out any leftover nails and scrape away old caulk or debris. You’ll also want to check the condition of the weather-resistant barrier, or house wrap, underneath. If it’s torn or damaged, you’ll need to patch it to ensure your home stays protected. A clean, solid, and dry surface is the foundation for a successful siding replacement that will last.
Step 1: Carefully Cut and Remove the Old Board
First, you’ll need to isolate and remove the bad board without damaging its neighbors. Use a pry bar and a hammer to gently loosen the nails holding the damaged board in place. You may need to carefully pry up the board above it to get access. Once the nails are out, the board should come off. If it’s a long board and only one section is damaged, you can use a circular saw or oscillating multi-tool to make clean vertical cuts on either side of the rotted area and just remove that piece.
How to Remove Old Nails Without Splitting Wood
Getting the old nails out is often the trickiest part of the job. They can be stubborn, and if you just try to yank them out with a hammer, you risk splitting the good siding board above it—the exact opposite of what we’re trying to do. The secret is to work smarter, not harder. Instead of pulling the nail through the wood, it’s often much safer to cut it. You can slide a small hacksaw or an oscillating multi-tool blade behind the board and carefully slice through the nail shank. To avoid scratching the neighboring board, slip a thin piece of plywood or a metal shim behind your tool as a guard. These gentle techniques are one of the best ways to protect the surrounding wood and make the removal process much smoother.
Step 2: Check the Sheathing for Hidden Damage
With the old siding gone, take a good look at what’s underneath. You’ll see the building paper (like tar paper or a house wrap) and the sheathing. Check the sheathing for any dark stains, soft spots, or signs of rot. Gently press on the wood with a screwdriver; if it feels spongy, you’ve got moisture damage. This is a critical step because simply covering up a problem will only lead to more extensive and expensive repairs later. If the damage looks widespread, it’s a good idea to get a professional opinion on your residential siding.
Step 3: Measure Twice, Cut Your New Board Once
For a perfect fit, use the piece you just removed as a template for your new board. If the old board crumbled, measure the opening carefully. Take a piece of the old siding with you to the lumber yard to ensure you get an exact match in both thickness and style. When you get home, measure your replacement piece and cut it to size with a handsaw or circular saw. It’s a good idea to prime all sides of the new board, including the cut ends, before you install it. This gives it an extra layer of protection against moisture.
Step 4: Fit and Fasten the New Siding
Now, carefully slide the new board into place. It should fit snugly under the board above it and sit flush with the surrounding siding. To secure it, use galvanized siding nails, which are resistant to rust. Drive the nails through the top of the new board so that the board above will cover the nail heads. Be sure not to overdrive the nails, as this can cause the wood to crack or dimple. The goal is for the nail head to sit just flush with the surface of the siding.
Proper Nailing Technique
The small details of a repair often make the biggest difference, and your nailing technique is a perfect example. Always use galvanized or stainless steel siding nails for your project. These are specifically treated to resist moisture, which means you won’t have to deal with ugly rust streaks running down your siding in a few years. When you drive the nail, aim for it to be flush with the siding surface. If you drive it too deep, you create a small divot where water can pool. If you leave it sticking out, it won’t hold the board securely and will interfere with the board above it. A little precision here goes a long way in creating a durable, professional-looking finish.
Staggering Joints for a Clean Look
If you’re replacing several boards next to each other, avoid the temptation to cut them all to the same length. For the most natural and professional appearance, you should stagger the butt joints—the places where the ends of two boards meet. Think of it like laying a brick wall or a hardwood floor; you never want the seams to line up in a perfect vertical line. By cutting your replacement boards to different lengths, you break up that visual line and help the repair blend seamlessly into the rest of your siding. This simple technique makes the new boards look like they’ve always been part of the original installation, rather than an obvious patch job.
Leaving Gaps for Expansion and Contraction
Wood is a natural material that responds to its environment. It expands slightly in warm, humid weather and contracts when it’s cold and dry. To account for this movement, you need to leave small gaps during installation. When fitting a new board, leave a tiny 1/8-inch gap where it meets a corner or another board at a butt joint. This gives the wood room to breathe without buckling or warping. It might feel counterintuitive to leave a gap, but this space is essential for the long-term health of your siding. You’ll seal these gaps with a flexible, paintable caulk, which will accommodate the movement while keeping moisture out.
Ensuring a Gap Between Siding and Roof
One of the most critical areas for moisture management is where your siding meets a roofline, like over a garage or a porch. It’s essential to maintain at least a one-inch gap between the bottom edge of the siding and the roof shingles. This space prevents rainwater from wicking up from the roof into the end grain of the wood siding, which is a primary cause of rot. This gap allows water to drain away properly and the area to dry out. It’s a key detail that shows how your home’s exterior systems, from the residential roofing to the siding, must work together to protect your home from the elements.
Step 5: Caulk and Seal for a Watertight Finish
The final step is to make your repair weatherproof and invisible. Apply a line of high-quality, paintable exterior caulk to the joints where the new board meets the old ones. Smooth the bead of caulk with your finger for a clean seal. Once the caulk is dry, you’re ready for paint. Apply a coat of exterior primer, followed by at least two coats of top-quality exterior paint that matches the rest of your siding. This finishing touch is key to protecting the wood and making your repair blend in perfectly.
Proactive Tips to Protect Your Wood Siding
After you’ve put in the work to repair your siding, the last thing you want is to do it all over again in a year. The best way to avoid major repairs is to adopt a simple maintenance routine. Think of it as preventative care for your home’s exterior. A little attention now and then can save you from costly headaches and keep your wood siding looking its best for years to come. By staying ahead of potential problems, you protect not just your siding but your entire home from moisture, pests, and weather damage. These straightforward habits don’t take much time, but they make a huge difference in extending the life of your siding and maintaining your home’s curb appeal.
Create a Simple Inspection Routine
One of the easiest things you can do is simply walk around your house a few times a year and take a close look at your siding. I like to do this in the spring and fall when the seasons change. Look for any peeling paint, cracks, or gaps in the caulking. Gently press on the boards in areas that get a lot of rain to check for soft spots, which could indicate rot. Catching these small issues early prevents them from turning into major projects. A consistent inspection schedule is the foundation of good maintenance for any type of residential siding.
Why Clean Gutters Are Your Siding’s Best Friend
Your gutters play a huge role in protecting your siding. When they get clogged with leaves and debris, rainwater can overflow and run directly down your walls. This constant exposure to moisture is a primary cause of wood rot and decay. Make it a habit to clean your gutters at least twice a year, once in the spring and again in the fall. While you’re up there, check that your downspouts are properly attached and directing water several feet away from your foundation. This simple task is one of the most effective ways to prevent water damage.
Trim Plants to Keep Moisture at Bay
Water is wood siding’s biggest enemy, and it doesn’t just come from the sky. Overgrown landscaping can be a hidden source of trouble. Trim back any bushes, trees, or vines that are touching your siding. Plants trap moisture against the wood and block airflow, creating the perfect environment for mildew and rot to develop. It’s also a good idea to check your sprinkler system. Make sure the spray is watering your lawn and garden, not your house. Adjusting sprinkler heads is a quick fix that can prevent a lot of future damage.
Repaint and Reseal for Long-Lasting Protection
A quality coat of paint or stain is more than just decorative—it’s your siding’s first line of defense against the elements. This protective layer seals the wood, shielding it from rain, snow, and damaging UV rays. Depending on our Pacific Northwest climate and the type of finish you have, you should plan to repaint or restain your siding every five to seven years. Don’t wait until you see widespread peeling or fading. Staying on top of your finishing schedule keeps the wood sealed and protected, which is much easier than dealing with the rot that can form underneath a failing finish.
Related Articles
- Choosing the Right Siding for Your Home
- Redmond Residential Siding Licensed Contractor
- Top Commercial Siding Materials & Their Pros and Cons
Frequently Asked Questions
When is the damage too much for a DIY repair? If you’re dealing with a few small cracks or replacing a single, easily accessible board, you can likely handle it yourself. However, it’s time to call a professional if you find widespread rot across multiple boards, if the sheathing underneath the siding feels soft and spongy, or if the damage is high up and requires complex ladder work. These are signs of a more significant moisture problem that needs an expert eye to ensure the structural integrity of your home isn’t compromised.
Can I just paint over peeling paint or small cracks? It’s tempting to look for a quick fix, but painting over a problem will only make it worse in the long run. Peeling paint is a sign that moisture is trapped underneath, and simply covering it up seals that moisture in, accelerating rot. You need to scrape away all the loose paint, fill any cracks, and properly prep the surface first. A solid foundation is the only way to get a paint job that both looks good and protects your home.
What’s the real difference between wood filler and epoxy? Think of it this way: standard wood filler is best for cosmetic issues. It’s great for filling small nail holes, minor dings, or shallow cracks on an otherwise healthy board. A two-part epoxy, on the other hand, is more of a structural solution. You use it after you’ve dug out soft, rotted wood. The epoxy hardens into a super-durable material that rebuilds the damaged area, making it strong and weather-resistant again.
I see some green or black stuff on my siding. Is that definitely rot? Not necessarily, so don’t panic just yet. If the spots are on the surface of the paint and the wood underneath feels firm, you’re likely looking at mildew. This is common in damp, shady areas and can usually be cleaned off with a siding-safe cleaning solution. Rot is different; it means the wood itself is decaying. If you press on the area and it feels soft, spongy, or crumbles, then you’re dealing with rot that needs to be repaired.
How critical is it to prime the new wood before painting? It’s an absolutely essential step that you shouldn’t skip. Raw wood is like a sponge, and if you apply paint directly to it, the wood will soak it up unevenly, leading to a blotchy finish. Primer seals the wood surface, creating a uniform base so your topcoat of paint goes on smoothly and looks consistent. More importantly, it provides an extra layer of moisture protection and helps the paint adhere better, meaning your repair will last much longer.
Save Good Siding Scraps for Future Repairs
Here’s a pro tip that will save you a major headache down the road: always keep the good pieces of siding you remove during a repair. Tucking away a few of these scraps in your garage or shed is like creating your own perfect repair kit for the future. When a small, isolated spot gets damaged later, you’ll have a perfectly weathered and matching piece ready to go, saving you the trouble of trying to find a new board that fits the color and texture. When you’re removing a longer board, remember that the nails are often placed high to allow for expansion. Instead of trying to pry them out and risk splitting the wood, it’s better to cut the nails with an oscillating tool to salvage the board cleanly.
Common Myths About Wood Siding
Wood siding sometimes gets a bad rap, surrounded by myths that can make homeowners hesitant. You might have heard that it’s a ton of work or that it can’t stand up to the weather we get here in the Puget Sound. The truth is, modern wood siding, especially when installed and maintained correctly, is a durable, beautiful, and surprisingly manageable choice for your home’s exterior. It’s time to set the record straight and clear up some of the most common misconceptions. Understanding the facts can help you feel confident in caring for your wood siding and appreciate its timeless appeal.
Myth: Wood siding needs constant work
The biggest myth out there is that wood siding requires endless upkeep. While it’s true that wood needs more attention than vinyl, “constant work” is a major exaggeration. The key to a low-maintenance wood exterior lies in two things: proper installation and a quality finish. When siding is installed correctly with the right gaps and fasteners, and then sealed with a high-quality paint or stain, it creates a durable barrier against the elements. This protective finish can last for years without needing major intervention. A simple routine of annual inspections and cleaning is usually all it takes to keep it in great shape, proving that you don’t have to dedicate every weekend to siding maintenance.
Myth: Wood is harder to fix than other materials
It might seem like a solid plank of wood would be more difficult to repair than a panel of vinyl or metal, but the opposite is often true. If a single wood board gets damaged by a stray baseball or a woodpecker, you can repair or replace just that one board. With vinyl or metal siding, damage often means replacing an entire, large section, which can be costly and difficult to match perfectly with the surrounding panels that have faded over time. The ability to handle repairs on a board-by-board basis makes wood siding one of the more forgiving and straightforward materials to maintain over the long term.
Myth: Wood isn’t good for bad weather
Living in the Pacific Northwest, it’s natural to worry about how wood will hold up to our famously damp climate. But the idea that wood can’t handle bad weather is simply untrue. The secret is choosing the right type of wood. Materials like cedar are naturally resistant to moisture, rot, and insects, making them an excellent choice for our region. These woods contain natural oils and preservatives that help them repel water and prevent decay. With a proper finish and good maintenance practices—like keeping gutters clean and trimming back plants—wood siding can perform beautifully in even the toughest weather conditions for decades.