Date
Tue Jan 27Here in the Puget Sound, our homes endure a lot of weather. The persistent rain and damp air mean our siding is working overtime, year-round. Think of it as your home’s raincoat; if it has a tear, everything underneath gets wet. This is why understanding what is siding repair is so critical for local homeowners. It’s not just about fixing visible damage, but about ensuring your home has an unbroken shield against moisture that can lead to rot, mold, and other structural headaches. We’ll explore the common signs of weather-related siding damage and explain the best ways to keep your home’s exterior in top condition.
That small crack in your siding is easy to ignore. You see it every day, and it’s tempting to add it to the bottom of your to-do list. But even the most minor-looking damage can be a major liability for your home. Openings in your siding are an invitation for water to seep into your walls, leading to hidden mold and rot that can compromise your home’s structure. Think of siding house repair not as a chore, but as essential preventative maintenance. Knowing what to look for is the first step. We’ll cover the six key indicators that your siding needs help, from subtle warping to obvious holes.
Key Takeaways
- Catch Problems Early with Routine Checks: Make it a habit to walk around your home a couple of times a year. Looking for issues like cracks, warped panels, or soft spots helps you address minor damage before it leads to more serious and expensive structural repairs.
- Know When to DIY vs. Call a Pro: While fixing a single cracked vinyl panel can be a manageable weekend project, widespread damage or repairs involving specialized materials like fiber cement are best left to an expert to ensure the job is done safely and correctly.
- Focus on a Proper Repair, Not Just a Patch: A successful repair is more than cosmetic. It requires checking for hidden water damage, matching materials for a seamless look, and following installation best practices to create a durable, weatherproof seal.
Does Your Siding Need Repair? 6 Signs to Look For
Think of your siding as your home’s first line of defense. It stands up to wind, rain, and sun, protecting everything and everyone inside. But like any hardworking exterior, it can’t last forever without a little attention. Catching problems early is the key to avoiding bigger, more expensive headaches down the road. A quick walk around your property every few months is often all it takes to spot the tell-tale signs that your siding needs some TLC. Not sure what to look for? Here are six clear indicators that it’s time for a repair.
Spotting Cracks, Holes, and Gaps
Even small openings in your siding can be a big deal. Cracks, holes, and gaps are open invitations for moisture and pests to sneak into your walls. Once water gets in, it can lead to mold, mildew, and rot in your home’s structural frame—causing serious damage you can’t even see. Take a close look at your siding, especially after a storm. Pay attention to where panels meet, around windows and doors, and near the foundation. If you spot any openings, it’s a sign that your residential siding needs attention before a small issue becomes a major problem.
Is Your Siding Warped or Buckling?
Your siding panels should lie flat and smooth against your house. If you notice any sections that are warped, bulging, or buckling, something is wrong. This often happens when moisture gets trapped behind the siding, causing the material to expand and contract with temperature changes. It can also be a sign of an improper installation. Warped panels not only look unsightly but also create gaps that compromise your home’s protective barrier. This is a problem that typically gets worse over time, so it’s best to address it as soon as you see it.
Checking for Soft Spots and Rot
Rot is a serious red flag, particularly for homes with wood siding. If you see discolored patches or areas that look like they’re crumbling, gently press on them with your finger or the handle of a screwdriver. If the area feels soft, spongy, or gives way easily, you’re dealing with rot. This means water has penetrated the siding and is actively decaying the material. According to home repair experts, visible damage on the outside often hints at more extensive moisture damage hidden underneath, so this is a sign you shouldn’t ignore.
Finding Loose or Missing Panels
A strong gust of wind or simple wear and tear can sometimes knock a piece of siding loose or tear it off completely. This leaves the underlayer of your home, known as the sheathing, exposed to the elements. This sheathing isn’t designed to be a permanent exterior surface, and prolonged exposure to rain and sun can cause it to deteriorate quickly. While it might be tempting to repair vinyl siding yourself, getting a professional to re-secure or replace the panel ensures a proper fit and seal, preventing future issues.
What Bubbling Paint and Stains Reveal
If you have painted siding, look out for any bubbling, peeling, or blistering. This is a classic sign that water is trapped beneath the paint, causing it to lose its adhesion. The moisture is likely coming from a leak in the siding itself or from within the wall. You might also notice water stains or discoloration running down the siding, especially under eaves or near windows. These stains indicate that water isn’t being properly diverted away from your home and is instead soaking into your siding, which can lead to bigger problems over time.
Are Pests Damaging Your Siding?
Unfortunately, critters sometimes see your siding as a great place to call home. Small holes, sawdust-like debris (known as frass), or faint scratching sounds can indicate an infestation of termites, carpenter ants, or other wood-boring insects. Woodpeckers can also cause significant damage by drilling holes into wood siding. Any sign of pests means your siding’s integrity has been compromised, creating pathways for moisture to enter your walls. Addressing both the pest problem and the siding damage is crucial to protecting your home’s structure.
Why Your Siding Material Matters for Repairs
When it comes to siding repairs, the material on your home plays a huge role in what can go wrong and how to fix it. Each type has its own unique strengths and weaknesses, which influences the kind of damage you’ll see and the steps needed to get it back in shape. Understanding these differences helps you spot problems early and know what to expect during a repair. From durable vinyl to classic wood, let’s look at the common issues you might face with different siding materials.
Repairing Common Vinyl Siding Issues
Vinyl is a popular and resilient choice for many homes, but it’s not indestructible. It can crack or get holes from impacts, like a stray baseball or a run-in with the lawnmower. Extreme weather can also cause it to become brittle and break. One of the biggest concerns with damaged vinyl is what you can’t see. A small crack can let moisture seep in behind the panel, leading to hidden rot and mold on your home’s structure. That’s why it’s so important to address even minor damage quickly. A professional siding contractor can replace the damaged section to prevent bigger, more expensive problems down the road.
How to Repair and Maintain Wood Siding
Wood siding offers a timeless, natural beauty, but it requires a bit more attention to keep it looking its best. Its main vulnerability is moisture, which can lead to rot, warping, and splitting, especially around windows, doors, and corners where water tends to collect. Regular maintenance is your best defense. Cleaning your siding annually helps remove dirt and mildew that can trap moisture and break down the wood. If you do find soft spots or damage, it’s often best to call in a professional. They can properly cut out the rotted section and fit a new piece that matches your existing cedar siding perfectly.
What to Know About Repairing Fiber Cement
If you’re looking for durability, fiber cement siding is hard to beat. Brands like James Hardie are engineered to withstand harsh weather, from heavy rain and wind to hail, making them a fantastic choice for homes in the Puget Sound region. It’s also resistant to fire, rot, and pests. While it’s incredibly tough, damage can still happen from a severe impact. Repairing fiber cement involves replacing the entire damaged plank, as patching isn’t an effective long-term solution. Due to the material’s weight and the specific tools required for cutting and installation, fiber cement repairs are typically best left to experienced professionals.
Repairing Metal Siding: What to Consider
Metal siding, often made of aluminum or steel, is known for its strength and longevity. It stands up well to harsh weather and won’t rot or fall victim to insects. However, its biggest drawback is that it can dent quite easily. A hailstorm or an accidental bump can leave noticeable dings on the surface. While minor dents can sometimes be pulled out, larger ones may require the panel to be replaced. Another thing to keep in mind is the finish. While metal siding requires less maintenance than wood, its painted surface can fade or scratch over time, eventually requiring a fresh coat of paint to restore its appearance and protective qualities.
Expected Lifespan of Siding Materials
Vinyl Siding: 20-40 Years
Vinyl siding is a go-to for many homeowners, and for good reason—it’s durable and doesn’t ask for much maintenance. You can typically expect it to last anywhere from 20 to 40 years, with the exact lifespan depending on the quality of the panels and the local climate. While it holds up well, it’s not immune to damage. Even a small crack from a storm or a hole from a misplaced ladder can create a serious vulnerability. These openings allow moisture to get behind the siding, leading to hidden problems like rot and mold that can quietly compromise your home’s structure. Promptly addressing these minor issues is key to preventing a much larger siding repair down the line.
Fiber Cement Siding: 30-50 Years
If you’re looking for a material that offers serious longevity, fiber cement is an outstanding choice. Engineered to last between 30 and 50 years, it’s built to handle just about anything the weather throws at it. This resilience makes it a perfect fit for homes in the Pacific Northwest, as it stands up beautifully to heavy rain, strong winds, and even hail. Brands like James Hardie are known for their incredible toughness. Should a panel get damaged, however, the best practice is to replace the entire plank. Patching just isn’t a reliable long-term fix for this material, which is why professional installation and repair are so important for maintaining its integrity.
Wood and Cedar Siding: 20-40 Years
There’s nothing quite like the classic, natural look of wood siding. With proper care, materials like cedar can protect your home for 20 to 40 years. The key to reaching that lifespan is consistent maintenance, as wood is particularly susceptible to moisture. Without a good seal, water can lead to rot and decay, especially in areas that are frequently damp. It’s a good idea to regularly inspect your siding for any signs of trouble. Keep in mind that visible damage on the surface can often be a clue that more extensive moisture issues are hiding underneath, making it crucial to address problems as soon as you spot them with a professional siding contractor.
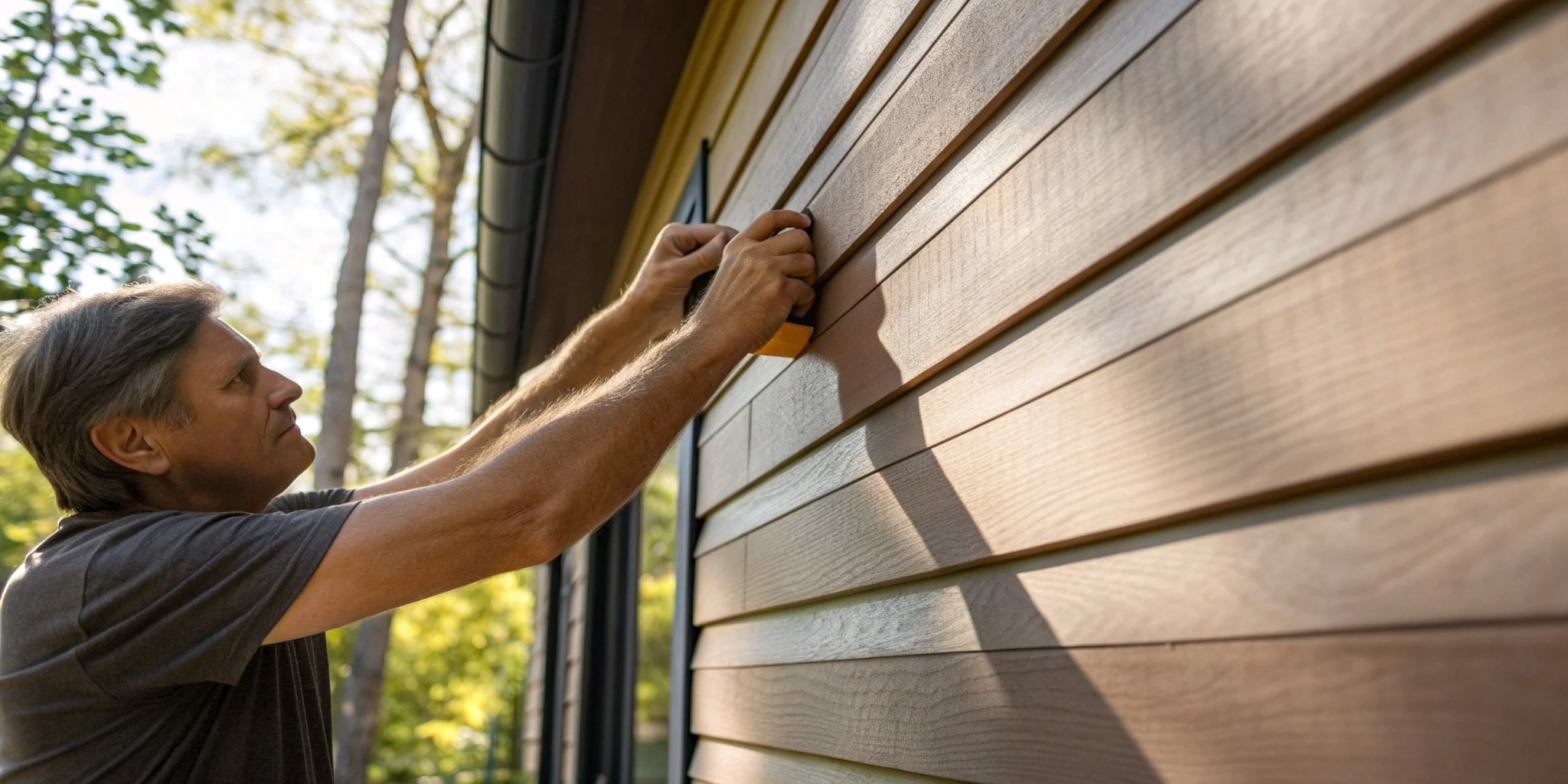
How to Repair Siding: A Step-by-Step Guide
Tackling a siding repair yourself can feel empowering, especially if it’s just a small, manageable section. The key is knowing what you’re getting into before you start. The process generally involves assessing the problem, removing the damaged piece, and carefully installing a new one. While the specifics can change depending on whether you have vinyl, wood, or fiber cement siding, the core steps are quite similar. This guide walks you through a typical repair for vinyl siding, one of the most common materials out there. Remember to always prioritize safety and, if the job feels bigger than you expected, don’t hesitate to call in a professional.
Step 1: Carefully Assess the Damage
Before you can fix the problem, you need to understand its full scope. Take a close walk around your home and look for any obvious signs of trouble. You’re searching for cracks, holes, or gaps, as well as panels that are warping, buckling, or pulling away from the wall. Pay special attention to any soft spots or signs of rot, which could point to moisture getting trapped behind the siding. If you find pieces that are loose, crooked, or missing entirely, you’ve definitely got a repair on your hands. A thorough inspection helps you determine if this is a simple patch job or a symptom of a larger issue. If the damage is widespread or you suspect problems with the structure underneath, it’s best to get a professional opinion on your residential siding.
Step 2: Get Your Tools and Materials Ready
Having everything you need on hand before you start makes the job go much smoother. For a standard vinyl siding repair, you’ll want to assemble a basic toolkit. This includes a measuring tape, framing square, utility knife, hammer, and a pry bar. You’ll also need a few specialty items like aviation snips for cutting the siding and a zip tool, which is designed to lock and unlock siding panels. Of course, you’ll need the replacement siding itself—try to get an exact match in color and texture for a seamless look—and roofing nails to secure it. Don’t forget safety gear like gloves and safety glasses. Laying everything out ahead of time prevents you from having to stop mid-project to find a tool.
Step 3: Safely Remove the Damaged Section
With your tools ready, it’s time to carefully take out the damaged section. The goal is to remove it without harming the surrounding panels. Start by using the zip tool to unhook the bottom lip of the panel above the one you’re replacing. This gives you access to the nailing strip of the damaged piece. Next, use your pry bar to gently pull out the nails holding the damaged siding in place. Once it’s loose, you can slide the panel down and out. If you’re only replacing a small part of a panel, you can use a utility knife and framing square to make a clean, straight cut and remove just the broken section. Take your time here—a patient approach prevents you from accidentally creating a bigger repair job.
Step 4: Fit and Install the New Siding
Now you can fit the new piece into place. Cut your replacement siding to the correct length, making sure it’s about a half-inch shorter than the space to allow for expansion and contraction with temperature changes. Slide the top lip of the new panel under the panel above it until it locks into place. Next, secure it with roofing nails. This is a critical step: drive the nails into the center of the nailing slots, but don’t hammer them in all the way. You should leave about a 1/16-inch gap between the nail head and the siding. This gives the panel room to move. Nailing it too tightly is a common mistake that can cause the siding to buckle or warp over time, so proper installation is key.
Step 5: Caulk, Paint, and Finish the Job
The final step is to lock the new panel into the surrounding siding for a secure, weatherproof fit. Take your zip tool and hook it onto the bottom edge of the panel you just installed. Then, pull it down and along the length of the panel, “zipping” it over the top lip of the panel below it. You should hear and feel it snap securely into place. This creates a tight interlock that prevents wind and rain from getting behind your siding. Run your hand along the seam to make sure it’s smooth and fully engaged. Once everything is locked in, stand back and admire your work. You’ve successfully patched your siding and helped protect your home from the elements.
What’s the Average Cost to Repair Siding?
Figuring out a budget for siding repair can feel like a moving target. Costs depend heavily on the type of siding you have, the extent of the damage, and local labor rates. Generally, you can expect to pay between $3,500 and $15,000 for every 1,000 square feet of siding that needs attention. That’s a wide range, I know, but it reflects just how different each repair job can be. A few cracked vinyl panels after a storm will land on the lower end of that spectrum, while addressing widespread wood rot on a cedar-sided home will be on the higher end.
The key is to understand what goes into the final price tag. Your choice of material, the complexity of the repair, and whether you find any surprises hiding underneath the damaged panels all play a role. Even the architecture of your home can affect the cost—working on a multi-story house with complex angles requires more time and equipment than a simple one-story ranch. Getting a professional assessment is the best way to get a clear picture of what your specific residential siding project will involve.
Why Siding Material Affects the Final Cost
The material on your home is one of the biggest factors in your repair bill. Some materials are simply more expensive to purchase and more complex to install than others. For example, durable and popular options like fiber cement siding can cost between $6 and $15 per square foot for repairs. Here’s a quick look at some average repair costs by material:
- Vinyl: $4–$12 per square foot
- Wood: $5–$15 per square foot
- Aluminum: $6–$10 per square foot
- Brick: $8–$18 per square foot
These numbers help explain why a quote for one home can be so different from another, even if the damaged area is the same size.
Cost Per Panel
Sometimes, you don’t need a massive overhaul—just a few panels fixed. Understanding the cost per panel can give you a clearer idea of what to budget for these smaller jobs. The price tag for repairing or replacing a single siding panel can swing quite a bit depending on the material. For instance, fixing a cracked vinyl panel is often a straightforward job, typically costing between $100 and $400. Wood siding, on the other hand, can be more involved. If you’re dealing with significant rot in a cedar siding panel, the repair could range from $300 to $800 due to the extra labor and material costs involved.
Other materials have their own price points. Repairing aluminum siding generally falls between $6 and $10 per square foot, while brick, being a more premium material, can range from $8 to $18 per square foot. It’s important to remember that these are just ballpark figures. The final price can be influenced by the complexity of the repair and the extent of the damage. According to professional estimates, a few minor cracks will be on the low end, but discovering widespread issues underneath the siding can increase the scope and cost of the project significantly.
Breaking Down Siding Repair Labor Costs
Labor is another significant piece of the puzzle. Siding specialists typically charge between $40 and $50 per hour for their expertise. If you’re working with a general contractor for a larger project, their oversight might run between $300 and $500 per day. While it might be tempting to focus only on the material costs, skilled labor is what ensures your repair is done correctly and will last. You’re paying for the experience to properly remove damaged sections, check for underlying issues, and install the new siding so it’s seamless and weatherproof. A professional job prevents bigger, more expensive problems down the road.
Hourly Rates by Siding Type
While a siding professional’s hourly rate generally stays within that $40 to $50 range, the material on your home directly impacts the total time your project will take. Think of it this way: repairing vinyl siding is often the most straightforward. It’s lightweight and designed for quick installation, so a skilled contractor can typically replace a damaged panel in less time. On the other hand, materials like wood or fiber cement siding demand more precision and effort. Wood repairs might involve careful cutting, sanding, and painting to achieve a perfect match, while heavy fiber cement requires special tools and handling. This added complexity means more labor hours, which is why the final cost for repairing these premium materials is often higher, even if the hourly rate is the same.
Should You Repair or Replace Your Siding?
Sometimes, the toughest question is whether to patch things up or start fresh with a full replacement. A good rule of thumb is to consider the age of your siding and the extent of the damage. If your siding has more than 10 years of life left and the damage is mostly cosmetic, a repair is usually the way to go. However, if the cost to repair siding is more than half the cost of a full replacement, it’s often smarter to invest in new siding. Widespread issues like leaks, mold, or significant warping are also clear signs that a replacement is the better long-term solution for your home.
When to Choose Repair
Opting for a repair makes perfect sense when the damage is small and contained. Think of a single cracked vinyl panel from a lawnmower mishap or a small hole left by a storm. If the rest of your siding is in good shape, a targeted repair is a cost-effective way to keep your home protected. It’s a great choice when you need a quick, more affordable fix for now. The key is to act fast. Addressing minor issues as soon as you spot them is smart preventative maintenance that stops a small problem from turning into a major, expensive headache involving hidden water damage.
When to Choose Replacement
A full replacement becomes the smarter move when the problems are bigger than just a few cosmetic spots. If your siding is over 15 years old and you’re calling for repairs every season, a replacement is likely a better long-term investment. Widespread damage, like multiple warped panels, extensive rot, or persistent leaks, is another clear sign. Think about the bigger picture, too. If your energy bills are creeping up due to poor insulation or you’re planning to sell and want to maximize your home’s curb appeal, a full siding replacement is the most effective solution.
Common Hidden Costs in Siding Repair
What you see on the surface isn’t always the whole story. A few cracked panels might be hiding more serious problems like water damage, wood rot, or even mold growing on your home’s sheathing. These are the “hidden costs” that can turn a small repair into a much larger project. A good contractor will know to look for these issues during the initial inspection. Addressing them properly might add to the final bill, but it’s crucial for protecting the structural integrity of your home. Ignoring underlying damage will only lead to more extensive and costly repairs in the future.
Addressing Mold, Dry Rot, or Asbestos
Discovering mold, rot, or asbestos can feel overwhelming, but it’s better to find it than to let it fester. If your home was built before the 1980s, there’s a chance your siding or the materials behind it could contain asbestos, which requires specialized and safe removal. More commonly, moisture that has seeped behind damaged siding can lead to mold growth and dry rot. Rot is an especially serious red flag for homes with wood siding. If you find discolored patches that feel soft or spongy, it’s a clear sign that water is actively decaying your home’s structure. These issues aren’t just about appearances; they can impact your family’s health and the safety of your home, making them essential to address properly.
Factoring in a Professional Inspection
This is exactly why getting a professional assessment is the best first step. An experienced contractor knows that what you see on the surface isn’t always the whole story. They have the training to spot the subtle signs of hidden trouble, from the early stages of wood rot to the water stains that indicate a bigger moisture problem. A thorough inspection uncovers these potential “hidden costs” before the work begins, giving you a realistic understanding of the project’s scope and budget. This proactive approach ensures that the root cause of the problem is fixed, rather than just putting a cosmetic patch on a deeper issue, giving you peace of mind that your siding repair is done right.
Understanding the Return on Investment of Siding Work
Thinking about siding work purely as an expense is easy, but it’s really an investment in your home’s future. Beyond just fixing a problem, new or repaired siding can have a real financial impact. It protects your property from the elements, improves its curb appeal, and can even help lower your monthly energy bills. When you weigh the costs, it’s important to look at the complete picture—from how it increases your home’s market value to the long-term savings of choosing a full replacement over endless patch-ups. Let’s break down the return you can expect from your siding project.
How Siding Replacement Impacts Home Value
Your home’s exterior is the first thing anyone sees, and fresh siding makes a powerful first impression. A full siding replacement can dramatically improve your home’s curb appeal, making it look modern, clean, and well-cared-for. This visual upgrade directly translates to a higher market value if you ever decide to sell. Potential buyers see new siding as a major plus, as it signals that the home is structurally sound and won’t require a big exterior project anytime soon. According to remodeling impact reports, siding replacement consistently ranks as one of the home improvement projects with the highest return on investment at resale.
ROI for Repairs vs. Replacement Over Time
When you’re facing siding issues, the “repair or replace” debate often comes down to long-term value. While a small repair is less expensive upfront, constantly patching up old, failing siding can become a financial drain. If your siding is over 15 years old and you find yourself calling for repairs every year, a full replacement is almost always the smarter investment. Think of it this way: a replacement resets the clock, giving you decades of worry-free protection and eliminating the recurring costs of small fixes. This long-term durability and peace of mind is a significant part of the return on your investment in a new residential siding system.
Improving Energy Efficiency During Replacement
A siding replacement offers a unique opportunity to improve your home’s energy efficiency. Modern siding materials and installation techniques create a much tighter protective envelope around your home, reducing air leakage. When you replace your siding, you can also add a layer of insulation underneath, which significantly improves your home’s thermal performance. This means your heating and cooling systems don’t have to work as hard to maintain a comfortable temperature inside. The result is a tangible return on your investment in the form of lower monthly utility bills, a benefit you’ll appreciate year after year.
DIY vs. Hiring a Pro: Which Is Right for You?
Figuring out whether to handle a siding repair yourself or call in a professional can feel like a tough call. On one hand, you want to save money, but on the other, you want the job done right. The best choice really comes down to the scale of the damage, your personal skill level, and the type of siding on your home. A small, straightforward fix might be a great weekend project, but larger issues often require an expert touch to avoid creating bigger, more expensive problems.
Making the right decision protects your home’s exterior and your peace of mind. Let’s walk through the key factors to consider so you can feel confident in your choice.
The Best Siding Repairs to DIY
If you’re comfortable with home improvement projects and the damage is minor, a DIY repair can be a practical option. Small issues like a single cracked vinyl panel or filling a few minor holes are often manageable for a handy homeowner. Taking on these smaller tasks can definitely save on labor costs and give you a sense of accomplishment. Before you start, make sure you have the right tools and a clear understanding of the process for your specific siding material. A quick, simple fix is one thing, but you don’t want to get halfway through and realize you’re in over your head.
Know When It’s Time to Call a Pro
For more significant siding damage, it’s almost always better to call a professional. If you’re dealing with widespread cracks, extensive rot, or warping across multiple panels, an expert eye is essential. Repairs on upper floors also introduce safety risks that are best left to a trained crew. Professionals have the specialized equipment, experience with local building codes, and the skill to ensure the repair is seamless and durable. For a job like a full siding replacement, hiring a pro is the most efficient and reliable path forward, preventing future headaches and ensuring your home is properly protected.
Finding a Qualified Contractor
Once you’ve decided to bring in an expert, the next step is finding the right one. A great contractor does more than just replace a panel; they provide a thorough assessment to uncover any hidden issues, like moisture damage lurking behind the siding. When you’re vetting potential companies, look for a team that is licensed, insured, and has a solid portfolio of work with your specific siding material. Don’t hesitate to ask for references and read online reviews to get a feel for their reputation. A qualified professional will make sure the repair is not only seamless but also durable and weatherproof, protecting your home for years to come.
Do You Have the Right Tools and Safety Gear?
One of the biggest challenges with DIY siding repair is having the right equipment. Using the wrong tools can not only make the job harder but can also lead to damaging the surrounding siding, trim, or the underlying structure of your home. Professionals arrive with everything needed, from specialized zip tools for vinyl siding to appropriate scaffolding for high-up repairs. They also know how to handle materials carefully to ensure pieces overlap correctly and create a weatherproof seal. Prioritizing safety and using the correct tools are non-negotiable for a quality repair.
Will a DIY Repair Void Your Warranty?
Before you start any DIY project, check your siding’s warranty. Many manufacturers’ warranties can be voided if repairs or alterations are not performed by a licensed professional. An improper repair that leads to moisture damage or other issues won’t be covered, leaving you responsible for the full cost. It’s also worth checking your homeowner’s insurance policy. In some cases, siding repair might be covered if the damage was caused by a storm or another covered event. A professional contractor can provide the proper documentation needed for an insurance claim, which is another great reason to have an expert on your side.
What to Expect During a Siding Project
Starting a big home improvement project can feel a little overwhelming, but knowing what’s coming makes the whole experience much smoother. A professional siding installation is a well-orchestrated process designed to be as efficient and undisruptive as possible. From the initial tear-off of your old siding to the final cleanup, a good crew will have a clear plan of action. Understanding the key phases of the project helps you prepare your home and your schedule, so you can sit back and watch the transformation happen without any unnecessary stress. Here’s a look at the typical timeline and the steps involved in giving your home a new exterior.
The Typical Project Timeline
For an average-sized home, a complete siding replacement project usually takes about 10 to 14 days from start to finish. This timeframe covers everything, including the delivery of materials, removing the old siding, inspecting for and repairing any underlying damage, and installing the new siding. The actual installation phase, where you see the new material going up, is often the quickest part of the process, typically lasting between four and seven days. Of course, this is just a general estimate. The schedule can shift based on the size of your home and a few other factors, but it gives you a solid idea of how long your property will be an active work zone.
Key Steps in the Siding Process
Every siding project follows a clear and logical progression. It all begins with an initial consultation and a detailed estimate, where you discuss your vision and material options. Once you’ve made your selections—whether it’s durable James Hardie siding or classic cedar—the materials are ordered. Before the crew arrives, you’ll need to prepare your home by clearing the areas around the exterior. Then, the installation begins. The team will remove the old siding, inspect the sheathing underneath, make any necessary repairs, and then expertly install your new siding, trim, and finishing touches. The final step is a thorough cleanup, leaving you with nothing but a beautiful new exterior.
Factors That Can Affect the Schedule
While contractors aim to stick to the projected timeline, a few variables can cause delays. The size and architectural complexity of your home are the biggest factors; a large, multi-story house with intricate details will naturally take longer than a simple one-story home. Weather is another major consideration, especially here in the Pacific Northwest. Heavy rain or wind can bring work to a temporary halt for safety reasons. Finally, unexpected discoveries can impact the schedule. It’s not uncommon to find hidden water damage or rot once the old siding is removed. According to siding professionals, addressing these underlying issues is crucial and will add time to the project, but a good team will communicate clearly with you every step of the way.
Avoid These Common Siding Repair Mistakes
Tackling a siding repair yourself can feel empowering, but a few common missteps can turn a simple fix into a much bigger headache. Knowing what to watch out for is the first step toward a successful repair that looks great and protects your home for years to come. Whether you’re patching a small hole or replacing a full panel, avoiding these mistakes will save you time, money, and frustration.
The goal is to make the repair seamless, so it blends in perfectly with your existing exterior. Unfortunately, many DIY projects end up looking like a patchwork quilt because of simple, preventable errors. From using the wrong materials to overlooking hidden damage, these mistakes can compromise your home’s curb appeal and its defense against the elements. Let’s walk through the most frequent slip-ups so you can get your repair right the first time.
Don’t Mismatch Materials and Colors
One of the most obvious signs of a DIY repair is a patch that just doesn’t match. Finding an exact color and texture match for siding that has been exposed to sun and rain for years can be incredibly difficult. Even if you find the same product from the same manufacturer, the new piece will likely look brighter and cleaner than the weathered siding around it. This can create an eyesore that detracts from your home’s overall look. Taking the time to find the closest possible match, or even consulting a professional for their sourcing expertise, is crucial for a repair that blends in seamlessly.
Ignoring Installation Best Practices
Siding is your home’s first line of defense, and installing it correctly is non-negotiable. A common mistake is nailing panels too tightly, which doesn’t allow for natural expansion and contraction with temperature changes, leading to warping and buckling. Another frequent error is improper lapping, which can create gaps where water can seep in. Each type of siding, from James Hardie to cedar, has specific installation guidelines that must be followed. Ignoring these best practices can compromise the siding’s protective function and lead to much more significant issues down the road.
Always Check for Hidden Water Damage
What looks like a small crack or a warped panel on the surface can sometimes be a sign of a much bigger problem lurking underneath. Water may have been seeping behind the siding for a while, causing rot, mold, or mildew on your home’s structural sheathing. Simply covering up the exterior damage without investigating the cause is a major mistake. Before you install a new piece of siding, it’s essential to peel back the surrounding area and carefully inspect the wall beneath for any signs of moisture. Addressing hidden water damage is critical to preventing costly structural repairs later on.
Never Skip Prep Work and Safety Measures
Jumping into a repair without the right preparation is a recipe for a sloppy or unsafe job. This includes thoroughly cleaning the area you’re about to work on and ensuring you have the correct tools for your specific siding material. Using the wrong saw blade can shatter vinyl, and improper fasteners can lead to loose panels. More importantly, safety should always come first. Many siding repairs require working on a ladder, which carries inherent risks. Make sure your ladder is secure, and never overreach. Taking a few extra minutes for proper prep and safety precautions ensures the project goes smoothly and you stay out of harm’s way.
How to Maintain Your Siding and Prevent Repairs
Think of siding maintenance as preventative care for your home. A little attention throughout the year can save you from facing major, expensive repairs down the road. By staying on top of cleaning and inspections, you protect your home’s structure, maintain its curb appeal, and ensure your siding lasts as long as it should. Creating a simple maintenance plan is one of the smartest investments you can make in your property. It doesn’t have to be complicated or time-consuming, but it does need to be consistent. Here’s how you can keep your siding in top shape.
Your Simple Siding Inspection Checklist
Set aside time twice a year—once in the spring and once in the fall—to walk around your house and take a close look at your siding. Check for any cracks, chips, or gaps, especially around windows and corners where moisture can easily sneak in. Look for panels that seem loose, warped, or discolored. Regular inspections are your first line of defense because they help you catch small issues before they escalate into significant problems. Taking a few photos during each inspection can also help you track changes over time and spot developing issues you might otherwise miss.
Clean Your Siding the Right Way
Dirt, grime, and mildew don’t just look bad; they can cause long-term damage to your siding. A gentle cleaning once a year can work wonders. For most siding types, a soft-bristle brush and a bucket of soapy water are all you need. Be careful with pressure washers, as the high-powered stream can damage certain materials or force water behind the panels. Using a cleaner specifically designed for your siding material helps remove dirt and mildew effectively, extending its life and keeping it looking fresh. A clean exterior not only boosts curb appeal but also prevents the buildup that can lead to rot and decay.
How to Prepare Your Siding for Every Season
Here in the Puget Sound, our homes face a lot of rain, so proper weatherproofing is key. Before the wet season arrives, double-check that your siding is ready. Look for any gaps in the caulking around windows, doors, and trim, and seal them up to prevent water intrusion. Ensure your gutters are clean and directing water away from your foundation and siding. Proper weatherproofing and moisture protection are crucial for preventing water damage, rot, and mold. Taking these steps helps ensure your home’s exterior is a solid, protective barrier against the elements.
Why You Should Fix Small Problems Right Away
If you spot a small crack, a loose panel, or a soft spot during your inspection, don’t put off the repair. Even minor damage can create an opening for water to seep behind your siding, leading to rot, mold, and structural issues that are much more complicated and costly to fix. Vulnerable areas like corners and window frames are especially important to watch. Addressing these problems right away is the best way to stop water from getting in and causing bigger headaches. If you’re not sure how to handle a repair, it’s always best to consult a professional residential siding expert.
Related Articles
- Replacing Wood Siding: A Step-by-Step Guide – Landmark Roofing & Siding
- Average Cost of Vinyl Siding: A Full Breakdown – Landmark Roofing & Siding
Frequently Asked Questions
How long does a typical siding repair take? The timeline for a siding repair really depends on the scope of the job. A simple fix, like replacing a single cracked vinyl panel on the first floor, can often be completed by a professional in just a few hours. However, if the job involves addressing wood rot, replacing multiple sections, or working on a second story, it could easily take a full day or more. The project can also take longer if the contractor discovers hidden water damage underneath that needs to be fixed before the new siding can be installed.
What if I can’t find siding that perfectly matches my old siding? This is a very common challenge, especially with older homes where siding has been weathered by the sun or the original product has been discontinued. A professional contractor can be a huge help here, as they often have access to a wider range of suppliers. If an exact match isn’t possible, a good strategy is to replace a full section in a less visible area of your home, like the back wall, and then use the old, weathered siding from that spot to make the repair in a more prominent location, like the front of the house.
Can I just paint over small cracks or peeling paint on my siding? While it might seem like an easy fix, painting over damage is never a good idea. Paint is only a surface coating and won’t stop moisture from getting into a crack or fix the underlying reason the paint is peeling, which is often trapped water. This approach only hides the problem temporarily and can allow water to cause serious rot and mold within your walls. It’s always best to repair the damaged siding first and then paint for a solution that actually protects your home.
Is it better to repair a small damaged area or replace the entire side of the house? This decision comes down to the overall health of your siding. If the damage is isolated to one or two panels from something like a storm or an impact, and the rest of your siding is in great shape, a targeted repair makes the most sense. However, if you’re seeing widespread issues like brittleness, extensive warping, or multiple failing seams, it’s often more cost-effective in the long run to replace the entire side. This ensures a uniform appearance and addresses any systemic problems.
Will my homeowner’s insurance help pay for siding repairs? It’s possible, but coverage depends entirely on your policy and what caused the damage. Most standard policies will cover damage from sudden and accidental events, such as a hailstorm, high winds, or a fallen tree branch. However, they typically do not cover issues that result from normal wear and tear, lack of maintenance, or old age. The best first step is to document the damage with photos and then call your insurance agent to review your specific policy.