Date
Wed Apr 15Thinking about installing your own cedar shingles? It’s a big project, but the difference between a roof that lasts ten years and one that lasts thirty is all in the details. It’s knowing how to handle corners and vents, the secret to getting lines perfectly straight, and why shingles need room to breathe. A successful cedar shake installation is a craft. We’re here to show you exactly how to install cedar roof shingles the right way. This practical guide provides the clear, step-by-step instructions you need to tackle the job with confidence, turning an intimidating task into a rewarding project.
Key Takeaways
- View cedar as a smart long-term investment: While the upfront cost is higher, cedar shingles pay off with a lifespan of 30 years or more, natural insulation that can lower energy bills, and timeless curb appeal.
- Proper preparation is non-negotiable: Before you begin, always let your shingles acclimate to the local climate, ensure your roof deck is clean and sound, and use the correct corrosion-resistant nails for the job.
- Focus on the details during installation: Critical steps like using a double starter course, leaving a small gap between shingles for expansion, and staggering the joints are what create a strong, weather-tight, and professional-looking roof.
Is a Cedar Shingle Roof Right for Your Home?
Choosing the right material for your roof is a big decision. It affects your home’s curb appeal, protection from the elements, and even your energy bills. Cedar shingles have long been a favorite, especially here in the Pacific Northwest, and for good reason. They offer a unique combination of natural beauty and rugged performance that’s hard to match. If you’re drawn to their classic, rustic look but want to know if they’re the right practical choice for your home, you’re in the right place. Let’s walk through what makes cedar a standout option, from its stunning appearance to its long-term value.
Why Cedar Offers Timeless Curb Appeal
There’s just something about a cedar roof that feels timeless and inviting. Cedar shingles provide a warm, natural texture that other materials simply can’t replicate. Their rich, amber tones gracefully weather over time to a distinguished silvery-gray, creating a look that blends perfectly with the lush landscapes of the Puget Sound. This isn’t just about aesthetics; the unique character of a cedar roof adds significant curb appeal and can increase your home’s overall value. For homeowners looking to make a statement with a classic, elegant finish, cedar is an incredible choice for any residential roofing project. It’s a look that feels both sophisticated and deeply connected to nature.
Cedar Shingles vs. Other Roofing Materials
Beyond its good looks, cedar is a true workhorse. It’s a remarkably stable material, which means it holds up well against the fluctuating humidity we see in the Redmond area, resisting the warping and shrinking that can affect other woods. But one of its most impressive features is its natural insulation. Cedar provides significantly more insulating value than many other common roofing materials. This helps keep your home warmer in the winter and cooler in the summer, which can lead to real savings on your energy bills over the years. When you’re weighing your options, it’s clear that cedar offers a powerful combination of durability and efficiency.
What’s the Real Cost and Lifespan of a Cedar Roof?
Let’s talk about the two biggest questions for any roofing project: cost and longevity. It’s true that cedar shingles come with a higher upfront cost compared to some other materials. However, it’s best to view this as a long-term investment in your home. Cedar is naturally resistant to moisture and decay, making it incredibly durable. With proper installation and maintenance, a cedar roof can easily last 30 years or more. This impressive lifespan means you won’t have to worry about a replacement for decades. When you consider its durability and energy-saving benefits, the initial cost often proves its worth over the life of the roof. You can get a better idea of the investment by using a roofing cost calculator to estimate your project.
Understanding the Scope of a Cedar Shingle Project
A cedar shingle roof is a beautiful addition to any home, but it’s also a major construction project. It’s easy to focus on the finished look, but understanding the full scope of the work involved is key to a successful outcome. This isn’t just about nailing shingles to a roof deck; it’s a complex process that involves careful planning, precise execution, and logistical coordination. From calculating the right amount of materials and estimating a realistic timeline to managing the significant amount of waste generated, every step requires attention to detail. Knowing what goes into a professional installation will help you appreciate the craftsmanship involved and set clear expectations, whether you’re considering a DIY approach or hiring a team of experts. Let’s break down the key components of a cedar shingle project so you know exactly what to expect.
Estimating Materials and Time
To get a sense of the scale, consider this: a typical 5,000-square-foot roof can generate around 90 cubic yards of waste from the old roof tear-off and material scraps. That’s a lot to manage. As for the installation itself, a skilled team of four can typically install about six “squares,” or 600 square feet, of cedar shingles per day. This pace is crucial for planning your project timeline effectively. These numbers help illustrate why a full roof replacement is a multi-day job that requires a coordinated effort for both removal of old materials and installation of the new ones. It’s a methodical process that can’t be rushed if you want a high-quality, lasting result.
Understanding Coverage Rates
The secret to a durable, weather-tight cedar roof lies in the small details of the installation. For instance, it’s essential to leave a small gap of about 3/8 to 5/8 of an inch between each shingle. This allows the wood to naturally expand and contract with changes in humidity without buckling or warping. Additionally, the gaps in one row of shingles must be offset from the gaps in the row below it by at least 1-1/2 inches. This staggered pattern is what prevents water from finding a path through the layers, ensuring your home stays dry and protected for years to come.
Waste Management and Site Logistics
A professional roofing job isn’t just about what happens on the roof; it’s also about how the entire site is managed. Proper material handling is critical from the moment the shingles arrive. Cedar shingles should be stored flat, kept dry, and covered in a well-ventilated area to maintain their quality. If they have to be placed on a concrete surface, a professional crew will lay down a vapor barrier and keep the shingles elevated. This prevents moisture from wicking up and damaging the wood before it even gets on your roof. This level of care is a hallmark of a professional installation and ensures that every shingle is in perfect condition when it’s nailed into place.
Gather Your Tools and Materials
Getting your tools and materials organized before you start is one of the best things you can do for a smooth installation. A well-prepared workspace saves you time and helps you focus on doing the job right. Think of it as setting up your kitchen before you start cooking; everything you need is within reach, so you can get into a good workflow. This preparation is the first step toward a beautiful, long-lasting cedar roof. It ensures you have the right equipment for every step, from laying the first shingle to securing the last nail. Taking the time to gather everything now will prevent frustrating interruptions later.
Your Must-Have Tool Checklist
For a professional-quality installation, you’ll need more than just a hammer and nails. Having the right tools makes the work easier and ensures your shingles are properly secured. Each shingle needs two fasteners, placed about 3/4 of an inch from each side and 1 inch above the butt line of the next course. This specific placement is key to preventing leaks and keeping your shingles flat.
Here’s a basic list to get you started:
- Hammer or roofing nailer
- Measuring tape
- Chalk line
- Utility knife
- Circular saw or handsaw
- Ladder and safety harness
Specialized Roofing Tools
While the basic list covers the essentials, a few specialized tools can really make the difference between a good job and a great one. A pneumatic roofing nailer, for instance, will dramatically speed up the process. The key is to use it correctly, ensuring it doesn’t damage the wood. For each shingle, you’ll need to place two fasteners about 3/4 of an inch from the sides and an inch above where the next course of shingles will start. This precise placement is what creates a weather-tight seal. A chalk line is your best friend for keeping courses perfectly straight, and a circular saw is invaluable for making clean cuts to fit shingles around vents or along roof valleys. Of course, safety is paramount, so a sturdy ladder and a reliable safety harness are non-negotiable when working at heights.
Choosing the Right Shingles and Fasteners
When it comes to materials, quality is everything. Cedar shingles are typically sold in bundles, and you can use our roofing cost calculator to help estimate how many you’ll need for your project. Remember the simple rule: two fasteners per shingle. It’s crucial to use corrosion-resistant fasteners, like stainless steel or hot-dipped galvanized nails, to prevent rust from staining your beautiful cedar. You’ll also need roofing felt or a synthetic underlayment to create a water-resistant barrier between the shingles and your roof deck. For certain installations, treated wood battens can also provide a durable framework that resists rot.
Cedar Shakes vs. Shingles: What’s the Difference?
You’ll often hear the terms “shake” and “shingle” used interchangeably, but they are actually two different products. The main distinction comes down to how they’re made. As the experts at Fine Homebuilding point out, “Cedar shakes are thicker and split on one or both sides… while shingles are thinner and sawn on both sides.” This difference in manufacturing gives them unique looks and applications. Shakes have a rugged, textured appearance from being split, which creates a more rustic feel perfect for a classic Northwest look. Shingles, being sawn, are more uniform and smooth, offering a cleaner, more tailored finish. While both are excellent for roofing, the smoother shingles are also a popular choice for wall siding.
Understanding Cedar Types and Grain Quality
Not all cedar is the same, and the quality of the wood will have a huge impact on your roof’s performance. For the best results, you want to look for premium-grade cedar with a vertical grain. What does that mean? Vertical grain is exactly what it sounds like: the wood grain runs straight up and down the length of the shingle. According to Fine Homebuilding, this makes the wood “very stable” and “less likely to curl.” In a climate like ours in the Puget Sound, where moisture is a constant, using stable, vertical-grain cedar is crucial for preventing warping and ensuring your roof lasts for decades. It’s a small detail that makes a massive difference in longevity.
How to Source Quality Materials
Finding high-quality cedar can sometimes be a challenge for a DIY project. As one guide notes, it can be “hard to find specific types of thick shakes locally,” and you might need to order directly from a mill. This can involve complicated logistics, like figuring out how to unload a large truck delivery. This is where working with an experienced professional really pays off. A seasoned contractor, like our team at Landmark, has long-standing relationships with the best suppliers and mills. We know exactly where to source premium, vertical-grain cedar and can handle all the logistics, so you get the best materials for your roofing project without the headache.
Choosing the Right Fasteners: Nails vs. Staples
The fasteners you use are just as important as the shingles themselves. They’re what hold everything together against wind and weather. The Cedar Shake & Shingle Bureau, the industry authority, states its preference for nails due to their superior holding power. However, staples can be used if they meet specific criteria. If you opt for staples, they must be stainless steel—specifically Type 316—especially for homes “within fifteen (15) miles of salt water.” This is a key consideration for many homes in the Puget Sound area, as it prevents rust and corrosion from the salty air. Using the wrong fastener can lead to ugly rust stains and premature failure, so getting this detail right is critical.
Safety First: Essential Gear for Your Project
Working on a roof is serious business, and your safety should always be the top priority. Skipping essential safety gear can lead to accidents and injuries, so please don’t take any chances. A proper setup not only protects you but also allows you to work more confidently and effectively, which leads to a better final result. If your roof is particularly steep or you feel uneasy about the height, it’s always best to contact a professional. Our team is fully equipped to handle all types of residential roofing projects safely.
Make sure you have:
- A safety harness and rope
- Sturdy, non-slip roofing boots
- Work gloves
- Safety glasses
Managing Wood Dust Hazards
As you begin cutting and fitting your cedar shingles, you’ll notice it creates a significant amount of wood dust. It’s important to understand that this isn’t just a simple cleanup issue; fine wood dust can be a serious hazard. It’s highly flammable and can irritate your lungs, eyes, and skin. To maintain a safe work environment, be mindful of keeping the dust away from any potential ignition sources, like sparks from power tools. When it’s time to clean up, use a shop vacuum with a good filter or damp cloths to capture the dust without sending it airborne. This is precisely why your safety glasses and work gloves are non-negotiable. Properly managing these risks is a critical part of the job, and it’s a standard procedure our professional roofing crews are trained to handle with every installation.
Prepping for a Successful Cedar Shingle Installation
A successful cedar shingle installation is all about the prep work. Before you even think about hammering the first shingle, taking a few key steps will ensure your new roof is beautiful, durable, and ready to handle Pacific Northwest weather. Getting these details right from the start prevents headaches down the road and is the secret to a roof that lasts for decades.
Step 1: Inspect and Acclimate Your Shingles
When your cedar shingles arrive, it’s tempting to get straight to work. However, patience is your best friend here. Cedar is a natural material that needs time to adjust to its new environment. Let the shingles acclimate to your local humidity for a few days before installation to prevent shrinking or swelling later on. This simple step helps avoid unsightly gaps or buckling. While they’re resting, take the opportunity to inspect each bundle. Check for any shingles that might have been damaged during shipping. Setting aside any cracked or broken pieces now will save you time and ensure your finished residential roofing project looks perfect.
Proper Storage and Handling On-Site
How you treat your shingles before they even get on the roof makes a huge difference. Think of it as protecting your investment from day one. Cedar shingles should be stored flat in a dry, covered, and well-ventilated area. If you have to place them on a concrete surface, lay down a plastic sheet first to act as a vapor barrier, and keep the bundles on their original pallet to ensure they stay off the ground. It’s also a good idea to cover any unused shingles at the end of the workday to protect them from overnight dew or unexpected rain. Proper storage ensures the wood remains stable and ready for a flawless installation, which is a key part of any professional residential roofing project.
The Importance of Pre-Installation Inspection
Before you install a single shingle, it’s crucial to give them a thorough once-over. Go through your bundles and inspect each piece for any defects like cracks or significant knots that could compromise its integrity. This step is your final quality control check. According to installation guidelines, once a shingle is installed, any visible defects are considered accepted, meaning you can’t hold the supplier responsible. Taking the time to inspect everything beforehand ensures that only the best quality materials make it onto your roof. This attention to detail is what separates an amateur job from a professional one and guarantees a beautiful, uniform finish for your home.
Preparing and Sealing Cut Shingles
Inevitably, you’ll need to cut some shingles to fit around vents, chimneys, or along the valleys and hips of your roof. Whenever you make a cut, you expose raw wood that is vulnerable to moisture. To protect these edges, you must seal them with an appropriate wood sealant before nailing the shingle in place. This small but critical step prevents water from seeping into the wood, which could lead to rot and decay over time. Be careful to apply the sealant only to the cut edge, as getting it on the face of the shingle can stain the wood and mar its natural beauty. It’s this kind of meticulous work that ensures the long-term durability of a cedar shake roof.
Step 2: Prepare the Roof Deck and Underlayment
Your new cedar shingles need a solid, clean foundation. Start by making sure the roof deck, or sheathing, is in good shape. It should be free of debris, dry, and structurally sound. Once the deck is prepped, you’ll install a high-quality underlayment to act as a secondary water barrier. When it’s time to fasten the shingles, use corrosion-resistant nails that penetrate the sheathing by at least half an inch. This ensures a secure hold against wind and weather. Pay close attention to the humidity, too. If the shingles are drier than the outside air, you’ll want to leave slightly more space between them to allow for natural expansion.
Installing an Ice Barrier Membrane
In areas with cold, wet winters like the Puget Sound, protecting your roof from ice dams is a must. An ice dam forms when snow on your roof melts and then refreezes at the eaves, creating a blockage. This can cause water to back up under your shingles, leading to leaks and serious water damage inside your home. To prevent this, a self-adhering membrane, often called a “peel-and-stick” barrier, is installed along the edges of the roof deck before any shingles go on. This sticky membrane creates a waterproof seal that acts as a critical line of defense, ensuring that even if an ice dam forms, water can’t penetrate your sheathing. It’s a non-negotiable step for a durable residential roofing system.
Using a Ventilation Matrix for Longevity
One of the secrets to a long-lasting cedar roof is ensuring the shingles can breathe. This is where a ventilation matrix comes in. This special layer, which looks like a tangled web of plastic filaments, is installed directly under the cedar shingles. Its job is to create a small, continuous air gap between the shingles and the roof deck. This space allows air to circulate freely, which is essential for helping both the top and bottom of the shingles dry out evenly after rain. Without proper ventilation, moisture can get trapped on the underside of the wood, leading to premature rot and decay. This simple addition is a game-changer for extending the life of your roof.
Applying Interlaced Felt Paper
Unlike other roofing types where a single layer of underlayment is rolled out, a proper cedar shingle installation involves interlacing felt paper between each course of shingles. For this, a thick #30 asphalt felt paper is the professional standard. As each row of shingles is installed, a strip of felt paper is laid over the top portion of the shingles before the next course is applied. This method creates a highly water-resistant barrier while still allowing the roof system to breathe. The felt paper is permeable, which means it lets water vapor escape as the wood dries. This process is vital for preventing moisture from getting trapped and is a hallmark of a high-quality installation built to last.
Step 3: Confirm Building Codes and Ventilation Needs
Before you begin, it’s crucial to understand your local requirements. Building codes can vary significantly between cities, so always check what your municipality requires for roofing installations. If you find that the manufacturer’s instructions conflict with local codes, it’s best to contact the manufacturer directly for guidance. Proper attic ventilation is another non-negotiable for a healthy roof. Good airflow prevents moisture buildup and heat traps, which can shorten the life of your cedar shingles. You can find general guidelines from the International Code Council, but your local building department will always have the final say.
How to Install Cedar Roof Shingles: A Step-by-Step Guide
Installing cedar shingles is a project that demands patience and precision, but the results are truly stunning. Whether you’re a seasoned DIYer or just starting, following the correct steps is essential for a beautiful and long-lasting finish. This guide breaks down the process into manageable stages, from laying the first course to navigating tricky corners. Think of it as your roadmap to a successful installation. While this guide covers the core techniques, remember that every project is unique. For complex rooflines or if you prefer a guaranteed professional outcome, our team is always here to help with your residential siding and roofing needs.
Laying the Double Starter Course
Think of the first row of shingles as the foundation of your entire project. To get it right, you need to begin with a double starter course. This means you’ll install one layer of shingles first, and then a second layer directly on top of it, making sure to offset the joints. This initial double layer is crucial because it provides extra thickness and protection at the most vulnerable part of the wall or roof: the very bottom edge. It helps cover the joints of the first course and ensures that water is properly shed away from the structure underneath. Skipping this step can lead to leaks and instability down the road, so take your time and get it perfect.
Using Thinner Shingles for the First Layer
For the very first layer of your double starter course, you’ll use thinner cedar shingles. These should be installed to hang over the edge of the roof by about 1-1/2 inches. This overhang is a critical detail; it acts as a drip edge, directing water away from the underlying structure and into your gutters. According to experts at Fine Homebuilding, this initial double layer is essential because it provides extra thickness and protection at the bottom edge of the roof, which is the area most exposed to the elements. By laying down two layers of shingles at the very bottom, as also recommended by installation guides, you create a solid base that supports the rest of your roof and ensures a durable, weather-tight finish from the start.
Perfecting Your Shingle Spacing and Alignment
Proper spacing is what gives cedar shingles their classic, textured look. As you lay your shingles, leave a small gap, or “keyway,” of about 1/4 to 3/8 of an inch between each one. This isn’t just for looks; it gives the wood shingles room to expand and contract with changes in humidity, preventing them from buckling over time. To keep your rows perfectly straight, use a level and snap a chalk line for each course. Another great trick is to temporarily nail a long, straight board to the wall to act as a guide for the bottom of each row. Every few courses, step back to check your work and ensure everything looks uniform and level.
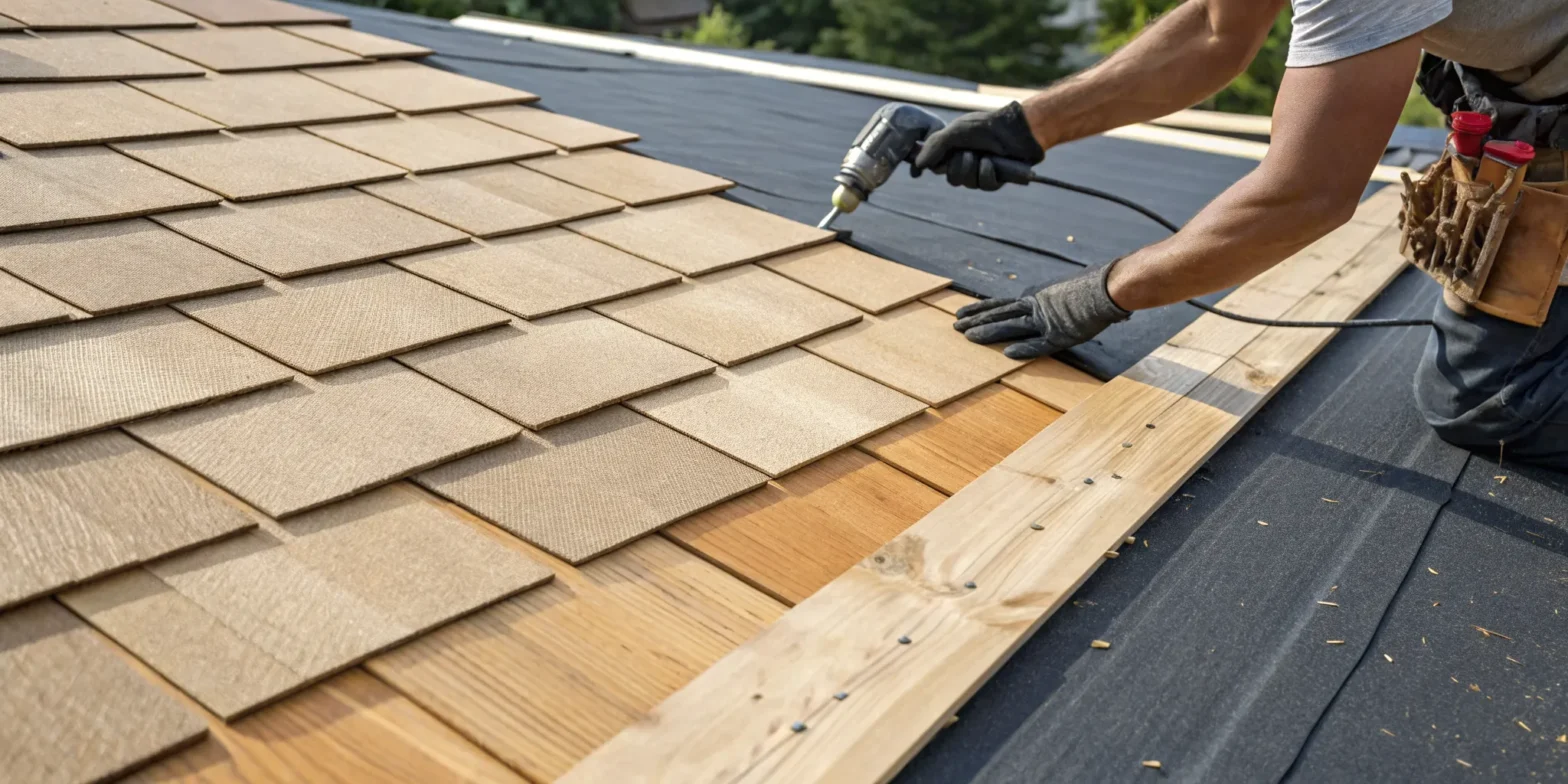
The Right Way to Nail Your Cedar Shingles
How you fasten your shingles is just as important as how you place them. The rule of thumb is simple: two nails per shingle. Use corrosion-resistant nails to stand up to the Puget Sound weather. Position one nail about 3/4 of an inch from one side and the other nail 3/4 of an inch from the other side. Vertically, the nails should be placed about 1 inch above the butt line of the course that will be laid on top. This specific placement is key because it secures the shingle firmly while hiding the nail heads under the next row. It also allows the wood to move naturally without splitting, ensuring your beautiful new residential roofing lasts for decades.
Special Nailing Rules for Wider Shingles
While the two-nail rule is a reliable guideline for most of your shingles, you’ll occasionally find wider pieces that require extra support. For any cedar shingle over 10 inches wide, you’ll need to use four nails instead of two. The placement is straightforward: keep the two outer nails about 3/4 of an inch from each edge, just as you normally would. Then, add two more nails toward the center of the shingle, spaced out evenly. This additional fastening is critical for preventing the wider piece of wood from warping or splitting over time. Properly installing cedar shakes and shingles with these specific rules ensures every piece stays flat and secure, maintaining the integrity of your roof against the elements.
How to Shingle Around Vents, Chimneys, and Valleys
Sooner or later, you’ll run into an obstacle like a vent, window, or chimney. This is where careful cutting and fitting come into play. For outside corners, let the last shingle in the row hang over the edge slightly. Once it’s nailed in place, you can trim it flush for a clean, sharp corner. For areas that require a watertight seal, like around a chimney, you’ll need to install metal flashing first, then carefully cut and fit the shingles around it. These detailed cuts are what separate an amateur job from a professional one. Take your time, measure twice, and cut once to ensure a snug fit that keeps water out and looks seamless.
Proper Step and Valley Flashing Techniques
Flashing is your roof’s best defense against leaks, and getting it right is absolutely critical. This is especially true where shingles meet a wall, chimney, or another roof plane. For walls and chimneys, you’ll use a technique called step flashing. This involves weaving L-shaped pieces of metal in with each course of shingles, creating a layered, staircase-like barrier that directs water away from the joint. For vent pipes, a special flashing boot slides over the pipe, and the shingles are then installed over the boot’s flange to create a watertight seal. The key is that each piece of flashing should overlap the one below it, guiding water safely down and off the roof. As experts at Fine Homebuilding note, this overlapping method is essential for protecting these critical junctions.
Roof valleys, where two roof slopes meet, handle a large volume of water and require special attention. The process starts by laying a waterproof membrane down the center of the valley. On top of that, you’ll install a wide strip of metal flashing, often copper or galvanized steel. The shingles on both sides are then carefully cut at an angle to align with the valley’s centerline, ensuring water flows smoothly down the metal channel and into the gutters. According to the Cedar Shake & Shingle Bureau, precise cuts and proper layering are non-negotiable for a durable, leak-proof valley. This is where attention to detail truly matters, as a poorly flashed valley is one of the most common sources of roof leaks.
Why and How to Stagger Shingle Joints
To create a strong, weather-tight surface, you must stagger the joints between shingles from one row to the next. The joint, or gap, in one course should never line up with the joint in the course directly above or below it. A good rule to follow is to make sure the joints are offset by at least 1 1/2 inches. This staggered pattern, much like a brick wall, distributes weight and stress evenly and eliminates any straight paths for water to seep through. This technique not only adds significant strength and durability to the installation but also creates the timeless, woven appearance that makes cedar shingles so appealing.
Finishing Hips and Ridges
The final touches on your roof are the hips and ridges—the high points where different roof planes meet. Getting these right is essential for a polished look and a watertight seal. This is where attention to detail really shines. You’ll need to carefully pre-cut your shingles to fit snugly and securely along these peaks. This process ensures there are no gaps for water to find its way in and gives your roof a clean, continuous line. Properly installed hip and ridge caps are the hallmark of a professional job, tying the whole project together and providing long-lasting performance for your residential roofing system. It’s a step that takes patience, but the beautiful, finished result is well worth the effort.
Considerations for Complex Roof Designs
When your roof has a bit more personality—think multiple hips, valleys, or dormers—the installation process requires extra planning and precision. Each intersection where different rooflines meet is a potential spot for leaks if not handled correctly. This means every shingle that meets a valley or wraps around a dormer needs to be cut and fitted with exacting care to maintain a watertight seal. For features like chimneys or vents, it’s critical to install metal flashing first. Then, you can cut and fit the shingles tightly around it. These intricate details demand a high level of skill, and taking your time here is what ensures your complex roof is as durable as it is beautiful.
Working with Mansard or Low-Slope Roofs
Mansard or low-slope roofs present their own unique set of challenges, primarily related to water drainage. On these gentler slopes, water doesn’t run off as quickly, so proper installation is vital to prevent pooling and potential leaks. You must ensure your shingles are installed with perfect alignment and spacing to encourage water to shed effectively. Staggering the shingle joints correctly is especially important here to eliminate any direct paths for water intrusion. As with the main roof, using a double starter course provides an extra layer of protection at the lower edges, giving water a clear path away from the structure. These specific techniques are crucial for the longevity of any commercial roofing or residential project with a low-slope design.
Cedar Roof Maintenance and Common Mistakes to Avoid
Installing a cedar roof is a significant investment in your home’s beauty and protection. Once the last shingle is in place, the work isn’t quite over. Ensuring your roof lasts for decades comes down to two things: avoiding common installation errors from the start and committing to simple, long-term care. A few missteps during installation can shorten your roof’s lifespan, while a little proactive care can extend it for years.
Getting these details right is what separates a good roof from a great one. Let’s walk through the most frequent installation mistakes to sidestep and the best practices for keeping your cedar roof in top condition, so you can enjoy its natural charm for as long as possible.
Common Cedar Shake Installation Mistakes to Avoid
Even the most carefully planned project can go wrong if you fall into a few common traps. One of the biggest mistakes is installing cedar shingles the moment they arrive. Cedar is a natural material that needs time to acclimate to your local humidity; installing it too soon can cause the shingles to expand or contract later, leading to damage. Another frequent error is using the wrong materials. Using incorrect nails or skipping the essential starter course can seriously compromise your roof’s integrity from day one. Finally, pay close attention to spacing. Shingles butted too tightly against each other don’t allow for natural movement, which can cause buckling and cracking. These details are why a professional residential roofing installation is often the safest bet.
How to Maintain Your Cedar Roof for Years to Come
A beautiful cedar roof deserves a little attention to keep it looking and performing its best. Your main task is to keep it clean and allow it to breathe. Regularly clear away any leaves, branches, or other debris that can trap moisture and encourage moss or algae growth. It’s also a good idea to visually inspect your roof a couple of times a year, especially after major storms. Look for any signs of trouble, like curling or cracked shingles. Curling can be a red flag for moisture issues or simply a sign of aging, but addressing it early can prevent leaks and more significant damage. A well-maintained cedar roof is a long-lasting one, and these simple steps will help you protect your investment.
Related Articles
- The Pros and Cons of Cedar Shake Roof Shingles
- A Step-by-Step Cedar Shake Roof Installation Guide
- Cedar Shake Roof: 9 Things You Need to Know
Frequently Asked Questions
How long does a cedar roof really last in the wet Pacific Northwest climate? With our damp weather, this is a great question. A professionally installed cedar roof can easily last 30 years or more here in the Puget Sound. The key is proper installation that allows the wood to breathe and dry out, combined with simple maintenance like keeping it clear of leaves and debris that trap moisture.
Is it normal for my cedar shingles to turn gray? Yes, that silvery-gray color is completely normal and part of cedar’s natural charm. This weathering process is a reaction to sun and rain and is a sign that the wood is aging gracefully. It doesn’t mean the shingles are rotting or failing; it’s simply the beautiful patina that makes cedar roofs so distinctive.
Can I install new cedar shingles directly over my old asphalt roof? It’s best to avoid installing new shingles over an old roof. For a cedar roof to last, it needs a solid, clean, and flat surface. Layering can trap moisture, hide underlying damage to the roof deck, and prevent the cedar from lying correctly, which can lead to leaks and a much shorter lifespan for your new roof.
What is the most common mistake people make when installing their own cedar roof? The most frequent error we see is improper spacing and fastening. People either place the shingles too tightly together, not allowing room for the wood to expand, or they place the nails incorrectly. Both mistakes can cause the shingles to buckle, split, or lift over time, which seriously compromises the roof’s ability to protect your home.
How often do I need to clean my cedar roof? You don’t need to be up there scrubbing it constantly. A good practice is to visually inspect it twice a year, in the spring and fall, and gently sweep off any accumulated leaves or pine needles. This prevents moisture from getting trapped. If you notice any moss or algae growth, a professional cleaning every five to seven years is usually enough to keep it in great shape.
The Dangers of Power Washing
While it might seem like the quickest way to blast away dirt and moss, power washing is one of the worst things you can do to your cedar roof. The intense pressure strips the natural protective oils from the wood, leaving it vulnerable and accelerating the aging process. It can also force water underneath the shingles, trapping moisture and leading to rot from the inside out. Worse, the powerful stream can easily crack, split, or dislodge the shingles themselves, creating immediate entry points for leaks. Instead of reaching for a power washer, stick to gentle methods. A soft-bristle broom is usually all you need to clear away loose debris. If you’re dealing with stubborn moss or algae, it’s far safer to have a professional roofer use cedar-safe cleaning solutions to restore your roof without causing damage.